How To Make Coffee In Stove Top Percolator The Easy Way
Making coffee in a stove top percolator is simple, rewarding, and delivers rich, bold flavor that drip machines can’t match. This guide walks you through every step, from choosing the right grounds to brewing the perfect cup. You’ll learn pro tips, common mistakes, and how to get stove top percolator coffee just right every time.
There is something deeply satisfying about brewing coffee on the stove. The smell fills the kitchen, the sound of bubbling tells you everything is working, and the result is a cup of coffee that feels like it belongs in a classic diner. If you have ever wanted to make coffee in stove top percolator style but felt unsure where to start, you are in the right place.
This guide breaks down the entire process into easy, followable steps. Whether you are a complete beginner or someone who wants to improve your current routine, you will find practical advice here. We will cover everything from choosing your coffee grounds to timing the brew just right. By the end, you will feel confident making percolator coffee every single morning.
Key Takeaways
- Stove top percolators brew rich, bold coffee by cycling boiling water through grounds repeatedly.
- Use coarse-ground coffee for the best flavor and to avoid bitterness.
- Monitor the brewing time closely — over-brewing leads to harsh, bitter coffee.
- Clean your percolator regularly to maintain taste and extend its life.
- Start with cold filtered water for the cleanest, best-tasting brew.
- Pair your morning percolator coffee with breakfast like toast or rolls for a complete start.
📑 Table of Contents
- What Is A Stove Top Percolator?
- Why Choose A Percolator For Your Coffee?
- What You Need To Get Started
- Step By Step Guide To Making Percolator Coffee
- Tips For Perfect Percolator Coffee
- Common Mistakes To Avoid
- How Percolator Coffee Compares To Other Brewing Methods
- Final Thoughts On Making Percolator Coffee
What Is A Stove Top Percolator?
A stove top percolator is a type of coffee maker that sits directly on your stovetop. It uses heat and gravity to cycle boiling water through coffee grounds over and over again. This constant cycling creates a strong, full-bodied cup of coffee that many people love.
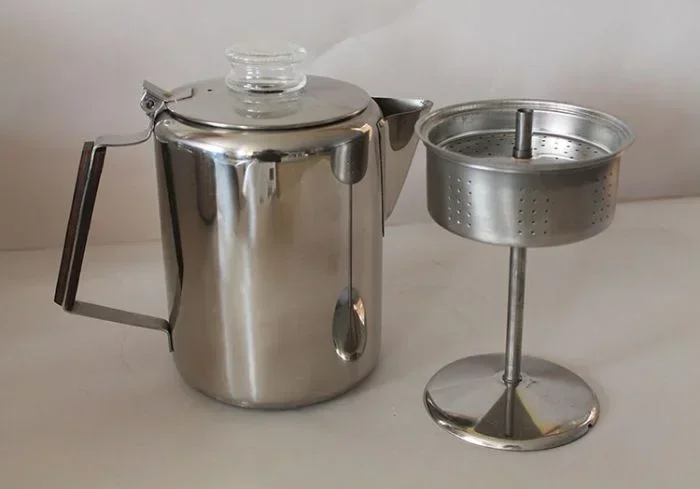
The design is simple. There is a bottom chamber for water, a vertical tube in the center, and a basket at the top where the coffee grounds go. As the water heats up, it travels up the tube, sprays over the grounds, and drips back down into the bottom chamber. This cycle repeats until you remove the percolator from the heat.
Stove top percolators have been around for a very long time. They were the standard way to brew coffee in most American homes before electric drip machines took over. Today, many coffee lovers are returning to percolators because they appreciate the control and the rich flavor they produce.
How Does Percolation Work?
The word “percolate” means to filter through a porous material. In a coffee percolator, hot water pushes through the coffee grounds and extracts oils, flavors, and caffeine along the way. Because the water passes through the grounds multiple times, the coffee becomes stronger and more concentrated than what a single-pass method like drip brewing produces.
This is why percolator coffee tastes so bold. You are not just brewing once — you are building flavor with every cycle. The key is knowing when to stop the process so the coffee stays rich without becoming bitter.
Why Choose A Percolator For Your Coffee?
You might wonder why anyone would choose a percolator over a modern coffee machine. The answer comes down to flavor, control, and simplicity. Here are some great reasons to give stove top percolator coffee a try.
- Rich, bold flavor: The repeated cycling extracts more oils from the grounds, giving you a deeper taste profile.
- No electricity needed: A percolator works on any stovetop, including gas, electric, and even campfire setups.
- Full control over strength: You decide how long to percolate, so you can make coffee as strong or mild as you like.
- Durable and long-lasting: A good percolator can last for decades with proper care.
- Budget-friendly: Most percolators cost less than many electric coffee makers.
- Nostalgic charm: There is a timeless quality to percolator coffee that many people find comforting.
If you enjoy the ritual of making coffee by hand and want a cup that packs a punch, a stovetop coffee maker like a percolator is a fantastic choice.
What You Need To Get Started
Before you start brewing, make sure you have everything ready. The good news is that you do not need much. Here is your simple checklist.
Your Percolator
You will need a stove top percolator. They come in different sizes, usually ranging from 2 cups to 12 cups. For a small household, a 4-cup or 6-cup percolator works great. Make sure yours is clean and in good condition before you begin.
Fresh Coffee Grounds
The quality of your coffee grounds matters a lot. Use fresh, whole bean coffee whenever possible and grind it yourself just before brewing. For percolators, a coarse grind works best. Think of the texture like sea salt — not fine like table salt and not chunky like French press grounds.
A good rule of thumb is to use about 1 tablespoon of coffee per cup of water. You can adjust this based on how strong you like your coffee.
Cold Filtered Water
Always start with cold water. Filtered water gives you the cleanest taste because it removes chlorine and other impurities that can affect flavor. Fill the bottom chamber of your percolator up to the safety line — never overfill it.
Your Stovetop
Place your percolator on a burner set to medium heat. You want a gentle, steady heat rather than high intensity. This gives the water time to extract flavor properly without boiling too aggressively.
Step By Step Guide To Making Percolator Coffee
Now for the fun part. Here is exactly how to make coffee in stove top percolator style, step by step. Follow these instructions and you will have a great cup every time.
Step 1: Fill The Bottom Chamber With Water
Open your percolator and remove the basket and tube assembly. Fill the bottom chamber with cold filtered water. Stop filling at the line that matches the number of cups you want to brew. Do not fill above the safety valve.
Step 2: Add The Coffee Grounds
Place the coffee grounds into the basket. Use a coarse grind and about 1 tablespoon per cup. Spread the grounds evenly so the water can flow through them uniformly. Do not pack the grounds down tightly.
Step 3: Assemble The Percolator
Put the tube assembly back into the bottom chamber. Place the basket on top, making sure it sits securely. Close the percolator lid tightly. This ensures no steam escapes and all the water cycles through the grounds.
Step 4: Place On The Stovetop
Set the percolator on a burner at medium heat. Let the water heat up gradually. You will start to hear a bubbling sound. This is the percolation process beginning.
Step 5: Monitor The Bubbling
Watch the percolator closely. The water will bubble up through the clear glass or plastic dome on the lid. The bubbling should be gentle and steady. If it is too fast, your heat is too high. Reduce the flame slightly.
Let the percolator brew for about 5 to 10 minutes. This is the sweet spot for most people. Some prefer a shorter brew for milder coffee, and some like it longer for extra strength. Experiment until you find your perfect timing.
Step 6: Remove From Heat And Serve
Once the brewing time is up, take the percolator off the heat. The bubbling will slow down and stop. Carefully pour the coffee into your favorite mug. Let it sit for a minute or two before drinking, as it will be very hot.
For the best results, serve percolator coffee right away. Unlike drip coffee, percolator coffee does not stay as fresh sitting on a warmer. Fresh is always better.
Quick Morning Routine Tip
Making percolator coffee fits beautifully into a morning routine. While your coffee brews on the stove, you can make toast in the oven without a toaster to go alongside your cup. You can also cook bacon and sausage in the oven for a hearty breakfast that pairs perfectly with strong, bold percolator coffee. The whole routine takes less than 15 minutes and starts your day the right way.
Tips For Perfect Percolator Coffee
Getting the best flavor from your percolator takes a little practice, but these tips will help you nail it from the start.
Use The Right Grind Size
This cannot be stressed enough. A coarse grind is essential for percolators. Fine grounds can pass through the basket and into your coffee, making it gritty and muddy. They can also clog the tube and disrupt the cycling process. Invest in a good burr grinder and set it to coarse.
Do Not Over-Brew
Over-brewing is the number one mistake people make with percolators. Because the water cycles through the grounds multiple times, leaving the percolator on the heat too long will extract too many bitter compounds. This leads to harsh, unpleasant coffee that nobody wants to drink.
Set a timer if you need to. Five to ten minutes is the general sweet spot. Once the time is up, remove the percolator from the heat immediately.
Preheat The Water
Some experienced coffee makers like to start with hot water in the bottom chamber instead of cold. This reduces the time the coffee grounds spend on the heat, which can help prevent over-extraction. If you want to try this method, just be careful when handling hot water.
Clean Your Percolator After Every Use
Old coffee oils build up inside a percolator over time and can make your next batch taste stale or rancid. After each use, disassemble the percolator and wash all parts with warm soapy water. Rinse thoroughly and dry completely before storing.
For a deeper clean, run a cycle with water and a tablespoon of white vinegar once a week. This removes any built-up residue and keeps your percolator tasting fresh.
Store Your Percolator Properly
When not in use, store your percolator in a dry place with the lid slightly open. This prevents moisture from getting trapped and causing odors or even mold. A well-stored percolator can last for many years.
Try Different Coffee Beans
Do not be afraid to experiment with different beans and roasts. Medium roasts tend to work very well in percolators because they balance flavor and strength. Dark roasts give you a bolder, more intense cup. Light roasts can also work but may taste thinner since percolators extract more flavor.
If you enjoy exploring coffee flavors, consider pairing your morning brew with warm dinner rolls. You can heat dinner rolls in the oven while your percolator does its work. The combination of warm, buttery rolls and fresh percolator coffee is hard to beat.
Common Mistakes To Avoid
Even experienced percolator users make mistakes sometimes. Here are the most common ones and how to avoid them.
Using Too Fine A Grind
Fine grounds will slip through the basket and create a muddy, unpleasant texture. Always use a coarse grind. Think sea salt, not powdered sugar.
Using Too Much Coffee
More coffee does not always mean better coffee. Using too many grounds can clog the basket and lead to uneven extraction. Stick to the recommended ratio of about 1 tablespoon per cup and adjust from there.
Leaving It On The Heat Too Long
This is the biggest error. Over-percolation makes coffee bitter and harsh. Once you hit the 5 to 10 minute mark, take it off the heat.
Using Hot Water From The Tap
Hot tap water can contain minerals and impurities that affect taste. Always use cold filtered water for the cleanest flavor.
Skipping The Cleaning
A dirty percolator ruins the taste of every batch you brew after it. Make cleaning part of your routine every single time.
Not Watching The Bubbling
The bubbling is your indicator that everything is working correctly. If the bubbles are too fast, lower the heat. If there are no bubbles, check that the water level is above the tube opening.
How Percolator Coffee Compares To Other Brewing Methods
Curious how percolator coffee stacks up against other popular brewing methods? Here is a quick comparison.
| Method | Strength | Flavor Profile | Ease Of Use | Brew Time |
|---|---|---|---|---|
| Stove Top Percolator | Strong | Bold, rich, full-bodied | Moderate | 5-10 minutes |
| Drip Coffee Maker | Medium | Clean, smooth, balanced | Easy | 5-8 minutes |
| French Press | Medium-Heavy | Rich, textured, earthy | Easy | 4-5 minutes |
| Espresso Machine | Very Strong | Intense, concentrated, creamy | Moderate | 2-3 minutes |
| Pour Over | Medium | Clean, bright, nuanced | Moderate | 3-5 minutes |
As you can see, percolator coffee sits in a unique spot on the spectrum. It is stronger than drip or pour over but less concentrated than espresso. The flavor is bold and rustic, which is exactly what many coffee lovers crave.
If you want to explore more coffee brewing techniques, understanding how different methods work helps you appreciate your percolator even more. The beauty of a stove top percolator is that it gives you control without complexity.
Final Thoughts On Making Percolator Coffee
Learning how to make coffee in stove top percolator is one of those simple life skills that brings real joy. Once you get the hang of it, you will not want to go back to your old routine. The aroma, the flavor, and the ritual of watching the water bubble through the dome all make the experience special.
Start with the basics: coarse grounds, cold filtered water, medium heat, and 5 to 10 minutes of brewing time. From there, adjust to your taste. Try different beans, experiment with timing, and find your perfect cup.
A good percolator can serve you well for years. Take care of it, clean it regularly, and it will reward you with excellent coffee every single time. Whether you are brewing for yourself or for the whole family, stove top percolator coffee never disappoints.
So go ahead. Plug in your percolator, fill it with water, add your favorite grounds, and let the magic happen. Your perfect cup of coffee is just a few minutes away.
Frequently Asked Questions
How Long Should I Percolate Coffee On The Stove?
The ideal percolation time is between 5 and 10 minutes. This gives the water enough time to cycle through the grounds and extract rich flavor without becoming bitter. Start checking your coffee at the 5-minute mark and stop when it reaches the strength you prefer.
Can I Use Regular Ground Coffee In A Percolator?
You can, but a coarse grind works much better. Regular finely ground coffee can slip through the basket and make your coffee gritty. It can also clog the percolator tube. For the best results, use a coarse grind similar to sea salt texture.
Why Does My Percolator Coffee Taste Bitter?
Bitter coffee usually means you over-brewed. Leaving the percolator on the heat too long causes the water to extract too many bitter compounds from the grounds. Try reducing your brew time to 5 to 8 minutes and make sure your heat is set to medium, not high.
How Do I Clean My Stove Top Percolator?
Disassemble all parts after each use and wash them with warm soapy water. Rinse thoroughly and dry completely. For a deeper clean, run a cycle with water and a tablespoon of white vinegar once a week. This removes built-up coffee oils and keeps your percolator tasting fresh.
Can I Use A Percolator On An Electric Stove?
Yes, stove top percolators work on electric, gas, and even induction stovetops. Just make sure your percolator is compatible with your stove type. Use medium heat and monitor the bubbling to get the best results.
What Is The Best Coffee Bean For A Percolator?
Medium roast coffee beans tend to work best in percolators. They offer a balanced flavor that comes through clearly with the percolation process. Dark roasts give you a bolder cup, while light roasts can taste thinner. Experiment with different beans to find your favorite.
=== CONCLUSION ===
Making coffee in a stove top percolator is a simple, enjoyable process that delivers bold, rich flavor every time. With the right grind, the right water, and the right timing, you can brew a cup of coffee that rivals any café. Follow the steps in this guide, avoid the common mistakes, and you will master percolator coffee in no time. Start your next morning with a fresh pot and taste the difference for yourself.