How To Disassemble Ninja Coffee Maker Complete Guide
Knowing how to disassemble your Ninja Coffee Maker is essential for keeping your machine running smoothly and your coffee tasting great. This complete guide walks you through every step, from unplugging and removing parts to cleaning, descaling, and reassembling with confidence. With the right tools and a little patience, anyone can master ninja coffee maker maintenance at home.
Your Ninja Coffee Maker is one of those kitchen appliances you rely on every single day. It brews your morning cup, keeps you going through the afternoon slump, and sometimes even makes hot water for tea. But here is the thing most people overlook. Over time, coffee oils, mineral deposits, and grime build up inside the machine. These hidden deposits affect the taste of your coffee and the efficiency of the brewing process. That is exactly why learning how to disassemble your Ninja Coffee Maker is so important.
Taking your coffee maker apart might feel intimidating at first. The machine has several components that fit together in specific ways. But once you understand the structure, the process becomes simple and even enjoyable. Think of it like solving a puzzle. Each piece has a designated spot, and once you see how it all fits, you will feel a real sense of accomplishment. More importantly, you will know your machine is clean and working at its best.
This guide covers everything you need to know about ninja coffee maker breakdown and reassembly. We will go through every step in detail. You will learn which tools to use, how to remove each part safely, the best cleaning methods for every component, and how to put everything back together correctly. Whether you are a complete beginner or someone who has been avoiding this task, you will find practical advice here. By the end, you will be able to handle your Ninja Coffee Maker with total confidence.
Key Takeaways
- Regular disassembly keeps your Ninja Coffee Maker running at its best. Taking parts apart allows you to reach hidden areas where buildup and bacteria collect.
- Use gentle cleaning methods only. Avoid harsh chemicals and abrasive tools that can damage plastic and metal components.
- Always unplug the machine before starting. Safety comes first every single time you work on any kitchen appliance.
- Dry all parts thoroughly before reassembly. Moisture left inside can cause mold, mildew, and electrical problems over time.
- Descale your machine regularly. Mineral buildup from hard water is one of the most common causes of poor performance in coffee makers.
- Keep small screws and clips organized. Use a bowl or magnetic tray to prevent losing tiny parts during the disassembly process.
- Run a test cycle after reassembly. This confirms everything is working properly and flushes out any remaining debris.
📑 Table of Contents
- Why You Should Disassemble Your Ninja Coffee Maker Regularly
- Tools You Will Need To Disassemble Your Ninja Coffee Maker
- Step-by-Step Guide To Disassembling Your Ninja Coffee Maker
- How To Clean Each Ninja Coffee Maker Part Properly
- Common Mistakes To Avoid When Disassembling Your Ninja Coffee Maker
- Reassembling Your Ninja Coffee Maker The Right Way
- Building a Coffee Maker Maintenance Routine
- Conclusion
Why You Should Disassemble Your Ninja Coffee Maker Regularly
Regular disassembly is the secret to a long-lasting coffee maker. When you take the machine apart, you expose areas that normal wiping simply cannot reach. Coffee oils build up inside the filter basket and spray head. Mineral deposits from hard water accumulate in the water reservoir and heating element. Bacteria can grow in damp, hidden spots. All of these problems affect the flavor of your coffee and the performance of your machine.
Think about it this way. You would not wash a dish by only rinsing the outside. The inside matters too. The same logic applies to your Ninja Coffee Maker. When you learn how to disassemble your Ninja Coffee Maker properly, you unlock the full cleaning potential of every part. This means better-tasting coffee, fewer strange noises, and a machine that lasts for years instead of months.
Another reason to take things apart regularly is early problem detection. While you are handling each component, you can spot cracks, wear, or damage before it becomes a serious issue. Catching a small problem early can save you from expensive ninja coffee maker repair bills later. It is much easier to replace a $5 filter basket than to fix a damaged heating element.
How Often Should You Fully Disassemble Your Machine
For daily coffee drinkers, a full disassembly and deep clean every two to four weeks is ideal. If you use your machine multiple times a day, lean toward the shorter interval. If you only brew coffee occasionally, a monthly deep clean should suffice. Between full disassemblies, you should still rinse the filter basket and carafe after every few uses. Wipe down the water reservoir weekly to prevent surface buildup.
People who live in areas with hard water need to be extra diligent. Mineral deposits build up faster and can clog internal pathways. A monthly descaling routine is essential for these users. Descaling is the process of removing mineral scale from the heating element and water channels. It is one of the most impactful things you can do for your machine. For more information on cleaning techniques used across kitchen appliances, you can explore our guide on how to deep clean a Ninja Air Fryer Oven. The same gentle cleaning principles apply across all your Ninja kitchen machines.
Tools You Will Need To Disassemble Your Ninja Coffee Maker
Before you start pulling your coffee maker apart, gather everything you need. Having all your tools ready prevents frustration and keeps the process moving smoothly. The good news is that you do not need any special or expensive equipment. Most of what you need is already in your kitchen.
Here is a complete list of tools and supplies for your ninja coffee maker cleaning session:
- Soft microfiber cloths for wiping down surfaces without scratching
- A small bowl or basin for soaking removable parts
- White vinegar or a commercial descaling solution for removing mineral deposits
- A soft-bristled brush, such as a clean toothbrush for scrubbing hard-to-reach areas
- A dry, lint-free towel for drying parts thoroughly
- A flat-head or Phillips-head screwdriver for any screws on the base plate
- A magnetic tray or small dish for organizing tiny screws and clips
- Warm water for rinsing and soaking
Avoid using bleach, abrasive scouring pads, or harsh chemical cleaners on any part of your Ninja Coffee Maker. These products can scratch plastic, corrode metal, and leave behind residues that affect the taste of your coffee. Stick to mild dish soap, white vinegar, and baking soda. These household staples are safe, effective, and affordable. They handle 99 percent of coffee maker cleaning tasks perfectly.
Why Using the Right Tools Matters
Using the wrong tools can cause more harm than good. A steel wool pad might remove a stain, but it will also scratch the surface and create tiny grooves where bacteria can grow later. A rough towel can leave fibers stuck to damp parts. Taking a few extra minutes to grab the right tools makes the entire process safer and more effective. Your ninja coffee maker parts will thank you for the gentle treatment.
Step-by-Step Guide To Disassembling Your Ninja Coffee Maker
Now let us walk through the actual disassembly process. Follow each step carefully and in order. This sequence is designed to prevent damage and ensure you do not miss any components. Take your time, especially if it is your first time doing this.
Step One: Unplug the Machine and Let It Cool
Safety is the absolute first priority. Unplug your Ninja Coffee Maker from the wall outlet. Do not just turn it off. Unplugging ensures there is no electrical current running through the machine. Wait at least 15 to 20 minutes for all parts to cool down completely. Even if you only brewed a quick cup, internal components can retain heat for a while.
Never attempt to disassemble a warm or hot coffee maker. Hot water and hot surfaces can cause burns. And sudden temperature changes can crack plastic components. Patience at this stage prevents injuries and damage. Once the machine is cool and unplugged, you are ready to begin.
Step Two: Remove the Water Reservoir
The water reservoir is the tall, removable tank on the side or back of your Ninja Coffee Maker. Lift it straight up and off the machine. Most Ninja models use a simple snap-fit design, so it should lift off with minimal effort. If it feels stuck, check for any locking tabs or clips around the base of the reservoir.
Set the reservoir on a clean towel. Inspect the inside for any visible buildup. You may notice a white or brownish film coating the interior walls. This is mineral scale from hard water. It is extremely common and completely normal. The reservoir is one of the easiest parts to clean, so do not skip it. Remove the lid if it detaches separately and set it aside with the other parts.
Step Three: Take Out the Filter Basket and Carafe
Open the top lid of the coffee maker. You will see the filter basket sitting in the center brew area. Gently pull the basket straight up and out. It should slide out smoothly. If it resists, check that there are no coffee grounds or debris blocking the tracks. Never force a stuck part. Instead, look for what might be causing the obstruction and remove it gently.
Next, lift the carafe straight off the warming plate. The carafe is the glass pot that holds your brewed coffee. Hold it by the handle and lift carefully. If the carafe is still warm from sitting on the plate, use a towel or oven mitt. Set both the filter basket and carafe on your towel for cleaning later.
These two components are the most removable coffee maker parts on your Ninja machine. They are designed to be removed and cleaned frequently. Make rinsing them part of your routine after every few brewing cycles. This simple habit prevents oil buildup from becoming a deep, rancid mess that is harder to clean later.
Step Four: Detach the Lid and Internal Spray Components
Open the lid of the coffee maker fully. Look closely at how the lid is attached. Most Ninja models use a hinge mechanism on one side. There may be small clips or tabs that hold the lid in place when it is closed. Gently squeeze any tabs and lift the lid away from the hinges.
Under the lid, you will likely find a small spray head or shower filter. This component distributes water evenly over the coffee grounds during brewing. It is usually held in place by a simple press-fit connection. Push it gently downward and it should release easily. If it seems stuck, check for any locking tabs around the rim.
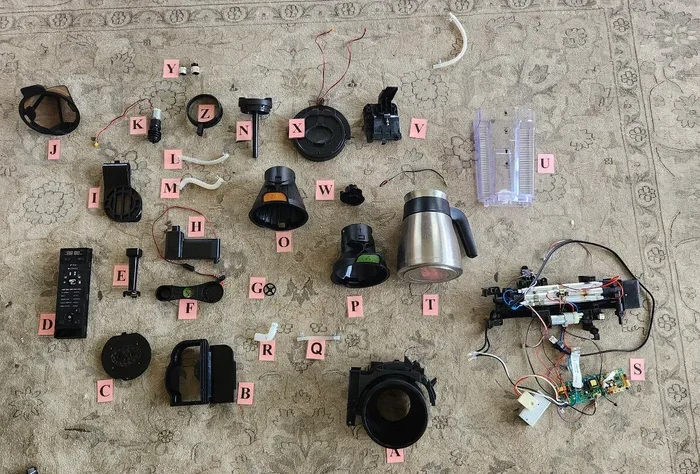
Take a moment to examine each piece as you remove it. Notice how everything fits together. This mental note makes ninja coffee maker assembly much easier later. Lay all the parts out on a clean towel in the order you removed them. This keeps everything organized and ensures nothing gets lost in the shuffle.
Step Five: Access the Base and Heating Element
For a thorough cleaning, you can go deeper and access the base area. Carefully turn the machine upside down on a protected surface. Look for screws on the bottom plate. Most Ninja Coffee Makers use two to four Phillips-head screws to secure the base.
Use your screwdriver to remove each screw. Place them in your magnetic tray or small bowl immediately. This prevents them from rolling away or getting lost. Once all screws are removed, gently lift the bottom plate. You should see the heating element, wiring, and internal water pathways.
Be extremely careful around the electrical components. Do not pull on any wires or connectors. Use a damp cloth to wipe away any visible buildup around the heating element. If you notice any damaged wires or loose connections, do not attempt to fix them yourself. Contact a professional for ninja coffee maker repair instead. Safety always comes first.
How To Clean Each Ninja Coffee Maker Part Properly
With all the parts separated, you can now give each one the attention it deserves. Proper cleaning removes coffee oils, mineral deposits, and bacteria that affect taste and performance. Follow these detailed cleaning instructions for every component.
Cleaning the Water Reservoir
Fill your sink with warm water and add a few drops of mild dish soap. Submerge the water reservoir completely. Let it soak for 10 to 15 minutes. This softens any mineral deposits and loosens coffee oils. After soaking, use a soft sponge to wipe down the inside walls. Pay extra attention to the bottom and corners where buildup tends to accumulate.
For stubborn mineral deposits, fill the reservoir with a mixture of equal parts white vinegar and warm water. Let it sit for 30 minutes. The acidity of the vinegar dissolves mineral scale effectively. After 30 minutes, use your soft brush to scrub the interior gently. Rinse the reservoir thoroughly with clean water several times. Make sure no soap or vinegar residue remains, as this can affect the taste of your next brew. Dry the reservoir completely with a clean towel before setting it aside.
Cleaning the Filter Basket and Carafe
The filter basket traps coffee grounds and oils. Over time, these residues go rancid and produce off-flavors. Wash the filter basket with warm soapy water. Use your soft-bristled brush to scrub away any stuck-on residue. Pay special attention to the small holes in the basket where oils can accumulate. Rinse thoroughly and set it on the towel to air dry.
The carafe deserves the same care. Wash it by hand with warm soapy water. Never use abrasive scouring pads on glass carafes, as they create micro-scratches that trap stains. For tough coffee stains inside the carafe, try this trick. Add a handful of uncooked rice and some warm soapy water. Swirl the mixture around vigorously. The rice acts as a gentle, natural abrasive that lifts stains without scratching. Rinse clean and dry thoroughly with a lint-free towel.
Descaling the Internal Pathways
Descaling is one of the most important steps in your ninja coffee maker breakdown routine. Mineral scale from hard water builds up inside the heating element and water channels. This buildup reduces heating efficiency and can eventually clog the machine entirely. Descaling should be part of your regular coffee maker maintenance schedule.
To descale, fill the water reservoir with a descaling solution or a mix of one part white vinegar to one part water. Place the carafe in position and run a full brew cycle without any coffee grounds. This pushes the solution through all the internal pathways. After the cycle finishes, discard the liquid. Then run two to three more cycles with fresh, clean water. This rinses out any remaining vinegar taste or descaling solution. Your machine will be fresh, clean, and ready to brew great-tasting coffee.
If you want to learn more about deep cleaning techniques for your Ninja appliances, check out our article on how to clean an oven with a dishwasher tablet without scrubbing. The gentle, effective approach described in that guide works wonderfully for many kitchen appliances, including coffee makers.
Common Mistakes To Avoid When Disassembling Your Ninja Coffee Maker
Even experienced home cooks make mistakes when taking apart their coffee makers. Knowing what to avoid saves you time, frustration, and potential damage. Here are the most common errors and how to prevent them.
Skipping the Unplugging Step
This is the single most dangerous mistake you can make. Never disassemble a coffee maker while it is still plugged in. Water and electricity are a deadly combination. Always unplug the machine first and let it cool completely. This simple step protects you from electric shock and prevents damage to the heating elements. Make unplugging the very first thing you do every single time.
Forcing Parts That Do Not Want to Come Out
Some parts fit snugly by design. If a component feels stuck, do not use excessive force. Double-check that you have removed all screws, clips, or locking tabs first. Forcing a part can crack the plastic housing or break internal connections. If something truly will not budge, consult your user manual or look up a video tutorial for your specific Ninja model. Patience always wins.
Using Harsh Cleaners on Delicate Components
Bleach, abrasive powders, and strong chemical cleaners can permanently damage your Ninja Coffee Maker. They scratch plastic, corrode metal, and leave behind toxic residues. Stick to mild dish soap, white vinegar, and baking soda. These household staples clean effectively without the risk. If you are dealing with tough residue that soap and vinegar cannot handle, try soaking the part longer or using a paste of baking soda and water. For more on gentle cleaning methods, you might find our article on how to clean melted plastic out of an oven helpful. The same gentle approach applies to coffee maker parts.
Not Drying Parts Before Reassembly
This small mistake can cause big problems. Putting parts back together while they are still wet creates the perfect environment for mold and mildew. Trapped moisture can also cause electrical issues over time. Always dry every piece thoroughly with a clean, lint-free towel before reassembling your coffee maker. Let parts air dry for a few extra minutes if needed. It is better to wait a few extra minutes than to deal with mold or electrical problems later.
Losing Small Screws and Clips
Those tiny screws and clips are essential to your machine. Losing them means your machine may not reassemble correctly or securely. Use a small bowl or magnetic tray to keep track of every single screw. Place each one in the bowl as soon as you remove it. This keeps everything organized and ensures nothing gets lost in the shuffle. A magnetic tray is especially useful because screws stick in place and are easy to see.
Reassembling Your Ninja Coffee Maker The Right Way
Once every part is clean and completely dry, it is time to put your machine back together. Reassembly is simply the reverse of disassembly. But there are a few tips that make the process go even more smoothly and ensure everything works correctly.
Start with the base and internal components. Make sure the heating element area is bone dry before reattaching the bottom plate. Secure the screws firmly but do not overtighten them. Over-tightening can strip the threads or crack the plastic housing. Hand-tight is usually sufficient. If you are unsure how tight to go, snug the screw gently and stop.
Next, reattach the spray head or shower filter. Press it firmly into place until you feel it click or seat properly. A loose spray head can cause uneven water distribution, which leads to poorly brewed coffee. Then place the filter basket back into its slot. Make sure it sits flat and level. A crooked filter basket can cause water to overflow or brew unevenly. This is a common issue that is easy to prevent with a simple alignment check.
Set the carafe on the warming plate. Now lift the water reservoir back onto the machine. Make sure it is seated properly and aligned with all the connectors. A reservoir that is not aligned correctly can cause leaks or prevent the machine from brewing. Once everything is in place, run a test cycle with just clean water and no coffee grounds. This flushes out any dust or debris that may have settled during reassembly. It also confirms that every component is working correctly.
During the test cycle, check for any leaks around the reservoir and base. Listen for unusual sounds from the heating element. If everything looks and sounds normal, your ninja coffee maker disassembly and reassembly project is complete. Brew your first cup and enjoy the difference that a properly cleaned machine makes. The taste will be cleaner, the brewing faster, and the aroma richer.
Building a Coffee Maker Maintenance Routine
Disassembling and cleaning your Ninja Coffee Maker is not a one-time event. It is part of an ongoing maintenance routine that keeps your machine performing at its best. Building a simple schedule makes this habit easy to maintain. Here is a practical routine you can follow.
After every use, rinse the filter basket and carafe with warm water. This takes less than 30 seconds and prevents oil buildup from setting in. Once a week, wipe down the water reservoir and the exterior of the machine. Every two to four weeks, perform a full disassembly and deep clean as described in this guide. Monthly, run a descaling cycle using white vinegar or a commercial descaling solution. Following this simple schedule means you will never face a heavily clogged or dirty machine.
Keep a small notebook or use your phone to track your cleaning dates. Write down when you last disassembled and descaled your machine. This small habit keeps you accountable and ensures you never miss a maintenance window. Over time, this routine becomes second nature. And your Ninja Coffee Maker will reward you with great-tasting coffee for many years to come.
Conclusion
Disassembling your Ninja Coffee Maker does not have to be intimidating or complicated. With the right tools, a clear set of steps, and a little patience, anyone can do it successfully. You now know exactly how to take your machine apart, clean each piece thoroughly, and put everything back together correctly. This simple routine transforms the taste of your coffee and extends the life of your appliance significantly.
Remember that ninja coffee maker maintenance is not a one-time task. It is an ongoing habit that pays off every single morning when you brew your favorite cup. The few minutes you spend cleaning and caring for your machine add up to years of reliable, delicious service. Your coffee will taste fresher, your machine will run more efficiently, and you will have the peace of mind that comes from knowing you are taking excellent care of your kitchen investment.
Start today. Grab your supplies, unplug your machine, and follow the steps in this guide. You will be amazed at the difference a proper cleaning makes. Do not wait until your coffee tastes off or your machine starts acting strange. Take control of your ninja coffee maker cleaning routine now. Your future self and your morning cup of coffee will thank you.
Frequently Asked Questions
Can I disassemble my Ninja Coffee Maker without any tools?
Most Ninja Coffee Maker models can be disassembled by hand without any tools at all. The water reservoir, filter basket, carafe, and lid all detach using simple snap-fit or press-fit connections. You only need a screwdriver if you plan to remove the bottom plate for deep cleaning. For a basic cleaning, your hands are all you need.
Is it safe to use vinegar to clean my Ninja Coffee Maker?
Yes, white vinegar is one of the safest and most effective cleaning agents for coffee makers. It naturally dissolves mineral deposits and coffee oils without damaging plastic or metal parts. Just make sure to rinse the machine thoroughly with fresh water after using vinegar. Running two to three clean water cycles after descaling removes any remaining vinegar taste.
How do I know if my Ninja Coffee Maker needs to be descaled?
Common signs that your machine needs descaling include slower brewing times, unusual noises during operation, and a change in coffee taste. You may also notice white mineral deposits around the water reservoir or spout. If you live in an area with hard water, you should descale more frequently, typically every month or so.
What should I do if a part is stuck and will not come out?
If a part feels stuck, do not force it. Double-check that you have removed all screws, clips, or locking tabs first. Sometimes parts need a gentle wiggle or twist to release. You can also try running warm water over the connection point to loosen any grime or mineral buildup that might be holding the part in place. Patience is key.
Can I put Ninja Coffee Maker parts in the dishwasher?
Most removable parts like the carafe, filter basket, and water reservoir are dishwasher-safe. However, hand washing is recommended for the best care and longevity. Dishwashers can be harsh on plastic components over time, causing them to warp or discolor. If you do use a dishwasher, place delicate parts on the top rack away from direct heat.
How long does it take to fully disassemble and clean a Ninja Coffee Maker?
A full disassembly and cleaning session typically takes about 30 to 45 minutes. The first time you do it may take a bit longer as you learn where each part goes. With practice, you will get faster and more efficient. Many people find that the routine becomes quick and easy after just a couple of sessions.