How To Deep Clean Your Ninja Air Fryer Oven The Right Way
Keeping your Ninja Air Fryer Oven clean is essential for great-tasting food and long-lasting performance. This guide walks you through every step of the deep cleaning process so you can remove baked-on grease, sanitize all parts, and eliminate stubborn odors. You will learn what supplies to use, how to clean each component, and simple habits that prevent buildup between deep cleans.
Key Takeaways
- Regular deep cleaning extends the life of your Ninja Air Fryer Oven and keeps food tasting fresh.
- Gather the right supplies first, including warm soapy water, baking soda, and a soft cloth.
- Soak removable parts like the basket and tray to loosen baked-on grease easily.
- Never use abrasive scrubbers on non-stick surfaces, as they cause permanent damage.
- Clean the heating element carefully with a damp cloth and mild degreaser.
- Establish a cleaning schedule so maintenance never feels overwhelming.
📑 Table of Contents
- Why Deep Cleaning Your Ninja Air Fryer Oven Matters
- Supplies You Will Need for a Thorough Clean
- Step-by-Step Guide to Deep Clean Your Ninja Air Fryer Oven
- How to Clean Each Part of Your Ninja Air Fryer Oven
- Common Mistakes to Avoid When Cleaning Your Ninja Air Fryer Oven
- How Often Should You Deep Clean Your Ninja Air Fryer Oven
- Expert Tips for Keeping Your Ninja Air Fryer Oven Spotless
- Final Thoughts on Deep Cleaning Your Ninja Air Fryer Oven
Why Deep Cleaning Your Ninja Air Fryer Oven Matters
Your Ninja Air Fryer Oven does a lot of heavy lifting in the kitchen. It crisps up chicken wings, roasts vegetables, and even bakes cookies. But here is the thing most people overlook. All that cooking leaves behind a layer of grease, food particles, and carbon buildup.
Over time, this buildup affects how your appliance performs. Food starts sticking more. Cooking times get longer. And sometimes, you notice weird smells when you turn the machine on. That is where deep cleaning comes in.
A proper deep clean removes all that hidden grime from places you cannot see. It also improves air circulation inside the oven. Better air flow means crispier results every time. Plus, a clean appliance simply feels more enjoyable to use.
Beyond performance, there is a hygiene factor too. Old grease and food residue can harbor bacteria. Regular ninja air fryer oven cleaning keeps your kitchen safer and your meals healthier. It is not just about looks. It is about how well your machine works and how safe your food is.
The good news is that deep cleaning a Ninja Air Fryer Oven is not as hard as it sounds. Once you know the steps, it becomes a simple routine. This guide breaks everything down so you can do it right the first time.
Supplies You Will Need for a Thorough Clean
Before you start, gather everything you need. Having all your supplies ready makes the process much smoother. You do not want to stop halfway because you are missing something.
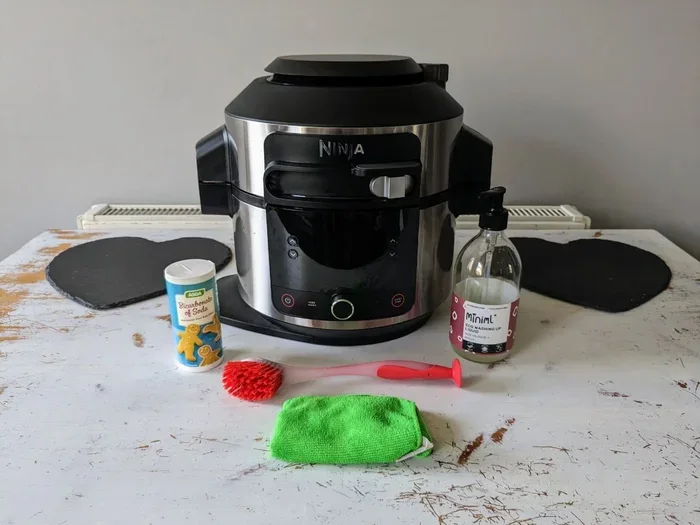
Essential Cleaning Supplies
- Warm water — the foundation of most cleaning tasks.
- Mild dish soap — cuts through grease without damaging surfaces.
- Baking soda — a natural degreaser and odor absorber.
- White vinegar — helps dissolve mineral deposits and grease.
- Soft microfiber cloths — safe for non-stick coatings.
- Soft-bristle brush or old toothbrush — reaches into tight corners.
- Sponge with a soft side — for wiping down surfaces gently.
- Dish basin or sink — for soaking removable parts.
Optional but Helpful Extras
- Degreaser spray — for heavy grease buildup on the interior.
- Cotton swabs — perfect for cleaning the heating element and small crevices.
- Rubber gloves — keeps your hands protected from hot water and grease.
- Drying rack or towel — helps parts air dry completely before reassembly.
Avoid using steel wool, abrasive pads, or harsh chemical cleaners. These can scratch the non-stick interior of your Ninja Air Fryer Oven. Scratches create spots where grease and food cling even more. Stick to gentle methods, and your appliance will stay in great shape.
Step-by-Step Guide to Deep Clean Your Ninja Air Fryer Oven
Now that you have your supplies, let us walk through the actual cleaning process. Follow these steps in order for the best results.
Step 1: Unplug and Let It Cool
This sounds obvious, but it is the most important step. Always unplug your air fryer oven before cleaning. Wait at least 30 minutes for it to cool down completely. Cleaning a hot appliance can cause burns or damage the interior surfaces.
Step 2: Remove All Removable Parts
Take out the cooking basket, the crumb tray, the oven rack, and any other removable components. Most Ninja Air Fryer Oven parts are designed to be removed easily. Check your user manual if you are unsure which parts come out.
Place all removable parts on a clean surface or in your sink. You want to wash each one separately for a thorough clean.
Step 3: Soak the Removable Parts
Fill your sink or a large basin with warm water and a few drops of mild dish soap. Submerge the basket, tray, and rack. Let them soak for at least 20 to 30 minutes.
The warm soapy water loosens baked-on grease and food residue. For really stubborn spots, add two tablespoons of baking soda to the water. The mild abrasion helps lift grime without scratching the surface.
Step 4: Scrub the Removable Parts
After soaking, take each part and scrub gently with a soft sponge or soft-bristle brush. Focus on areas with visible grease or discoloration. Use an old toothbrush for tight mesh areas on the basket.
Rinse each piece thoroughly under warm running water. Make sure all soap residue is gone. Then place the parts on a drying rack or clean towel to dry completely.
Step 5: Clean the Interior
Wipe down the inside of the oven cavity with a damp microfiber cloth. For tough grease spots, sprinkle baking soda directly on the area and let it sit for 10 minutes. Then wipe it away with a damp cloth.
For extra degreasing power, spray a light mist of vinegar on the baking soda. It will fizz, which helps lift stubborn grime. Wipe the interior again with a clean damp cloth to remove any residue.
Step 6: Clean the Heating Element
The heating element is one of the most important parts to keep clean. Use a dry or slightly damp cloth to gently wipe it down. Do not use excessive water near the heating element or the electrical components.
If there is baked-on food on the element, use a cotton swab dipped in a little vinegar to carefully remove it. Be gentle. The heating element is delicate, and damage here can affect how evenly your oven cooks.
Step 7: Clean the Exterior
Wipe the outside of the Ninja Air Fryer Oven with a damp cloth and a little mild soap. Pay attention to the control panel, the handle, and the door seal. Use a cotton swab to clean around buttons and knobs where grease tends to accumulate.
Step 8: Dry and Reassemble
Make sure every part is completely dry before putting the appliance back together. Moisture trapped inside can lead to mold or unpleasant odors. Once everything is dry, reassemble your Ninja Air Fryer Oven and plug it back in.
Run the oven empty on a low heat setting for about 5 minutes. This helps evaporate any remaining moisture and removes any lingering cleaning smells. Your appliance is now fully clean and ready to use.
How to Clean Each Part of Your Ninja Air Fryer Oven
Different parts of your Ninja Air Fryer Oven need slightly different cleaning approaches. Here is a closer look at each component.
Cleaning the Cooking Basket
The basket is where most food contact happens, so it tends to collect the most grease. After soaking, use a soft sponge to scrub both sides of the mesh. For baked-on bits, make a paste of baking soda and water, apply it to the spots, and let it sit for 15 minutes before scrubbing.
Cleaning the Crumb Tray
The crumb tray catches all the drippings and food debris. It can get quite greasy, especially after cooking fatty foods like bacon or sausages. Remove the tray and wash it with warm soapy water. A soft brush helps clear out any stuck-on particles in the corners.
Cleaning the Oven Rack
The rack supports your food during cooking. Grease tends to build up on the bottom edge of the rack. Soak it alongside the basket and scrub gently. If the rack has heavy grease buildup, a paste of baking soda and vinegar works wonders.
Cleaning the Non-Stick Interior
The interior of your Ninja Air Fryer Oven has a non-stick coating. This coating makes cooking easier and cleanup simpler. But it is also sensitive. Never use metal utensils or abrasive scrubbers on the interior. Stick to soft cloths, sponges, and gentle cleaning solutions.
If you notice scratches on the interior, avoid using the appliance until they are addressed. Scratches can cause food to stick more and may affect cooking performance. For light discoloration, a baking soda paste usually does the trick.
Cleaning the Door and Seal
The door seal keeps heat contained during cooking. Wipe it with a damp cloth after each use to prevent grease buildup. For a deep clean, use a cotton swab dipped in warm soapy water to clean along the edges of the seal. A clean seal ensures your air fryer oven heats efficiently.
Common Mistakes to Avoid When Cleaning Your Ninja Air Fryer Oven
Even with the best intentions, people make mistakes when cleaning their air fryer ovens. Here are the most common ones and how to avoid them.
Using Abrasive Cleaners or Scrubbers
This is the number one mistake. Steel wool, harsh scrub pads, and abrasive cleaners damage the non-stick coating. Once the coating is scratched, it cannot be repaired. Always use soft materials and gentle cleaners.
Soaking Electrical Components
Never submerge the main unit, the control panel, or the heating element in water. These parts contain electrical components that can be damaged by moisture. Only wash removable, non-electrical parts in water.
Skipping the Soak Step
Some people try to scrub baked-on grease immediately without soaking. This leads to excessive scrubbing, which can damage surfaces. Always let parts soak for at least 20 minutes. It makes the actual scrubbing much easier and more effective.
Not Drying Parts Completely
Putting parts back together while they are still wet can lead to mold growth and unpleasant odors. Always dry every piece thoroughly before reassembling your Ninja Air Fryer Oven.
Using Too Much Vinegar or Baking Soda
While both are safe and effective, using excessive amounts is unnecessary. A little goes a long way. Too much vinegar can leave a lingering smell, and too much baking soda can leave a white residue that is hard to rinse away.
How Often Should You Deep Clean Your Ninja Air Fryer Oven
The frequency of deep cleaning depends on how often you use your appliance. For regular users who cook in the Ninja Air Fryer Oven several times a week, a deep clean every two to four weeks is ideal.
Light users may only need a deep clean once a month. But even if you use it infrequently, it is a good idea to give it a thorough cleaning every few months. This prevents grease from building up to problematic levels.
In between deep cleans, you should do a quick wipe-down after each use. Simply remove the basket and tray, wash them with warm soapy water, and wipe the interior with a damp cloth. This routine maintenance keeps your appliance in top shape and makes the next deep clean much easier.
Pay attention to signs that your Ninja Air Fryer Oven needs a deep clean. If you notice smoke during cooking, lingering odors, or food sticking more than usual, it is time for a thorough cleaning. These are clear signals that grease and residue have built up beyond what a quick wipe can handle.
Expert Tips for Keeping Your Ninja Air Fryer Oven Spotless
Professional chefs and appliance experts share a few habits that make maintaining a clean air fryer oven much simpler.
Line the bottom of the oven with aluminum foil. This catches drips and makes cleanup faster. Just make sure the foil does not block the air vents, as proper airflow is essential for cooking performance.
Use parchment paper in the basket. Parchment paper prevents food from directly touching the mesh surface. It reduces sticking and makes the basket easier to clean after each use.
Cook with a light coating of oil. Excess oil splatters and creates more grease buildup. Using a light mist of oil instead of pouring it directly onto food reduces mess significantly.
Wipe down immediately after cooking. Once the appliance has cooled slightly but is still warm, give the interior a quick wipe. Warm grease is easier to remove than cold, hardened grease.
Run a steam clean cycle if your model supports it. Some newer Ninja Air Fryer Oven models have a steam clean or self-clean function. Use this feature regularly to keep the interior fresh between deep cleans.
Store the appliance with the door slightly open. This allows air to circulate and prevents moisture from getting trapped inside. It also helps prevent mold and musty smells from developing.
The Benefits of Keeping Your Ninja Air Fryer Oven Clean
When you maintain a regular deep clean routine, you will notice several benefits right away.
- Better-tasting food. A clean oven does not impart old grease or burnt flavors to your meals.
- More even cooking. A clean heating element and unobstructed air flow ensure heat distributes properly.
- Longer appliance lifespan. Regular maintenance prevents wear and tear on internal components.
- Improved safety. Built-up grease can smoke or even cause small flare-ups during cooking.
- Better energy efficiency. A clean appliance operates more efficiently, which can save on electricity costs.
- Fewer odors. A clean air fryer oven does not produce burnt smells or stale odors.
All of these benefits come from one simple habit. Taking the time to properly clean your Ninja Air Fryer Oven on a regular basis. It is a small investment of time that pays off in performance, safety, and the quality of your food.
Final Thoughts on Deep Cleaning Your Ninja Air Fryer Oven
Deep cleaning your Ninja Air Fryer Oven does not have to be a daunting task. With the right supplies, a clear process, and a little bit of regular maintenance, you can keep your appliance running like new. The steps outlined in this guide cover everything from soaking removable parts to carefully cleaning the heating element and exterior.
Remember that consistency is key. A quick wipe-down after each use combined with a thorough deep clean every few weeks will keep grease and grime from building up to problematic levels. Your Ninja Air Fryer Oven will cook better, last longer, and make your kitchen a more pleasant place.
Start today. Gather your supplies, follow the steps, and enjoy the satisfaction of using a sparkling clean appliance. Once you experience the difference a proper deep clean makes, you will never skip it again.
Frequently Asked Questions
Can I put the Ninja Air Fryer Oven basket in the dishwasher?
Most Ninja Air Fryer Oven baskets are dishwasher safe, but hand washing is always better for extending their lifespan. The dishwasher’s high heat and harsh detergents can gradually wear down the non-stick coating. If you do use a dishwasher, place the basket on the top rack and use a gentle cycle.
What is the best homemade cleaner for a Ninja Air Fryer Oven?
A simple mixture of baking soda and water works as an excellent homemade cleaner. Make a paste, apply it to greasy areas, let it sit for 15 minutes, then wipe clean. For extra degreasing power, add a splash of white vinegar to the paste. These natural ingredients are safe and effective.
How do I remove baked-on grease from my Ninja Air Fryer Oven?
Soak the affected parts in warm soapy water for at least 30 minutes. For stubborn baked-on grease, apply a paste of baking soda and water directly to the area. Let it sit for 15 to 20 minutes, then scrub gently with a soft sponge. Repeat if necessary.
Is it safe to use vinegar to clean my Ninja Air Fryer Oven?
Yes, white vinegar is safe and effective for cleaning your Ninja Air Fryer Oven. It helps dissolve grease and mineral deposits naturally. Just avoid using excessive amounts, and never mix vinegar with bleach or other harsh chemicals. A light spray or wipe with a vinegar-dampened cloth works perfectly.
Why does my Ninja Air Fryer Oven smell bad during use?
Unpleasant smells usually come from built-up grease and food residue inside the oven. A thorough deep clean should eliminate the odor. Also, make sure you are cleaning the crumb tray regularly, as trapped food debris is a common cause of bad smells during cooking.
How long does it take to deep clean a Ninja Air Fryer Oven?
A complete deep clean typically takes about 30 to 45 minutes. Soaking the removable parts takes the longest, around 20 to 30 minutes. The actual scrubbing and wiping process takes another 15 to 20 minutes. Regular maintenance after each use keeps the deep clean time shorter over time.