How To Cook Duck Legs In The Oven For Crispy Perfection
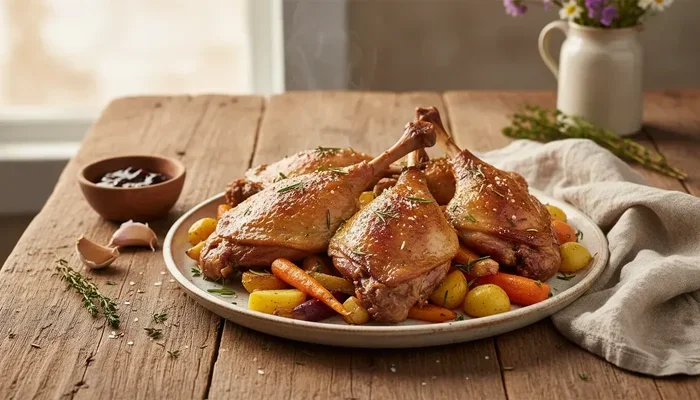
Learning how to cook duck legs in the oven is easier than you think. This guide covers everything from prep and seasoning to achieving perfectly crispy skin every time. You will get a tender, flavorful result that looks and tastes restaurant-quality. Follow our step-by-step method for oven roasted duck legs that turn out juicy inside and golden outside. Whether you are a beginner or a seasoned cook, this duck leg recipe will become a kitchen staple.
Duck legs are one of the most underrated cuts of meat you can buy. They are affordable, packed with flavor, and incredibly forgiving when cooked in the oven. If you have been wondering how to cook duck legs in the oven, you are in the right place.
This guide walks you through every step of the process. From choosing the right duck legs at the store to pulling them out of the oven with golden, crispy skin, we have you covered. The method is simple, but the results are extraordinary.
Many people shy away from cooking duck because they think it is too complicated or too fatty. The truth is, oven roasted duck legs are one of the easiest impressive dishes you can make. The fat renders out during cooking, leaving you with tender meat and crackling skin. Once you try this recipe, you will wonder why you ever ordered duck at a restaurant.
Key Takeaways
- Low and slow cooking: Start with a lower temperature to render the duck fat, then crank up the heat for crispy skin.
- Score the skin properly: Cutting shallow lines helps the fat escape and creates that coveted crispy texture.
- Resting matters: Letting the duck legs rest after cooking keeps the juices locked in for tender meat.
- Simple seasoning works best: Salt, garlic, and thyme are all you need for a classic flavor profile.
- Internal temperature is key: Aim for 165°F in the thickest part for perfectly cooked duck legs.
- Pair with the right sides: Roasted vegetables, potatoes, or a fresh salad complement the rich flavor of duck.
- Practice makes perfect: Once you master this method, you can customize it with your own flavors and techniques.
📑 Table of Contents
- Why Duck Legs Are Perfect For Oven Cooking
- How To Prepare Duck Legs For The Oven
- The Best Seasonings And Marinades For Duck Legs
- Step-By-Step Oven Roasted Duck Legs
- How To Get Crispy Skin On Duck Legs
- Serving Suggestions And Side Dishes
- Common Mistakes To Avoid When Cooking Duck Legs
- Expert Tips For Perfect Duck Legs Every Time
- Nutritional Benefits Of Duck Legs
- Storing And Reheating Leftover Duck Legs
- Frequently Asked Questions
- Conclusion
Why Duck Legs Are Perfect For Oven Cooking
Duck legs are built for oven cooking. Unlike chicken thighs or breasts, they have a thick layer of fat and tough connective tissue that breaks down slowly with heat. This makes them ideal for longer cooking methods like roasting.
When you roast duck legs, the fat slowly melts and bastes the meat from the inside out. This self-basting effect keeps the duck incredibly juicy. The skin, when exposed to high heat at the right time, transforms into a crispy, golden shell.
Here is why duck legs shine in the oven:
- Forgiving cook time: Duck legs are hard to overcook compared to leaner cuts like chicken breast.
- Rich flavor: The fat content gives duck a deep, savory taste that is hard to replicate with other meats.
- Minimal prep: You do not need fancy equipment or advanced skills.
- One pan cooking: Everything happens in a single oven dish, which means easy cleanup.
- Feeds a crowd: Two or three duck legs make a generous serving for two to four people.
The beauty of oven roasted duck legs is that they do not demand constant attention. You can prep them, pop them in the oven, and focus on side dishes or spending time with family. They are the kind of meal that fills your kitchen with an amazing aroma that will have everyone gathered around the oven.
How To Prepare Duck Legs For The Oven
Proper preparation is the secret behind great duck leg recipe results. Taking a few extra minutes at the start makes a huge difference in the final outcome.
Choosing Your Duck Legs
Look for duck legs that feel heavy for their size. This means they have a good amount of fat, which is exactly what you want. The skin should be smooth and pale pinkish-white. Avoid legs with a strong odor or discolored skin.
You can buy duck legs from most grocery stores, butcher shops, or online. Farm-raised duck often has better flavor and texture than supermarket brands, but either works fine for oven cooking.
Thawing Frozen Duck Legs
If your duck legs are frozen, plan ahead. The safest way to thaw them is in the refrigerator for 24 to 48 hours. You can also thaw them in cold water, changing the water every 30 minutes. Never thaw duck at room temperature, as this promotes bacteria growth.
Patting Dry And Scoring The Skin
This step is non-negotiable if you want crispy skin. Use paper towels to thoroughly pat the duck legs dry on all sides. Moisture is the enemy of crispy skin.
Next, use a sharp knife to score the skin. Make shallow cuts in a crosshatch pattern, being careful not to cut into the meat. Scoring helps the fat render out evenly and gives the skin more surface area to crisp up.
Quick Tip: Place the scored duck legs on a wire rack over a tray and put them in the fridge, uncovered, for a few hours or overnight. This air-drying step is a game-changer for achieving crispy perfection.
The Best Seasonings And Marinades For Duck Legs
Duck legs pair well with a wide range of flavors. While the bird has a rich taste on its own, a good seasoning blend elevates it to the next level.
Classic Salt And Garlic
The simplest approach is often the best. Rub the duck legs generously with kosher salt, freshly cracked black pepper, and minced garlic. Add a few sprigs of fresh thyme or rosemary for an aromatic touch. This classic combination lets the natural flavor of the duck legs in oven shine.
Asian-Inspired Glaze
For something different, try a soy-ginger glaze. Mix soy sauce, rice vinegar, honey, fresh ginger, and a touch of sesame oil. Brush this onto the duck legs before roasting for a sweet and savory flavor profile that pairs beautifully with the rich meat.
Herbes De Provence Marinade
For a French-inspired roast, use herbes de provence along with olive oil, lemon zest, and a splash of white wine. This marinade works wonderfully for oven roasted duck and creates a fragrant, aromatic dish that feels elegant yet effortless.
Citrus And Spice Rub
Combine orange zest, cumin, paprika, and a pinch of cinnamon for a warm, complex rub. The citrus cuts through the richness of the duck fat and adds a bright, fresh dimension to every bite.
No matter which seasoning you choose, always salt the duck at least 30 minutes before cooking. Better yet, salt it the night before and let it sit in the fridge. This draws out moisture, seasons the meat deeply, and helps the skin dry out for maximum crispiness.
Step-By-Step Oven Roasted Duck Legs
Now for the part you have been waiting for. Here is the complete method for how to cook duck legs in the oven for perfect results every time.
Step 1: Preheat And Set Up
Preheat your oven to 325°F (165°C). Place a wire rack inside a roasting pan or baking dish. The rack allows hot air to circulate around the duck, which is essential for even cooking and crispy skin.
Step 2: Season The Duck
Pat the duck legs dry again if needed. Apply your chosen seasoning generously on all sides. Make sure to get salt and spices into the scored lines on the skin. This is where the most flavor develops during cooking.
Step 3: Place In The Oven
Put the duck legs on the rack, skin side up. Place the pan in the center of the oven. Cook at 325°F for about 45 minutes. This lower temperature allows the fat to render slowly without burning the skin.
Step 4: Increase The Heat
After 45 minutes, increase the oven temperature to 425°F (220°C). This is the step that creates the crispy skin. Roast for an additional 15 to 20 minutes, watching closely to prevent burning.
Step 5: Check The Internal Temperature
Use a meat thermometer to check the internal temperature. Insert it into the thickest part of the meat, avoiding the bone. The temperature should read 165°F (74°C) for fully cooked duck legs. If not quite there yet, give them a few more minutes.
Step 6: Rest Before Serving
Remove the duck legs from the oven and let them rest on a cutting board for 5 to 10 minutes. This resting period allows the juices to redistribute, making the meat more tender and flavorful. Skipping this step means losing precious juices when you cut into the meat.
How To Get Crispy Skin On Duck Legs
Crispy skin is what separates a good duck leg from a great one. Getting that perfect crackling texture takes a bit of know-how, but it is entirely achievable at home.
Dry The Skin Thoroughly
Moisture is the single biggest enemy of crispy skin. After scoring, pat the duck legs completely dry with paper towels. For even better results, leave them uncovered in the refrigerator for several hours or overnight. The dry air in the fridge will pull moisture from the skin surface.
Use The Two-Temperature Method
Start low and slow, then finish hot. The initial low temperature renders the fat without cooking the skin too quickly. The final blast of high heat crisps up the skin in just minutes. This two-step approach is the foundation of every great roasted duck recipe.
Do Not Skip The Rack
Cooking duck legs directly in a pan traps steam underneath. That steam softens the skin and prevents it from crisping. A wire rack lifts the duck and allows air to flow freely around the entire surface.
Dab Excess Fat During Cooking
About halfway through cooking, you may notice a pool of liquid fat forming in the pan. Carefully spoon some of this out. Too much fat surrounding the duck can cause the skin to boil rather than crisp. A quick dab with a paper towel can also help.
Broil At The End
If your duck skin is not crispy enough after the high-heat phase, switch your oven to broil. Place the duck legs back in for 2 to 3 minutes, watching them like a hawk. The broiler delivers intense direct heat that can finish the job beautifully.
Common Mistake: Do not skip the resting step after cooking. Cutting into hot duck legs immediately releases all the juices onto the cutting board instead of staying in the meat. Patience pays off with juicier results.
Serving Suggestions And Side Dishes
Oven roasted duck legs are incredibly versatile when it comes to pairing. The rich, savory flavor of the duck works well with a variety of sides.
Best Side Dishes For Duck Legs
Here are some side dishes that complement oven roasted duck perfectly:
- Crispy roasted potatoes: Toss baby potatoes with olive oil, rosemary, and salt. Roast them in the same pan during the last 20 minutes of duck cooking for a one-pan meal.
- Braised red cabbage: The tangy sweetness of braised cabbage cuts through the richness of duck fat beautifully.
- Fresh green salad: A simple mixed greens salad with a light vinaigrette provides a refreshing contrast.
- Butternut squash puree: Creamy and slightly sweet, this pairs wonderfully with the savory depth of duck.
- Sautéed green beans: Toss with garlic and a squeeze of lemon for a bright, simple side.
- Wild rice pilaf: Nutty, earthy wild rice makes a sophisticated base for the duck.
Sauces That Elevate Duck Legs
While duck legs are delicious on their own, a simple sauce can take them to restaurant quality. A classic orange and brandy sauce is a traditional pairing. You can also make a quick pan sauce using the drippings left in the roasting pan, a splash of chicken stock, and a knob of butter.
Quick Tip: Save the rendered duck fat from the pan. It is liquid gold in the kitchen. Use it to roast vegetables, fry potatoes, or make savory pastries. Do not waste a single drop.
Common Mistakes To Avoid When Cooking Duck Legs
Even simple recipes have pitfalls. Here are the most common mistakes people make when cooking duck legs in the oven, and how to avoid them.
Not Drying The Skin Enough
This is the number one reason people end up with flabby, chewy duck skin. Take the time to pat the duck completely dry and consider the overnight fridge method. The extra effort makes a massive difference.
Cooking At Too High A Temperature From The Start
Starting at high heat causes the skin to burn before the fat has a chance to render out. Always begin with a lower temperature and increase it partway through.
Overcrowding The Pan
Give each duck leg enough space. Overcrowding traps steam and leads to uneven cooking. If you are cooking more than three or four legs, use two pans or cook in batches.
Cutting Into The Meat Too Soon
Resist the urge to cut into the duck the moment it comes out of the oven. The resting period is crucial for juicy, tender meat. Trust the process and wait those extra few minutes.
Discarding The Fat
Some people pour the rendered duck fat down the drain. Do not do this. Duck fat is a prized cooking ingredient. Strain it, store it in a jar in the fridge, and use it for frying, roasting, or baking.
Expert Tips For Perfect Duck Legs Every Time
Here are some insider tips from experienced cooks that will level up your duck leg recipe results:
- Bring the duck to room temperature before cooking. Take it out of the fridge 30 minutes ahead. This ensures more even cooking throughout the meat.
- Use a meat thermometer. Guessing leads to overcooked or undercooked duck. A thermometer removes all the guesswork.
- Add a splash of water to the bottom of the pan during the low-heat phase. This prevents the rendered fat from smoking too much.
- Experiment with flavors. Once you master the basic method, try different spice blends, glazes, and marinades to keep things interesting.
- Store leftovers properly. Cooked duck legs keep well in the fridge for up to three days. Reheat them in a 350°F oven for 10 to 15 minutes to keep the skin crispy.
Expert Insight: The best duck leg recipe is the one you feel confident making. Once you nail the basic oven method, you can adapt it to your taste preferences. Add a honey glaze, try a five-spice rub, or stuff the duck cavity with citrus slices and herbs. The possibilities are endless.
Nutritional Benefits Of Duck Legs
Duck legs are not just delicious, they also offer nutritional benefits. They are a rich source of protein, which supports muscle growth and repair. Duck meat contains iron, zinc, and B vitamins, particularly B12, which is essential for nerve function and energy production.
While duck has more fat than chicken, much of it renders out during cooking. The remaining fat contributes to flavor and satiety. When enjoyed in moderation as part of a balanced diet, duck legs can be a satisfying and nutritious meal choice.
Quick Tip: Pair your duck legs with plenty of vegetables and whole grains for a well-rounded, nutritious plate that balances the richness of the meat.
Storing And Reheating Leftover Duck Legs
If you have leftovers, you will be happy to know that cooked duck legs store beautifully. Let them cool completely, then place them in an airtight container in the refrigerator. They will keep for up to three days.
To reheat, place the duck legs in a 350°F oven for 10 to 15 minutes. This gentle reheating method keeps the meat moist and helps the skin stay crispy. Avoid microwaving, as it tends to make the skin soggy and the meat rubbery.
You can also shred leftover duck and use it in salads, sandwiches, tacos, or stir-fries. Creative leftovers are one of the best parts of cooking a big dish like oven roasted duck.
Frequently Asked Questions
How long does it take to cook duck legs in the oven?
Total cooking time for how to cook duck legs in the oven is about 60 to 75 minutes. This includes 45 minutes at 325°F for rendering fat, followed by 15 to 20 minutes at 425°F for crisping the skin. Always use a meat thermometer to confirm doneness.
Should I cover duck legs with foil while cooking?
No, do not cover duck legs with foil. Covering traps steam and prevents the skin from crisping. The whole goal of oven roasting duck legs is to expose the skin to dry, circulating heat for maximum crispiness.
What temperature should duck legs be when done?
The internal temperature of cooked duck legs should reach 165°F (74°C) in the thickest part of the meat. Some people prefer duck cooked to 170°F for a slightly more well-done texture, but 165°F is the safe minimum recommended by food safety guidelines.
Can I cook duck legs from frozen?
It is not recommended to cook duck legs directly from frozen. Thawing them first ensures even cooking and better texture. If you must cook from frozen, increase the cooking time by about 50% and check the internal temperature carefully.
How do I know when duck legs are done without a thermometer?
Without a thermometer, pierce the thickest part of the meat with a fork. If the juices run clear and the meat pulls away from the bone easily, the duck is done. The skin should also be deeply golden and firm to the touch.
What is the best way to store cooked duck legs?
Store cooked duck legs in an airtight container in the refrigerator for up to three days. For longer storage, you can freeze them for up to three months. Reheat in the oven at 350°F to maintain crispy skin and moist meat.
Conclusion
How to cook duck legs in the oven is a skill that will serve you well in the kitchen for years to come. The method is straightforward, the results are impressive, and the flavors are unforgettable. From scoring the skin and seasoning the meat to the final blast of high heat for crispy perfection, every step builds toward a dish that will wow your family and guests.
Remember the key principles: dry the skin thoroughly, use the two-temperature method, rest the meat before serving, and never waste that beautiful rendered duck fat. With these tips in your back pocket, you are ready to make oven roasted duck legs that rival any restaurant dish.
Start with the classic salt and garlic seasoning, master the technique, and then get creative with flavors and glazes. The more you cook duck legs, the more confident you will become. Soon, roast duck will be one of your go-to recipes for special occasions or a cozy weeknight dinner alike.
So pull out those duck legs, fire up your oven, and get ready for a meal that is rich, satisfying, and absolutely delicious. Your kitchen is about to smell incredible, and your dinner plate is about to look and taste amazing. Happy cooking!