How To Make A Clay Oven For Perfect Homemade Pizza
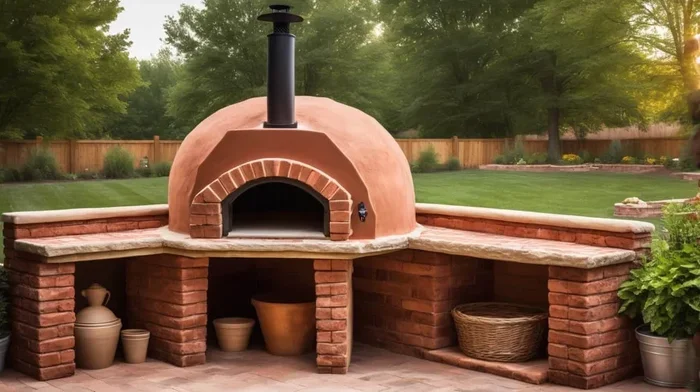
Building a clay oven at home is easier than you think and transforms your backyard cooking game. A homemade clay oven delivers authentic wood-fired pizza with crispy crust and smoky flavor. This guide walks you through every step, from gathering materials to baking your first pie. You do not need fancy tools or expert skills to get started. Follow along and create your own clay oven this weekend.
There is something magical about pulling a homemade pizza out of your own clay oven. The crust gets beautifully charred. The cheese bubbles perfectly. The aroma fills your entire backyard. Making a clay oven at home might sound like a big project, but it is surprisingly doable. People have been baking bread and pizza in clay ovens for thousands of years. You can too.
This guide gives you everything you need to build your own clay oven for homemade pizza. We cover every step in detail. You will learn what materials to use, how to shape the dome, how to cure it properly, and how to bake the perfect pizza. Whether you are a complete beginner or a DIY enthusiast, this guide has you covered. Let us get into it.
Key Takeaways
- A clay oven makes incredible homemade pizza: It reaches high temperatures for a crispy, blistered crust just like a professional pizzeria.
- Basic materials are all you need: Clay, sand, straw, and a few simple tools are enough to build a functional oven.
- The build process is beginner-friendly: You do not need advanced construction skills to create a working clay oven.
- Curing is essential: Slow, gradual firing prevents cracks and ensures your oven lasts for many cooking sessions.
- Maintenance keeps it going strong: Proper care and storage extend the life of your clay oven significantly.
📑 Table of Contents
- Why Build A Clay Oven For Homemade Pizza
- Tools And Materials You Will Need
- Step By Step Guide To Building Your Clay Oven
- How To Fire And Cure Your Clay Oven
- Tips For Perfect Pizza Every Time
- Common Mistakes To Avoid When Building A Clay Oven
- Comparison: Clay Oven Vs Other Pizza Cooking Methods
- Maintenance And Care For Your Clay Oven
- Expert Insights On Clay Oven Building
- Key Takeaways
Why Build A Clay Oven For Homemade Pizza
A clay oven is not just a cooking tool. It is a backyard centerpiece. It brings people together. It creates memorable meals. But beyond the fun factor, there are real reasons to build one.
First, a clay oven gets incredibly hot. Professional pizza ovens reach temperatures above 800 degrees Fahrenheit. A well-built clay oven can get close to that range. This intense heat is what gives Neapolitan-style pizza its signature charred, blistery crust. You simply cannot replicate that with a home kitchen oven.
Second, building a clay oven is deeply satisfying. There is something rewarding about creating something with your own hands. You use natural materials. You shape it yourself. You fire it up for the first time. The sense of accomplishment is huge.
Third, a clay oven is versatile. Yes, it is perfect for pizza. But you can also bake bread, roast vegetables, slow-cook meats, and even smoke fish. Once your oven is built, the cooking possibilities are endless.
The Flavor Difference Is Real
Let us talk about taste. Pizza baked in a clay oven tastes completely different from pizza baked in a standard home oven. The dome shape reflects heat evenly onto the pizza. The clay retains and radiates warmth consistently. Wood or charcoal adds a subtle smoky flavor that store-bought pizza simply cannot match.
Even if you use a pizza stone in your kitchen oven, the results will not compare. A clay oven creates a microclimate of intense, even heat. The crust develops in seconds. The toppings cook quickly without drying out. The cheese melts into a perfect, gooey layer. Once you taste pizza from a clay oven, you will never go back.
Tools And Materials You Will Need
Before you start building, gather everything you need. Having all materials ready makes the process smooth and enjoyable. Here is a complete list.
Core Materials
- Clay: Use natural clay or refractory clay. Refractory clay handles high heat better. You can find it at pottery supply stores or online.
- Sand: Sharp builder’s sand works best. Mix it with clay to create a strong, durable compound.
- Straw or hay: This acts as binding material. It helps the clay mixture hold its shape while drying.
- Water: You need enough to mix the clay to a thick, workable consistency.
- Firebricks: These line the oven floor. They withstand extreme heat without cracking. You need about 10 to 15 bricks.
Tools And Supplies
- A large mixing tub or wheelbarrow
- A trowel or putty knife
- A bucket for water
- A stick or dowel for shaping
- A rake or fork for mixing
- Newspaper or plastic sheeting for the base
- A garbage bag or damp cloth for curing
- A thermometer for monitoring oven temperature
Optional But Helpful Items
- A pizza peel for sliding pizza in and out
- A metal or wooden door for the oven opening
- Insulation material like vermiculite or wool
- A small chimney or vent pipe
You do not need everything on the optional list to get started. But these additions make your clay oven build more efficient and easier to use.
Step By Step Guide To Building Your Clay Oven
Now comes the fun part. Building your clay oven step by step. Follow these instructions carefully and you will have a working oven in just a few days.
Step 1: Build The Base
Start by creating a sturdy base for your oven. A simple concrete slab works great. You can also use stacked cinder blocks or even a sturdy wooden platform. The base should be about waist height. This makes it comfortable to use and helps with airflow underneath.
Make sure the base is level and stable. If it wobbles, your oven will lean and the door will not close properly. A dirt floor or sand base also works well for a simpler approach. Some builders use a metal barrel or old oil drum as the base structure.
Step 2: Create The Oven Floor
Lay your firebricks on top of the base. Arrange them in a circle or oval shape. This forms the cooking surface. Leave a small gap between bricks for airflow. The floor should be about 3 to 4 inches thick for good heat retention.
Use a spirit level to make sure the bricks are even. A flat, level floor ensures your pizza cooks evenly. If one side is higher than the other, your toppings will slide to the low side. Not ideal when you are trying to impress guests.
Step 3: Build The Sand Dome
Here is a clever trick. Before you apply the clay, build a dome shape out of sand. This acts as a temporary mold. Pack the sand tightly into a ball shape on top of the firebrick floor. Shape it into a smooth dome about 12 to 14 inches tall.
Cover the sand dome with plastic wrap. This prevents the clay from sticking to the sand. It also makes removal easier later. The plastic wrap is a small detail that makes a big difference in your clay oven build.
Step 4: Mix And Apply The Clay
Now it is time to mix your clay. The classic ratio is one part clay to three parts sand, with a handful of straw. Mix thoroughly in your tub or wheelbarrow. Add water gradually until the mixture feels like thick, sticky dough.
Start applying the clay mixture to the sand dome. Use your hands or a trowel. Build up the walls to about 3 to 4 inches thick. Work from the bottom up in a spiral pattern. Smooth each layer as you go. The thicker the walls, the more heat your oven will retain.
Leave the front opening uncovered. This is where you will load your fire and slide in your pizza. Make the opening about 12 inches wide and 10 inches tall. A good opening size is key for proper oven ventilation and heat control.
Step 5: Add The Insulation Layer
Once the clay layer is dry to the touch, add an insulation layer on top. Vermiculite mixed with clay works perfectly. This outer layer traps heat inside the oven. It also protects the clay from cracking in cold or wet weather.
Apply the insulation about 2 to 3 inches thick. Smooth it out gently. Some builders add a final layer of regular clay on top of the insulation for a clean, finished look. This outer skin also helps protect against rain and moisture.
Step 6: Remove The Sand And Let It Dry
Wait at least 48 hours for the clay to partially dry. Then carefully dig out the sand from inside the dome. Start from the top opening and work your way down. The sand should come out easily if you used plastic wrap.
Let the oven dry completely for several days. In warm, dry weather, this takes about a week. In humid conditions, it may take longer. You can speed up drying by pointing a fan into the oven opening. Do not rush this step. Rushing leads to cracks, and cracks mean heat escapes during cooking.
How To Fire And Cure Your Clay Oven
Curing is the most important part of the process. It slowly drives out all the moisture from the clay. Skipping or rushing this step is the number one reason clay ovens crack and fail. Take your time here.
Day One: The Small Fire
On day one, build a very small fire inside the oven. Use twigs and small sticks. Keep the fire tiny. You are not trying to cook anything yet. You are just gently warming the clay walls.
Let the small fire burn for about two hours. Then let it die out naturally. Close the opening loosely with a piece of wood or brick. Leave the oven overnight. The goal is slow, gentle drying.
Days Two And Three: Gradually Increase Heat
On day two, build a slightly bigger fire. Use small branches and kindling. Let it burn for three to four hours. Again, let it cool naturally overnight.
On day three, go a little bigger. Add some thicker wood pieces. Maintain a moderate fire for four to five hours. You should notice the oven walls changing color slightly as moisture evaporates.
Days Four Through Seven: Full Heat
By day four, you can build a full-sized fire. Let it burn hot for several hours each day. By the end of the week, your clay oven should be fully cured and ready for cooking.
The key principle is gradual heating. Think of it like warming up before exercise. You would not sprint without stretching. Your oven needs the same gentle warm-up process. Patience here pays off big time.
How To Know When Your Oven Is Ready
A cured clay oven is ready when the walls feel completely dry and warm to the touch. You can test this by pointing a hairdryer or heat gun at the walls. If steam comes out, there is still moisture. Keep curing until no steam appears.
Another test is to build a small fire and check for cracks after it cools. Hairline cracks are normal and can be patched with fresh clay. Large cracks mean you need more curing time or thicker walls.
Tips For Perfect Pizza Every Time
Your clay oven is built and cured. Now comes the best part: making pizza. Here are expert tips for consistently amazing results.
Get Your Fire Going Early
Build your fire about 45 minutes before you plan to cook. Use hardwoods like oak, maple, or ash. Avoid softwoods like pine. Softwoods create too much smoke and leave a bitter taste on your pizza.
Let the fire burn down until you have a bed of glowing coals. Push the coals to the back or side of the oven. The oven walls should be glowing hot. A good target temperature is 700 to 800 degrees Fahrenheit for authentic Neapolitan-style pizza.
Use A Pizza Peel
A pizza peel is a flat, paddle-shaped tool. It helps you slide the pizza into the oven and pull it out. Dust the peel with flour or cornmeal to prevent sticking.
Work quickly once the pizza is in the oven. A hot clay oven cooks a pizza in just 60 to 90 seconds. You need to rotate it a few times to ensure even cooking. Use tongs or a long fork to rotate the pizza.
Keep Your Toppings Simple
Less is more when it comes to pizza toppings in a clay oven. A great pizza dough recipe is the foundation. Use high-quality flour, fresh yeast, and good olive oil. Let the dough rest and rise properly before shaping.
Classic margherita is always a winner. Fresh mozzarella, San Marzano tomatoes, basil, and a drizzle of olive oil. The intense heat of the clay oven blisters the cheese and crisps the crust in under two minutes. The simplicity of the toppings lets the quality of the dough shine.
Manage Your Heat Like A Pro
Controlling heat is the real art of clay oven cooking. Here is a quick guide:
- For pizza: Push coals to the side. Cook directly on the hot floor.
- For bread: Rake out the coals. Let the oven cool to about 500 degrees.
- For roasting: Let the oven cool further to 350 to 400 degrees.
- For slow cooking: Wait until the oven drops to 250 to 300 degrees.
The same oven can handle all these tasks. You just need to manage the heat by controlling the fire and timing your cooking sessions.
Common Mistakes To Avoid When Building A Clay Oven
Even with the best intentions, mistakes happen. Here are the most common errors and how to avoid them.
Skipping The Curing Process
This is the biggest mistake people make. A wet clay oven will crack the first time you build a hot fire. Always cure slowly over several days. Do not try to rush it. The curing process is what makes your oven strong and durable.
Using The Wrong Type Of Clay
Not all clay is created equal. Standard modeling clay from a craft store will not work. You need natural clay or refractory clay that can handle high temperatures. Using the wrong type leads to cracking, crumbling, and a failed build.
Making The Walls Too Thin
Thin walls lose heat fast and crack easily. Aim for at least 3 inches of thickness on all sides. Thicker walls store more heat and provide better insulation. Your pizza will cook more evenly as a result.
Ignoring The Base
A weak or unstable base causes problems down the road. The oven needs a solid, level foundation. If the base shifts or sinks, the entire structure suffers. Take time to build a proper base and your oven will thank you.
Overloading The Pizza With Toppings
Too many toppings create a soggy center that will not cook properly in the fast, intense heat of a clay oven. Keep it simple. A few quality ingredients beat a mountain of toppings every time.
Not Insulating The Oven
Skipping insulation means your oven loses heat quickly. You will need to constantly feed the fire to maintain temperature. Insulation saves fuel, retains heat longer, and makes cooking more efficient. It is an easy addition that makes a big difference.
Comparison: Clay Oven Vs Other Pizza Cooking Methods
How does a clay oven compare to other ways of cooking pizza at home? Here is a helpful comparison.
| Method | Max Temperature | Cook Time | Flavor | Cost | Effort Level |
|---|---|---|---|---|---|
| Clay Oven | 700-900 degrees F | 60-90 seconds | Smoky, charred, authentic | Low to medium | High to build, easy to use |
| Wood-Fired Outdoor Oven | 800-1000 degrees F | 60-90 seconds | Smoky, professional quality | High | Medium |
| Home Oven With Pizza Stone | 500-550 degrees F | 8-12 minutes | Good, but less char | Low | Low |
| Outdoor Gas Pizza Oven | 600-800 degrees F | 2-4 minutes | Good, less smoky | Medium to high | Low |
| Pizza Steel On Grill | 500-700 degrees F | 3-5 minutes | Decent, some char | Low to medium | Low |
As you can see, a clay oven offers the best flavor at a fraction of the cost of a commercial wood-fired oven. The trade-off is the initial effort of building it. But once it is done, you have a backyard cooking machine that lasts for years.
Maintenance And Care For Your Clay Oven
A well-built clay oven can last for many years with proper care. Here is how to keep yours in top shape.
- Cover it when not in use: A waterproof cover or tarp protects against rain and snow. Moisture is the enemy of clay structures.
- Clean out ash after each use: Remove ash and leftover coals. This keeps the oven floor clean and ready for the next cooking session.
- Inspect for cracks regularly: Small cracks are normal. Patch them with fresh clay mixture before they grow larger.
- Reapply sealant annually: A thin layer of clay slip (liquid clay mixed with water) seals the surface and prevents moisture penetration.
- Store firewood nearby: Keep a small covered area near your oven for wood. This keeps it dry and ready for your next fire.
Taking care of your clay oven is simple. A little regular maintenance goes a long way toward preserving your investment and ensuring great cooking results every time.
Expert Insights On Clay Oven Building
Experienced oven builders share a few insights that can save you time and frustration.
Start small. Your first oven does not need to be huge. A compact dome about 30 inches in diameter is perfect for a family. You can always build a bigger one later once you have mastered the basics.
Watch the weather. Build your oven during a dry spell. Rain during the curing process can weaken the structure significantly. If rain is forecast, cover the oven with a tarp or plastic sheeting.
Trust the process. Your first oven might not be perfect. That is okay. Every build teaches you something. The second and third ovens always turn out better because you learn from experience. Do not get discouraged by small imperfections.
Experiment with shapes. While a dome is the classic shape, some builders prefer a barrel vault or a rectangular design. Each shape has its own heat dynamics. Try different shapes to find what works best for your cooking style.
Key Takeaways
- A clay oven makes incredible homemade pizza: It reaches high temperatures for a crispy, blistered crust just like a professional pizzeria.
- Basic materials are all you need: Clay, sand, straw, and a few simple tools are enough to build a functional oven.
- The build process is beginner-friendly: You do not need advanced construction skills to create a working clay oven.
- Curing is essential: Slow, gradual firing prevents cracks and ensures your oven lasts for many cooking sessions.
- Maintenance keeps it going strong: Proper care and storage extend the life of your clay oven significantly.
Building a clay oven for homemade pizza is one of the most rewarding DIY projects you can take on. It combines creativity, craftsmanship, and practical cooking skills into one satisfying experience. The result is an oven that produces restaurant-quality pizza right in your own backyard.
Start with the materials list. Follow the building steps carefully. Do not rush the curing process. And when you finally slide that first pizza into the glowing hot dome, you will know every minute of effort was worth it. The smell of wood smoke, the sound of crust crackling, the taste of perfectly charred cheese. That is the magic of a clay oven.
So grab your clay, gather your friends, and start building. Your homemade pizza journey begins with a single brick of clay. And once you taste the difference, you will never look at store-bought pizza the same way again.
Frequently Asked Questions
What type of clay is best for building a pizza oven?
Refractory clay is the best choice because it withstands extreme heat without cracking. You can also use natural clay mixed with sand and straw. Avoid standard modeling or craft clay, as it cannot handle the high temperatures needed for pizza baking.
How long does it take to build a clay oven?
The actual building process takes about one to two days. However, the curing process adds another five to seven days. So plan for roughly one week from start to finish before you begin cooking. The curing time is non-negotiable for a durable oven.
Can I use a clay oven in cold or rainy weather?
Yes, but you need to protect it. Always cover your clay oven when not in use. Moisture weakens the clay over time. In very cold climates, make sure the oven is fully dry before firing it up. A well-insulated and covered oven handles all seasons beautifully.
How hot does a clay oven get?
A properly built and cured clay oven can reach temperatures between 700 and 900 degrees Fahrenheit. This is hot enough for authentic Neapolitan-style pizza that cooks in under two minutes. The temperature depends on your fire size and how long you let the oven preheat.
Do I need a chimney in my clay oven?
A chimney is not strictly necessary but highly recommended. It improves airflow and helps control the fire more effectively. A simple metal pipe inserted into the top of the dome works well. Better ventilation also means cleaner burning and less smoke during cooking.
Can I bake bread and other foods in a clay oven?
Absolutely. A clay oven is incredibly versatile. After pushing out the coals and letting the oven cool, you can bake artisan bread, roast meats, cook stews, and even bake desserts. The retained heat makes it perfect for a wide range of cooking styles beyond pizza.
=== CONCLUSION ===
A clay oven is more than a cooking tool. It is a gateway to better food, better gatherings, and a more connected outdoor cooking experience. From the first moment you mix the clay to the moment you pull a steaming, perfectly charred pizza out of the dome, you will feel the satisfaction of creating something with your own hands.
The process is straightforward. The materials are affordable. The results are extraordinary. Whether you are a seasoned cook or a complete beginner, building a clay oven for homemade pizza is a project worth every minute of effort. Start today, and soon you will be serving the best pizza your friends and family have ever tasted.