How To Use A Greca Coffee Maker To Make Amazing Coffee
Using a Greca coffee maker is one of the easiest ways to brew rich espresso-style coffee at home without expensive machines. This stovetop Italian coffee maker uses steam pressure to push water through coffee grounds, creating a bold and aromatic cup. You will learn every step from assembling the parts to perfecting your brew. Whether you are a beginner or a coffee lover, this guide covers everything you need to know.
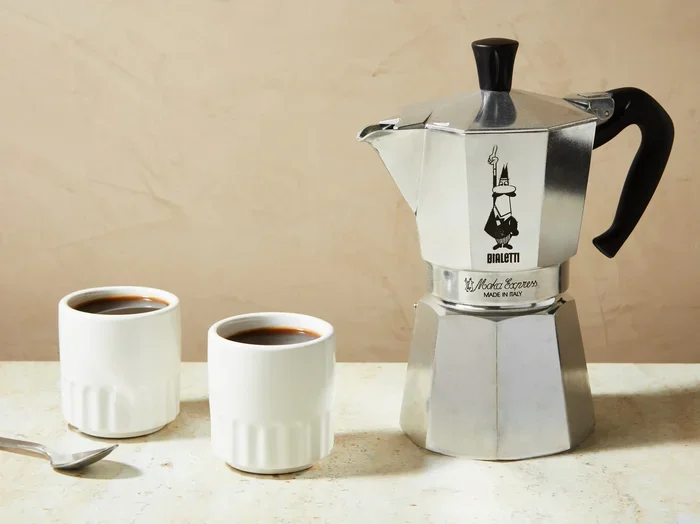
A Greca coffee maker is a classic stovetop espresso maker that has been a staple in Italian kitchens for decades. Also known as a Moka pot, this simple yet brilliant device lets you brew rich, concentrated coffee without needing a fancy machine. If you have ever wanted to enjoy espresso-style coffee at home without spending hundreds of dollars, the Greca is your answer.
Many people feel intimidated by coffee makers with lots of buttons and settings. The Greca coffee maker strips all of that away. There are no digital screens, no complex programming, and no confusing parts. You fill the bottom with water, add ground coffee to the filter basket, screw the top on, and place it on the stove. That is it. In just a few minutes, you have a full cup of bold coffee that rivals what you would get at a coffee shop.
If you already own other kitchen appliances like the Breville Smart Oven Air Fryer, you know how satisfying it is to master a versatile kitchen tool. The Greca coffee maker offers the same kind of simple, hands-on cooking experience. Once you learn how it works, you will wonder how you ever lived without it.
This guide walks you through every step of using a Greca coffee maker. From understanding the parts to troubleshooting common issues, you will find everything you need right here. Let us get started.
Key Takeaways
- Easy Stovetop Brewing: The Greca coffee maker uses simple steam pressure to brew espresso-style coffee on any stove.
- Few Parts, Simple Assembly: Understanding the water chamber, filter basket, and top chamber makes operation effortless.
- Perfect Coffee Every Time: Using the right grind size, water temperature, and coffee-to-water ratio guarantees great flavor.
- Easy Cleaning: Regular maintenance keeps your Greca performing well and your coffee tasting fresh.
- Budget-Friendly Alternative: A Greca coffee maker costs a fraction of an espresso machine and delivers similar results.
- Versatile Use: You can experiment with different coffee beans and grind sizes to customize your brew.
📑 Table of Contents
What Is A Greca Coffee Maker?
The Greca coffee maker is a stovetop espresso maker that originated in Italy. It uses steam pressure to force hot water through a bed of coffee grounds, extracting flavor and aroma as it passes through. The result is a strong, concentrated coffee that sits somewhere between drip coffee and true espresso in intensity.
The design has remained largely unchanged since it was first invented. This is a testament to how well the basic concept works. A Greca coffee maker typically consists of three main coffee maker parts:
- The Base (Water Chamber): This is the bottom section where you pour cold water. It has a valve that controls steam pressure.
- The Filter Basket: This sits above the water chamber and holds the ground coffee. It is removable for easy filling and cleaning.
- The Top Chamber (Collection Pot): This is where your finished coffee collects. It has a spout or lid for pouring.
When you place the Greca on a stovetop, the water in the base heats up and creates steam. The pressure pushes the hot water up through the coffee grounds and into the top chamber. This process is called stovetop brewing, and it produces a full-bodied cup with a rich coffee aroma that fills your kitchen.
How Does Stovetop Brewing Work?
Understanding the brewing process helps you make better coffee. Here is what happens inside your Greca in simple terms:
- You fill the bottom chamber with cold water up to the valve line.
- You fill the filter basket with finely ground coffee, leveling it off without packing it too tightly.
- You screw the top chamber onto the base securely.
- You place the Greca on a stove over medium heat.
- As the water heats, steam builds pressure and pushes water through the coffee grounds.
- The brewed coffee rises into the top chamber through a central tube.
- You hear a gurgling sound when the brewing is almost complete.
- You remove the Greca from the heat and pour your coffee.
This process takes about three to five minutes. The simplicity of stovetop brewing is what makes the Greca so appealing. There are no moving parts to break and no electricity required (unless you use an electric stove).
Parts Of Your Greca Coffee Maker
Before you start brewing, it helps to know each part of your coffee maker by name. This makes following the steps much easier and helps with cleaning later on.
| Part | Function | Material |
|---|---|---|
| Water Chamber (Base) | Holds cold water and generates steam pressure | Aluminum or Stainless Steel |
| Filter Basket | Holds the ground coffee during brewing | Aluminum or Stainless Steel |
| Gasket Seal | Creates a tight seal between base and top to maintain pressure | Rubber or Silicone |
| Central Tube | Channels brewed coffee from the filter basket to the top chamber | Aluminum or Stainless Steel |
| Top Chamber (Collection Pot) | Collects and holds the finished coffee | Aluminum or Stainless Steel |
| Safety Valve | Prevents excessive pressure buildup for safe operation | Metal |
Each coffee maker part plays a vital role. The gasket seal is especially important because it maintains the brewing pressure needed for proper extraction. Over time, gaskets can wear out and may need replacement. Most Greca models come with a spare gasket included, so keep it handy.
How To Use A Greca Coffee Maker Step By Step
Now that you know what the Greca is and what its parts do, let us walk through the actual process of making coffee. Follow these steps carefully for the best results every time.
Step 1: Prepare Your Water
Start by removing the top chamber from the base. Fill the bottom water chamber with cold, fresh water. Stop filling right at the safety valve, which is a small metal pin or line near the top of the base. Do not overfill the water chamber. Using filtered water helps prevent mineral buildup inside your kitchen coffee maker and improves the taste of your coffee.
Step 2: Fill The Filter Basket With Coffee Grounds
Remove the filter basket from the base. Add finely ground coffee to the basket. The grind should be slightly finer than what you would use for drip coffee but coarser than true espresso. Use about one tablespoon of coffee grounds per small cup your Greca produces.
Do not pack the grounds down tightly. Just level them off with your finger or a flat utensil. Packing too firmly can restrict water flow and cause uneven coffee extraction, leading to bitter or weak coffee.
Step 3: Assemble The Greca
Place the filter basket back into the base. Make sure it sits snugly and evenly. Then screw the top chamber onto the base. Tighten it firmly but do not overtighten. The gasket seal needs to sit properly between the base and the top to create the right amount of pressure.
Step 4: Place On The Stove
Set your assembled Greca on the stove over medium heat. Keep the lid open so you can watch the brewing process. Using medium heat is important. Too much heat can burn the coffee grounds and create a bitter taste. Too little heat will slow down the process and produce weak coffee.
Within two to three minutes, you will start to hear a gurgling sound. This means the coffee brewing process is working and the brewed coffee is rising into the top chamber.
Step 5: Remove From Heat At The Right Time
When you hear a hissing and sputtering sound, this is your signal that the brewing is nearly complete. The coffee extraction is pushing the last of the water through the grounds. Remove the Greca from the heat immediately.
Some people like to wrap a cold, damp cloth around the base to stop the brewing process quickly. This prevents the coffee from over-extracting and becoming bitter. This small trick makes a noticeable difference in coffee flavor.
Step 6: Pour And Enjoy
Once the brewing has stopped, carefully unscrew the top chamber from the base. Pour your fresh coffee into a warm cup. The coffee will be strong and concentrated, similar to a shot of espresso. You can drink it straight, add hot water for an Americano-style cup, or mix in milk or cream to taste.
Tips For Making The Perfect Cup
Getting great coffee from a Greca takes a little practice, but these quick tips will help you achieve excellent results from the start.
Use The Right Coffee Grind Size
The grind size is one of the most important factors in coffee preparation. Too coarse and the water passes through too quickly, giving you weak, sour coffee. Too fine and the water struggles to pass through, causing over-extraction and bitterness. Aim for a medium-fine grind, similar to the texture of table salt.
Use Freshly Ground Coffee
Freshly ground coffee beans produce a much better coffee aroma and flavor than pre-ground coffee. If you have a burr grinder at home, grind your beans just before brewing. This simple step elevates your coffee from average to exceptional.
Preheat Your Water
Using preheated water instead of cold water reduces the time the Greca spends on the stove. This prevents the coffee grounds from sitting on heat too long, which can cause a burnt or bitter taste. Heat your water in a kettle first, then pour it into the base up to the valve line.
Experiment With Coffee Ratios
Everyone has different taste preferences. Start with a standard ratio of one tablespoon of coffee per small cup. Then adjust based on your preference. If your coffee tastes too weak, add more grounds. If it tastes too strong, use a little less.
Keep Your Stove Heat Medium
Consistent, moderate heat produces the best results. A gentle simmer allows the water to extract flavor evenly from the grounds. High heat causes rapid boiling and uneven extraction, which ruins the coffee flavor.
Warm Your Cups Before Pouring
Pouring hot coffee into a cold cup causes the temperature to drop quickly. Warm your cups by rinsing them with hot water before pouring. This keeps your coffee at the perfect drinking temperature for longer.
Common Mistakes To Avoid
Even experienced Greca users make mistakes from time to time. Here are the most common errors and how to avoid them.
Overfilling The Water Chamber
Filling past the safety valve creates excessive pressure and can be dangerous. Always stop at the valve line or the small marking inside the base.
Using The Wrong Grind Size
Using pre-ground coffee meant for drip machines is a common mistake. These grounds are too coarse for a Greca and produce weak, watery coffee. Invest in a simple hand grinder and adjust the setting to medium-fine.
Tightening Too Much
Overtightening the top chamber can damage the gasket seal and make it difficult to unscrew later. Tighten just until you feel firm resistance.
Ignoring The Cleaning Routine
Coffee oils build up inside the Greca over time and turn rancid, affecting the taste of your coffee. Clean your Greca after every few uses. You can follow gentle cleaning methods similar to how you would clean an oven without harsh scrubbing by using mild solutions and soft materials. Avoid using soap on the interior parts, as it can leave a residue that affects the taste of your next brew.
Leaving The Greca On The Stove Too Long
Once the brewing is complete, remove the Greca from the heat immediately. Leaving it on the stove causes the remaining water to boil away and the coffee grounds to burn, creating a bitter and unpleasant taste.
Cleaning And Maintaining Your Greca
Proper maintenance keeps your Greca coffee maker working beautifully for years. Unlike electric coffee machines with complex parts, the Greca has very few components to clean. This is one of its biggest advantages.
After each use, disassemble the Greca and rinse all parts with warm water. Do not use soap on the interior surfaces because soap residue can affect the flavor of your next brew. Use a soft brush or cloth to remove any remaining coffee grounds from the filter basket and the top chamber.
Once a week, give your Greca a deeper clean. Soak the filter basket and top chamber in warm water with a small amount of baking soda. This removes built-up coffee oils and keeps your coffee tasting fresh. Check the gasket seal for any cracks or wear. A damaged gasket will cause steam to leak and reduce the brewing pressure, which leads to poor extraction.
If you notice mineral deposits inside the water chamber, fill it with a mixture of water and white vinegar, let it sit for 15 minutes, then rinse thoroughly. This descaling process keeps your stovetop coffee maker running smoothly.
Always let all parts dry completely before reassembling. Storing the Greca with moisture trapped inside can lead to mold or unpleasant odors.
Greca Coffee Maker Vs Other Brewing Methods
How does the Greca compare to other popular ways of making coffee? Here is a quick comparison to help you understand where the Greca stands.
| Feature | Greca Coffee Maker | Drip Coffee Maker | |
|---|---|---|---|
| Price Range | $20 – $50 | $30 – $100 | $150 – $500+ |
| Brew Time | 3 – 5 minutes | 5 – 10 minutes | 25 – 45 seconds |
| Coffee Strength | Strong, concentrated | Medium | Very strong, rich |
| Electricity Needed | No (stovetop only) | Yes | Yes |
| Portability | High | Low | Low |
| Learning Curve | Easy | Very Easy | Moderate |
| Coffee Volume Per Brew | 1 – 3 cups | 4 – 12 cups | 1 – 2 shots |
The Greca offers a wonderful middle ground. It produces stronger coffee than a drip machine but costs a fraction of an espresso machine. It also works without electricity, making it ideal for camping trips, power outages, or kitchens with limited counter space.
If you enjoy exploring different kitchen appliances, you might also appreciate learning how to work an air fryer oven for other cooking tasks. Both the Greca and an air fryer oven bring restaurant-quality results into your home with simple operation.
Frequently Asked Questions
Can I Use A Greca Coffee Maker On An Electric Stove?
Yes, you can use a Greca coffee maker on an electric stove. However, you should use medium heat instead of high heat because electric stoves retain heat longer and can cause the coffee to over-extract. The brewing process works the same way on gas and electric stoves, but you need to be a little more careful with temperature control on electric surfaces.
How Often Should I Replace The Gasket Seal?
Most experts recommend replacing the gasket seal every six to twelve months, depending on how frequently you use your Greca. A worn gasket will cause steam leaks and reduce the brewing pressure, which leads to weaker coffee. Inspect your gasket regularly for cracks, warping, or stiffness, and replace it as soon as you notice any damage.
Can I Use Pre-Ground Coffee In A Greca?
Yes, you can use pre-ground coffee, but freshly ground coffee produces significantly better flavor and aroma. If you must use pre-ground coffee, look for a brand that specifically labels the grind as fine or espresso grind. This will give you results much closer to what you would get with freshly ground beans.
Why Does My Coffee Taste Bitter?
Bitter coffee from a Greca is usually caused by one of three things: the grind is too fine, the heat is too high, or you are leaving the Greca on the stove too long. Try using a slightly coarser grind, lowering the heat to medium, and removing the Greca from the stove as soon as you hear the sputtering sound. Adjusting any one of these factors can dramatically improve the taste.
Is The Greca Coffee Maker The Same As A Moka Pot?
Yes, the Greca is essentially the same thing as a Moka pot. The name “Greca” is a brand-specific term used in some regions, while “Moka pot” is the more widely recognized name. Both refer to the same stovetop espresso maker that uses steam pressure to brew concentrated coffee. The design and brewing process are identical.
Can I Make Multiple Cups At Once?
Yes, Greca coffee makers come in different sizes, typically ranging from one-cup to six-cup models. A standard three-cup Greca produces about one and a half mugs of coffee. If you need to serve multiple people, simply choose a larger size Greca or brew multiple rounds in quick succession.
Final Thoughts
Using a Greca coffee maker is one of the simplest and most rewarding ways to enjoy espresso-style coffee at home. With just three main parts and a stovetop, you can brew rich, aromatic coffee that rivals what you would find in a café. The process takes only a few minutes, the cleanup is effortless, and the cost is minimal compared to electric espresso machines.
Once you master the basics, you can start experimenting with different beans, grind sizes, and water temperatures to find your perfect cup. The beauty of the Greca is in its simplicity and consistency. It does not have fancy features or complicated settings, and that is exactly what makes it so reliable.
Follow the steps outlined in this guide, avoid the common mistakes, and maintain your Greca with regular cleaning. You will be making amazing coffee every morning in no time. The Greca coffee maker is more than just a kitchen tool, it is a daily ritual that brings the tradition of Italian coffee culture right into your home. Happy brewing.