How To Unclog My Keurig Coffee Maker Quickly At Home
Learn how to unclog my Keurig coffee maker fast using simple household supplies and easy step-by-step methods. This guide covers everything from needle cleaning to descaling, so your machine brews perfectly again. No tools or expertise needed — just follow along and get your Keurig flowing again.
Key Takeaways
- Mineral buildup is the #1 cause of a clogged Keurig, and descaling fixes most problems quickly.
- Cleaning the needle and reservoir should be part of your weekly Keurig maintenance routine.
- White vinegar and citric acid are the best natural descaling solutions for your machine.
- Running a water-only flush cycle after descaling removes any leftover residue and taste.
- Prevention is easier than repair — regular cleaning keeps your Keurig working smoothly for years.
- Call a professional if you notice persistent leaks, error codes, or no water flow after trying all fixes.
📑 Table of Contents
Why Does My Keurig Coffee Maker Get Clogged?
Every coffee lover knows the frustration. You press the brew button, and nothing happens. Or worse — your Keurig drips slowly, spits watery coffee, or makes strange gurgling sounds. A clogged Keurig is one of the most common problems owners face. But here is the good news. Most clogs are easy to fix at home without calling a repair tech.
Understanding why your machine gets blocked helps you prevent it from happening again. Keurig descale buildup, coffee grounds, and mineral deposits are the usual culprits. Over time, these particles build up inside the water lines, needle, and reservoir. The result is weak coffee, slow brewing, or a machine that simply refuses to work.
Let us walk through everything you need to know about Keurig cleaning and how to get your machine back in top shape. Whether you are dealing with a minor drip or a complete blockage, this guide has you covered.
Common Causes of Keurig Clogs
Several things can cause your coffee maker to slow down or stop working. Here are the most common reasons:
- Mineral and lime buildup — Hard water leaves calcium and magnesium deposits inside the machine. These build up over weeks and months.
- Coffee grounds stuck in the needle — Fine particles can accumulate at the entry point, blocking water flow.
- Debris in the water reservoir — Dust, old coffee oils, and scale flakes can collect at the bottom of the tank.
- Clogged exit needle — The needle that punctures the K-Cup pod can get jammed with dried coffee grounds.
- Air bubbles in the water line — Sometimes air gets trapped, which mimics a clog and stops water from pumping.
- Old or expired coffee pods — Stale pods can leave behind sticky residue that clings to internal parts.
How To Tell If Your Keurig Is Clogged
Not sure if your machine is actually clogged? Look for these clear signs. Your Keurig takes much longer than usual to brew a cup. The coffee comes out weak or watery. You hear clicking, gurgling, or grinding noises during the brew cycle. Water pools around the machine or leaks from the base. The reservoir light stays on even after you refill it. If you notice any of these, your machine likely needs a good cleaning.
What You Need Before You Start
Gathering your supplies ahead of time makes the whole process smoother. You do not need anything fancy or expensive. Most of what you need is already in your kitchen pantry.
Essential Supplies for Keurig Clog Fix
- White distilled vinegar or citric acid powder
- Clean cloth or soft sponge
- A small straightened paperclip or needle
- Warm water
- Dish soap (mild, unscented)
- A mug or measuring cup
- Dry towel for wiping spills
Safety Tips Before Cleaning
Always unplug your Keurig before starting any cleaning or repair work. Let the machine cool down completely if you just finished brewing. Never submerge the base unit in water. Only wash removable parts with warm, soapy water. Following these simple safety steps protects both you and your machine.
Some people also wonder about deep cleaning other kitchen appliances. For example, many owners ask how to clean an oven with a dishwasher tablet without scrubbing using similar no-effort methods. The principle is the same — household products can tackle tough buildup without harsh chemicals.
How To Unclog My Keurig Coffee Maker Step by Step
Now let us get into the actual fix. Follow these steps in order for the best results. Each step targets a different part of your machine where buildup tends to collect.
Step 1: Turn Off and Unplug Your Keurig
This is the most important safety step. Power down the machine and pull the plug from the wall. Wait at least five minutes before you touch any internal parts. This lets the electrical components cool down and reduces any risk of short circuits. A safe start makes for a smooth repair.
Step 2: Disassemble the Removable Parts
Take off the water reservoir, the drip tray, and the K-Cup holder. Most of these parts lift right out with no tools needed. Check each piece for visible debris, coffee stains, or mineral crust. Wash them in warm, soapy water and rinse thoroughly. Let them air dry on a clean towel while you work on the internal parts.
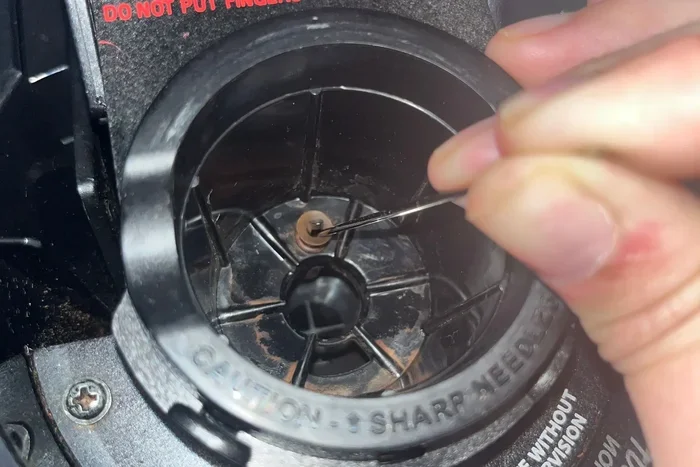
Step 3: Clean the Entry and Exit Needles
The needles are the small metal pins that pierce the K-Cup pod. Over time, dried coffee grounds stick to them and create a blockage. To clean them, gently remove the K-Cup holder assembly. Use a straightened paperclip or a dedicated needle-cleaning tool to poke through the needle openings. Push gently and repeat several times. You will likely see dark residue come out. Wipe the needles with a damp cloth to remove any remaining buildup.
This is one of the most overlooked parts of Keurig needle cleaning, and it makes a huge difference in water flow.
Step 4: Run a Descaling Cycle
Descaling is the process of dissolving mineral deposits inside the water lines and heating element. Fill the reservoir halfway with white vinegar and the rest with warm water. Place a large mug on the drip tray. Run a full brew cycle without a K-Cup pod. Let the vinegar solution sit in the machine for 30 minutes. Then run 2 to 3 more brew cycles with fresh water to flush everything out.
If you prefer a descaling solution over vinegar, you can use a store-bought descaling solution or citric acid powder. Follow the product instructions for the correct ratio. Both methods work well for descale Keurig maintenance and restore proper water pressure.
It is worth noting that self-cleaning features exist on many modern appliances. For instance, some ovens offer Aqualift self clean on a Kitchenaid oven that handles tough grime automatically. Your Keurig does not have that luxury, but the vinegar method works just as effectively with a little manual effort.
Step 5: Flush the System Thoroughly
After descaling, run at least 3 to 4 full water-only cycles. This removes any vinegar taste or loosened debris from the internal pipes. Taste the water from each cycle. When it smells and tastes completely clean, your Keurig is ready to brew again. This flushing step is critical because leftover vinegar can affect the flavor of your next cup of coffee.
Step 6: Reassemble and Test
Put all the clean, dry parts back in place. Plug the machine in and power it on. Run a test brew with a K-Cup of your choice. Check the water flow speed and coffee strength. If everything looks and tastes normal, you have successfully completed your Keurig clog fix. If the problem persists, move on to the next section for advanced troubleshooting.
How To Prevent Future Clogs
Once you have fixed the clog, you want to keep it from coming back. Prevention is much easier than repair, and a few simple habits go a long way.
Daily Habits That Help
- Always use fresh, filtered water in your reservoir. Tap water contains more minerals that cause buildup.
- Remove used K-Cup pods immediately after brewing. Do not let them sit in the machine.
- Wipe the needle area with a dry cloth after every few uses to catch stray grounds.
- Keep the lid closed on the reservoir when not in use to prevent dust from getting inside.
Weekly and Monthly Maintenance Routine
Set a schedule that works for you. Here is a simple routine to follow:
- Weekly: Remove and wash the reservoir, drip tray, and K-Cup holder with warm soapy water.
- Bi-weekly: Clean the needles with a paperclip or needle tool to clear any fresh grounds.
- Monthly: Run a full descaling cycle with vinegar or citric acid solution.
- Every 3 months: Deep clean the entire machine, including the internal water lines, with a vinegar flush.
Following this routine keeps your machine in great shape and extends its lifespan significantly. Think of it as coffee maker maintenance that takes only minutes each week.
Prevention also applies to other kitchen tasks. For example, knowing how to cook pancetta in the oven without splattering grease helps keep your oven clean — just like regular Keurig cleaning prevents buildup from becoming a serious clog.
When To Call a Professional
Most clogs respond well to the methods above. But sometimes the problem goes deeper than surface buildup. Here are signs that you should stop DIY fixes and call a professional technician.
Signs That DIY Fixes Are Not Enough
- Persistent water flow problems — If your Keurig still does not pump water after two full descaling attempts, the internal pump may be failing.
- Error codes on the display — Modern Keurig models show error messages for a reason. These often indicate electrical or sensor issues that need professional diagnosis.
- Visible damage to internal parts — Cracks, leaks, or broken components should never be repaired with household methods.
- Burning smell or smoke — This is a serious warning sign. Unplug the machine immediately and contact support.
- Repeated clogs after cleaning — If the same clog keeps returning, there may be a deeper blockage in the water line or pump assembly.
Trying to force a repair beyond your skill level can cause more damage. A qualified technician can diagnose the real issue and fix it safely. Most Keurig repairs are affordable and much cheaper than buying a new machine.
Quick Tips for a Clean Keurig
Here are some bonus tips that make a real difference in keeping your machine running smoothly:
- Use filtered water instead of tap water to reduce mineral buildup from the start.
- Descale every 3 to 6 months even if you do not notice any slowdown. Prevention beats cure.
- Do not use metal utensils inside the reservoir. They can scratch the interior and create spots where bacteria grow.
- Store your Keurig in a dry place away from steam and moisture when not in use.
- Run a water flush after every 10 brews to clear any residual coffee oils from the lines.
- Replace your water filter regularly — most Keurig models use a charcoal filter that needs swapping every 2 months.
These small habits take almost no time but save you from the headache of a clogged machine. Think of them as Keurig troubleshooting steps that keep problems from ever starting.
Some owners also deal with residue buildup from other kitchen messes. For instance, cleaning melted plastic out of an oven requires patience and the right technique — similar to how you need the right approach to clear mineral buildup inside a Keurig. In both cases, gentle but consistent cleaning gets the job done without damaging the appliance.
Conclusion
Dealing with a clogged Keurig coffee maker does not have to be stressful. With the right supplies and a little patience, you can fix most clogs in under 30 minutes. Start by identifying the cause — mineral buildup, coffee grounds, or debris — and then follow the step-by-step cleaning process we outlined above. Regular Keurig maintenance including descaling, needle cleaning, and flushing will keep your machine performing at its best for years to come.
Remember, prevention is your best tool. A little weekly care saves you from emergency troubleshooting later. And if the problem ever goes beyond what you can handle, do not hesitate to call a professional. Your morning coffee deserves a machine that works perfectly every single time.
Now you know exactly how to unclog my Keurig coffee maker quickly at home. Go ahead and give it a try — your next cup of coffee will taste even better for it.
Frequently Asked Questions
How long does it take to unclog a Keurig coffee maker?
Most clogs clear up within 30 minutes using the vinegar descaling method. If the blockage is severe or the pump is failing, it may take longer or require professional help. Regular maintenance keeps the process fast and simple.
Can I use vinegar to descale my Keurig?
Yes, white distilled vinegar is one of the most effective and affordable descaling solutions. Mix it with warm water in equal parts and run it through a brew cycle. Always follow up with several water-only flushes to remove any vinegar taste.
How often should I clean my Keurig to prevent clogs?
Aim to clean removable parts weekly and run a full descaling cycle every 3 to 6 months. If you live in an area with hard water, you may need to descale more frequently. Consistent cleaning prevents buildup before it becomes a clog.
What should I do if my Keurig still will not brew after cleaning?
Try unplugging the machine for 10 minutes and then plugging it back in. Check that the water reservoir is seated properly and that there are no air bubbles in the line. If the problem continues, the pump or internal components may need professional inspection.
Is citric acid better than vinegar for descaling a Keurig?
Both work well. Citric acid is often preferred because it leaves less smell and taste behind. Vinegar is more commonly found in households and is slightly cheaper. Either one effectively dissolves mineral deposits when used correctly.
Can I use a paperclip to clean the Keurig needle?
Yes, a straightened paperclip works perfectly as a needle cleaning tool. Gently insert it into the needle openings and push to dislodge coffee grounds and debris. Be careful not to bend or damage the needle. A dedicated needle-cleaning tool works even better if you brew coffee daily.