Master How To Use Oven Cleaner With These Simple Steps
Oven cleaner is one of the most powerful tools you can use to keep your kitchen fresh and grease-free. This guide shows you exactly how to use oven cleaner safely and effectively, from choosing the right product to tackling stubborn burnt-on stains. You will learn simple step-by-step methods, essential safety tips, and expert tricks that make the job fast and easy. Whether you own a self-cleaning oven or a traditional model, these techniques will transform your cleaning routine.
Oven cleaner is one of the most powerful tools you can use to keep your kitchen fresh and grease-free. Your oven works hard every single day. It bakes your favorite meals, roasts Sunday dinners, and handles all kinds of cooking tasks. Over time, grease, food splatters, and burnt residue build up inside. This buildup can affect how your oven performs and even change the taste of your food.
Using oven cleaner is the best way to tackle this mess. But many people are unsure about the right method. They worry about safety, effectiveness, or damaging their appliance. This article breaks it all down into easy, practical steps. You will learn simple techniques that save time, effort, and money. Whether you own a self-cleaning oven or a traditional model, these methods will transform your cleaning routine and give you sparkling results.
Key Takeaways
- Choose the right type: Spray, foam, and natural oven cleaners each work best for different levels of grime and oven types.
- Always ventilate: Open windows and turn on fans before using any chemical cleaner to protect your lungs and health.
- Wear protective gear: Gloves and eye protection prevent skin irritation and chemical burns during the cleaning process.
- Remove racks first: Cleaning oven racks separately gives you better access and more thorough grease removal results.
- Wipe thoroughly after cleaning: Residue left behind can affect food taste and safety, so always rinse and wipe the interior completely.
- Maintain regularly: A quick wipe-down after each use prevents buildup and reduces the need for heavy-duty oven maintenance.
- Natural alternatives work too: Baking soda and vinegar can be effective for light to medium cleaning without harsh chemicals.
📑 Table of Contents
Why Oven Cleaner Is Essential for Your Kitchen
Grease and food residue build up inside your oven every time you cook. Roasting meats, baking casseroles, and even reheating pizza leave behind sticky, baked-on grime. Over weeks and months, this layer becomes thicker and harder to remove. Regular wiping with a cloth simply is not enough for deep grease removal.
This is where oven cleaner comes in. A quality cleaning solution breaks down hardened grease and carbonized food particles that regular soap cannot touch. Without proper cleaning, burnt residue can create unpleasant odors when you heat the oven. It can also smoke during cooking, which affects the flavor of your food.
Using oven cleaner regularly also extends the life of your appliance. Built-up grime can cause uneven heating and reduce energy efficiency. A clean oven heats more evenly and uses less electricity or gas. This means lower utility bills and better cooking results over time.
The Hidden Risks of a Dirty Oven
A dirty oven is more than just an eyesore. Old food particles can harbor bacteria and germs. When you cook at high temperatures, these residues can release smoke and odors into your kitchen. Some people notice a smoky smell the first time they use their oven after a long break. This is a clear sign that oven maintenance has been neglected.
Heavy grease buildup can also become a fire hazard. In extreme cases, accumulated grime near the heating elements can ignite. While this is rare, it is a real risk that every home cook should be aware of. Regular use of oven cleaner helps prevent this dangerous situation.
Types of Oven Cleaners Available
Not all oven cleaners are the same. Different products work in different ways and suit different needs. Understanding your options helps you choose the best one for your situation. Here are the most common types available on the market today.
Spray Oven Cleaners
Spray cleaners are the most popular option. They come in pressurized cans and spray a fine mist directly onto the oven interior. The formula penetrates grease quickly and breaks it down over time. Most spray products need about 15 to 30 minutes of dwell time before wiping away.
These are great for routine cleaning and light to moderate buildup. They are easy to use and widely available at grocery stores. However, some spray cleaners contain strong chemicals that produce fumes. Always use them in a well-ventilated area.
Foam Oven Cleaners
Foam cleaners expand and cling to oven surfaces. This makes them ideal for vertical surfaces like oven walls and the door glass. The foam sits on the grime longer without dripping, giving the active ingredients more time to work.
Foam products are often preferred for heavy-duty grease removal. They stick to greasy surfaces better than spray formulas. Many users find foam cleaners easier to control and less messy to apply. They work especially well on burnt food residue that has been building up for weeks.
Natural and DIY Oven Cleaners
Not everyone wants to use chemical-based products. Natural cleaning solutions made from baking soda, vinegar, and water offer a gentler alternative. A paste of baking soda and water applied to the oven interior can loosen light to moderate grime over several hours.
DIY methods are safer for homes with children and pets. They produce no harmful fumes and are very affordable. However, they may not be strong enough for heavy, baked-on grease. If your oven has years of buildup, a commercial oven cleaner will likely give better results.
Comparison Table: Oven Cleaner Types
| Type | Best For | Dwell Time | Fumes | Cost |
|---|---|---|---|---|
| Spray Cleaner | Light to moderate grease | 15-30 minutes | Moderate | Low |
| Foam Cleaner | Heavy grease and burnt residue | 30-60 minutes | Moderate to heavy | Medium |
| Natural/DIY | Light maintenance cleaning | 2-12 hours | None | Very low |
| Self-Cleaning Cycle | Deep cleaning without manual effort | 2-4 hours | Heavy (during cycle) | No product cost |
Step-by-Step: How to Use Oven Cleaner
Now that you understand the types of oven cleaner available, let us walk through the actual process. Following these steps ensures the best results while keeping you safe. Take your time and do not rush through the process.
Step 1: Remove the Oven Racks
Before you do anything else, pull out all oven racks. Cleaning them separately gives you full access to the oven interior. Racks often collect the heaviest grease and food buildup. They need their own cleaning session with degreaser or hot soapy water.
Place the racks in a bathtub or large sink. Apply a cleaning solution designed for tough grease. Let them soak for at least 30 minutes. Scrub with a non-abrasive pad, then rinse and dry thoroughly before placing them back inside.
Step 2: Clear the Oven Interior
Remove any loose food particles, trays, or accessories from inside the oven. Take out the oven floor or bottom tray if it is removable. Shake out crumbs and wipe away any loose debris with a damp cloth. A clean surface allows the oven cleaner to work directly on the greasy buildup.
Check the oven door glass as well. If there is loose grime on the outside, wipe it down now. This prevents it from mixing with the cleaner later and creating a muddy mess.
Step 3: Apply the Oven Cleaner
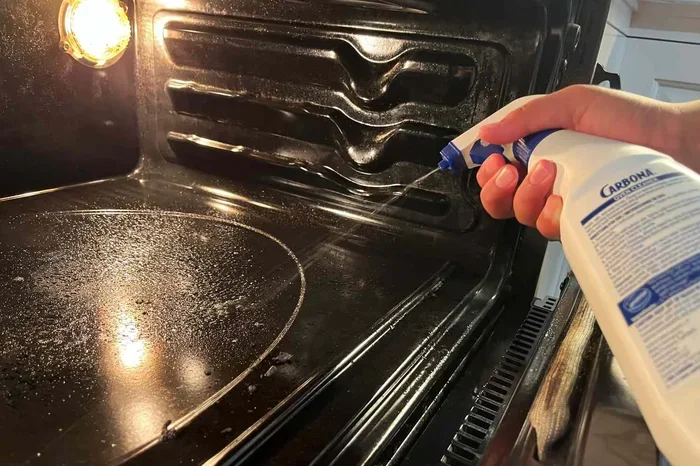
Shake the oven cleaner can well before use. Hold the can about 6 inches from the oven interior walls. Spray or apply the product in long, even strokes. Cover all greasy areas, paying extra attention to corners, crevices, and around the heating elements.
If you are using a foam product, apply it in a thick, even layer. Foam clings to surfaces better than spray, so it covers more area with less dripping. For the oven door, spray or wipe the cleaner on both the inside and outside glass surfaces.
Avoid spraying the cleaner directly on the heating elements. This can damage them and reduce their effectiveness. Also, do not apply chemical cleaner to the oven thermometer or any electronic components.
Step 4: Let It Sit
Now comes the waiting game. Most oven cleaners need time to break down the grease. Check the product label for the recommended dwell time. Spray formulas typically need 15 to 30 minutes. Foam products and heavy-duty cleaners may need 30 minutes to one hour.
During this time, the cleaner will start to foam and dissolve the baked-on grime. You may see it turn brown or gray as it lifts the grease. This is completely normal and shows the product is working. Do not skip this step. Letting the cleaner sit long enough is one of the most important parts of the entire process.
Quick Tip: If you are dealing with extremely heavy buildup, let the cleaner sit overnight. Cover the oven with plastic wrap or foil to prevent the product from drying out too quickly.
Step 5: Wipe Away the Cleaner and Grease
After the dwell time is complete, put on a pair of protective gloves. Use a damp cloth or sponge to wipe away the cleaner and dissolved grease. Start from the top of the oven interior and work your way down. This prevents dirty water from dripping onto already-cleaned areas.
You will likely need to rinse and wring out your cloth several times. The grime comes off in large, greasy clumps. Keep wiping until no more residue transfers to the cloth. For stubborn spots, apply a little more cleaning solution and let it sit for a few more minutes.
Rinse the interior thoroughly with a clean damp cloth. This removes any leftover chemical residue. Residue left behind can affect the taste of your food and produce unpleasant odors during future cooking sessions.
Step 6: Clean the Oven Door and Exterior
The oven door often collects a lot of grease, especially around the edges and handle. Spray or wipe the oven cleaner on the door glass, both inside and out. For the inside of the glass, let the cleaner sit for 10 to 15 minutes before wiping.
Use a razor scraper or plastic scrubber for tough spots on the glass. Be gentle to avoid scratching the surface. Wipe the door frame, handle, and exterior with a damp cloth to remove any cleaner that may have splashed during application.
Step 7: Replace the Racks and Run a Test Cycle
Once everything is clean and dry, put the oven racks back in place. Before cooking food, run the oven at a high temperature for about 10 to 15 minutes. This burns off any remaining chemical traces and eliminates any lingering cleaner odor. Your oven is now ready for use.
Dealing with Stubborn Stains and Heavy Grease
Sometimes a single application of oven cleaner is not enough. Old, baked-on grease and carbonized food require extra effort. Here are proven techniques for handling the toughest messes.
The Baking Soda Paste Method
For heavy grime that will not budge, make a thick paste from baking soda and water. Spread it over the greasy areas and let it sit for several hours or overnight. The baking soda works as a gentle degreaser and absorbs odors. Rinse thoroughly with a damp cloth afterward.
This method pairs well with commercial oven cleaners. Use the baking soda paste first to loosen the worst buildup, then follow up with your preferred cleaning solution for a final deep clean. The combination of mechanical and chemical cleaning is very effective.
Using Vinegar for Final Rinse
White vinegar is a natural cleaning solution that cuts through remaining grease and removes chemical residue. After wiping the oven with oven cleaner, spray or wipe a diluted vinegar solution inside. The vinegar will fizz slightly, which helps lift any remaining grime. Wipe clean with a fresh damp cloth.
When to Repeat the Process
Do not be afraid to repeat the cleaning process if needed. Very dirty ovens sometimes require two or three applications for complete grease removal. Each round removes another layer of buildup. Be patient and persistent. The results are worth the extra effort.
Common Mistakes: Many people try to scrub aggressively with harsh abrasive pads. This can scratch the oven interior and damage the coating. Always use soft cloths, sponges, or non-abrasive scrubbers. Let the cleaner do the hard work for you.
Safety Tips When Using Oven Cleaner
Oven cleaners contain powerful chemicals that can irritate skin, eyes, and lungs. Safety should always come first. Follow these precautions every single time you clean your oven.
- Wear protective gloves: Chemical cleaners can cause skin irritation and burns. Heavy-duty rubber gloves protect your hands completely.
- Ventilate the area: Open all windows and turn on the exhaust fan. Fresh air circulation reduces fume exposure significantly.
- Wear eye protection: Spray can accidentally splash. Safety goggles prevent chemical contact with your eyes.
- Keep children and pets away: Lock the kitchen door during cleaning. Chemical cleaner fumes are harmful to young children and animals.
- Never mix products: Combining different cleaning solutions can create dangerous chemical reactions. Use one product at a time.
- Read the label: Every oven cleaner has specific instructions and warnings. Follow them carefully for safe and effective use.
- Wash hands thoroughly: Even with gloves, wash your hands with soap and water after cleaning to remove any trace residue.
Expert Insight: According to kitchen safety professionals, the most common injury during oven cleaning comes from inhaling fumes in enclosed spaces. Always ventilate before, during, and after the cleaning process. If you feel dizzy or lightheaded, step outside immediately and get fresh air.
How to Keep Your Oven Clean After Cleaning
Getting your oven clean is only half the battle. Maintaining it afterward prevents heavy buildup and makes future cleaning much easier. A little effort after each use goes a long way toward keeping your oven in top shape.
Wipe Down After Every Use
After cooking, let the oven cool slightly and wipe the interior with a damp cloth. This removes fresh spills before they harden and bake onto the surfaces. A quick 30-second wipe after each use saves hours of deep cleaning later.
Use Oven Liners
Oven liners are thin, heat-resistant mats that sit on the oven floor. They catch drips and spills before they reach the bottom of the oven. Simply remove the liner, shake off debris, and wipe it clean. This simple tool dramatically reduces oven maintenance time.
Schedule Monthly Spot Cleaning
Set a reminder to inspect your oven once a month. If you notice any new grease spots or food residue, address them immediately. Spot cleaning with a gentle cleaning solution takes only a few minutes and prevents the need for heavy-duty oven cleaner later.
Run the Self-Cleaning Cycle Regularly
If you have a self-cleaning oven, use this feature every few months. The high heat burns off grease and food particles, leaving behind only ash that you can wipe away easily. However, do not overuse this feature, as the extreme heat can wear on oven components over time.
Key Takeaways: A clean oven cooks better, smells better, and lasts longer. Regular oven maintenance is the secret to avoiding tough cleaning jobs. Make it a habit, and your self-cleaning oven or traditional model will stay in excellent condition for years.
Conclusion
Learning how to use oven cleaner properly is a skill every home cook should have. With the right product, the right technique, and proper safety precautions, you can transform a greasy, dirty oven into a sparkling clean appliance. The steps are simple and straightforward. Remove the racks, apply the cleaner, let it sit, wipe it away, and enjoy the results.
Remember that regular maintenance makes the job easier over time. A quick wipe after each use and monthly spot cleaning prevents heavy buildup. When you do need a deep clean, the methods in this guide will get the job done quickly and safely. Your oven works hard for you every day. Taking care of it with proper oven cleaner use is the least you can do.
Start today. Pick up your preferred cleaning solution, follow these steps, and experience the satisfaction of a truly clean oven. Your kitchen will smell fresh, your food will taste better, and your appliance will perform at its best. Happy cleaning!
Frequently Asked Questions
Can I use oven cleaner in a self-cleaning oven?
It is best to avoid using commercial oven cleaner in a self-cleaning oven. These ovens are designed to handle heavy cleaning through their high-heat cycle. Using chemical cleaners can damage the interior coating and interfere with the self-cleaning function. Stick to the self-cleaning cycle or use only gentle, manufacturer-recommended methods.
How long should I leave oven cleaner inside the oven?
Most oven cleaners need 15 to 60 minutes of dwell time to break down grease effectively. Check the product label for specific instructions. For extremely heavy buildup, letting the cleaner sit overnight wrapped in plastic gives the best results for deep grease removal.
Is oven cleaner safe for food surfaces after rinsing?
Yes, as long as you rinse the interior thoroughly after cleaning. Wipe down all surfaces with a clean damp cloth several times. Then run the oven at a high temperature for 10 to 15 minutes to burn off any remaining chemical traces. This ensures the oven is completely safe for cooking food.
What is the best natural alternative to commercial oven cleaner?
A paste made from baking soda and water is the most effective natural alternative. Apply it to the greasy interior, let it sit for several hours, then wipe clean. Follow up with a vinegar and water spray to cut any remaining grease. This combination works well for light to moderate oven maintenance without harsh chemicals.
Can oven cleaner damage oven racks?
Most commercial oven cleaners are safe for metal oven racks when used as directed. However, prolonged exposure can cause discoloration on some rack finishes. It is best to clean racks separately in a sink or bathtub with a dedicated degreaser rather than applying spray cleaner directly while they are inside the oven.
Why does my oven still smell after cleaning?
A lingering smell usually means chemical residue was not fully rinsed away. Wipe the interior again with a clean damp cloth and run a high-heat cycle for 15 minutes. If the smell persists, the cleaning solution may need another round of wiping. Always ensure thorough rinsing and ventilation during the cleaning process.