Foil Wrapped Baby Back Ribs in Oven Tips and Tricks
Foil wrapped baby back ribs in oven deliver tender, juicy flavor without needing a smoker. This method uses low heat and aluminum foil to lock in moisture and create fall-off-the-bone texture. You will learn the prep steps, oven settings, timing, and pro tips for perfect ribs at home.
There is nothing quite like pork ribs on a Sunday afternoon. The smell of slow-cooked meat fills the house and everyone gathers in the kitchen. But not everyone owns a smoker or has access to a backyard grill. That is where foil wrapped baby back ribs in oven come to the rescue.
This method gives you restaurant-quality ribs right in your own kitchen. You do not need fancy equipment. You just need a good rack of ribs, some aluminum foil, and a little patience. In this guide, we will walk you through every step to get fall-off-the-bone tender ribs using your oven.
Whether you are a beginner or a seasoned home cook, these tips will help you nail the perfect batch. We will cover everything from picking the right ribs at the store to the final glaze. By the end, you will wonder why you ever ordered ribs from a restaurant again.
Key Takeaways
- Low and slow cooking: Oven ribs work best at 275°F to 300°F for tender results.
- Foil wrapping traps moisture: It keeps the meat juicy and speeds up the cooking process.
- Remove the membrane first: This small step makes a big difference in texture and flavor.
- A simple dry rub is all you need: Brown sugar, paprika, garlic powder, and salt create amazing flavor.
- Rest your ribs after cooking: Letting them sit for 15 minutes helps the juices redistribute.
- Glaze at the end: A light brush of BBQ sauce in the last few minutes adds a beautiful finish.
- Leftovers reheat well: Store properly and you can enjoy oven ribs for days.
📑 Table of Contents
Why Foil Wrapped Baby Back Ribs in Oven Work So Well
The Science Behind Foil Wrapping Ribs
When you wrap ribs in foil, you create a mini oven inside your oven. The aluminum traps steam and heat around the meat. This keeps the temperature steady and the moisture locked in. The result is pork ribs that are incredibly tender and juicy.
Think of it like braising meat on the stovetop. The foil acts as a lid. It prevents the heat from escaping and keeps the rib surface from drying out. This is especially important for baby back ribs, which are leaner than other cuts and can dry out faster.
The steam also helps break down the connective tissue in the meat. Collagen turns into gelatin over time. This is what gives ribs that soft, melt-in-your-mouth texture. Without foil, you would need to cook them much longer to reach the same result.
Benefits of the Oven-Rib Method
Cooking ribs in the oven has many advantages. Here is why so many home cooks prefer this approach:
- Consistent heat: Ovens maintain a steady temperature better than most grills.
- No weather worries: Rain or snow does not stop you from making ribs.
- Easy cleanup: One foil-lined pan and you are done.
- Even cooking: The heat surrounds the ribs on all sides.
- Less monitoring: Once the ribs are in, you can focus on other dishes.
Compared to grilling, the oven method gives you more control. You can set the temperature and forget about it for a few hours. This makes it perfect for weeknight dinners or holiday meals when you want to spend time with family instead of standing over a hot grill.
Choosing the Right Baby Back Ribs
What to Look for at the Store
Not all racks of ribs are created equal. When you are shopping for baby back ribs, look for meat that is pink and firm. Avoid ribs that look gray or have a slimy texture. The fat should be white, not yellow.
Check the bone-to-meat ratio too. A good rack should have a nice layer of meat between the bones. If the bones are sticking out too far, the rack may be too lean. You want some fat to render during cooking, as this adds flavor and moisture.
Buy from a trusted butcher or meat counter when possible. They can often cut ribs to your preferred size. Some stores even sell St. Louis cut ribs, which are trimmed and easier to handle in the oven.
St. Louis Cut vs. Standard Ribs
Standard baby back ribs come with the rib tips still attached. These tips are mostly cartilage and can be chewy. St. Louis cut ribs have the tips removed, giving you a more uniform shape that fits better on a baking sheet.
Both cuts work great for foil wrapped ribs in the oven. The St. Louis style is often preferred because it cooks more evenly. However, standard ribs have more surface area, which means more flavor from the bones during cooking.
| Feature | Standard Ribs | St. Louis Cut |
|---|---|---|
| Shape | Irregular with tips | Uniform rectangle |
| Cooking Evenness | Good | Excellent |
| Meat Coverage | Varies by rack | Consistent |
| Best For | Smoking and grilling | Oven cooking |
Preparing Your Ribs Before the Oven
Removing the Membrane
This is the most important prep step, and many people skip it. The membrane is that thin, papery layer on the back of the rib rack. If you leave it on, it will not absorb any rub or smoke flavor. It also gets rubbery when cooked.
To remove it, flip the ribs bone-side up. Use a butter knife to loosen the membrane at one end. Once you have a grip, peel it off slowly. It should come away in one piece. If it tears, use a paper towel for better grip.
This step takes about two minutes but makes a huge difference. Your ribs will absorb the rub better and cook more evenly. Trust us on this one.
Making a Simple Dry Rub
A great dry rub is the foundation of amazing oven baked ribs. You do not need a long list of ingredients. A simple blend works perfectly for baby back ribs.
Here is a basic rub recipe to get you started:
- 2 tablespoons brown sugar
- 1 tablespoon paprika
- 1 teaspoon garlic powder
- 1 teaspoon onion powder
- 1 teaspoon salt
- 1 teaspoon black pepper
- 1 teaspoon cumin
- 1/2 teaspoon chili powder
Mix all the ingredients in a small bowl. Pat the ribs dry with paper towels first. Then apply the rub generously on all sides. Press it into the meat so it sticks. Let the ribs sit at room temperature for about 30 minutes before cooking.
This resting time allows the rub to penetrate the meat. It also brings the ribs closer to oven temperature, which helps them cook more evenly. Some cooks wrap the ribs in plastic wrap and refrigerate them overnight for deeper flavor.
The Step-by-Step Oven Rib Process
Oven Temperature and Timing
Low and slow is the golden rule for foil wrapped baby back ribs in oven. Set your oven to 275°F. This gentle heat breaks down the collagen in the meat without drying it out. Higher temperatures will cook the ribs faster but often result in tough, chewy meat.
For a full rack of ribs, plan on about 2.5 to 3 hours of cooking time. The exact time depends on the thickness of the meat and your oven’s accuracy. Here is a general guideline:
- Preheat the oven to 275°F.
- Place the ribs bone-side down on a large sheet of heavy-duty foil.
- Add a liquid to the foil. Apple cider vinegar, beef broth, or apple juice all work well.
- Wrap the ribs tightly in the foil, sealing the edges.
- Place the wrapped ribs on a baking sheet and put them in the oven.
- Cook for 2.5 to 3 hours until the meat is tender and pulls back from the bones.
You can also use the 3-2-1 method for a more advanced approach. With this method, you smoke the ribs for 3 hours unwrapped, then wrap them for 2 hours, and finish unwrapped for 1 hour with sauce. But for oven cooking, the foil-only method is simpler and just as effective.
Wrapping Technique
The way you wrap the ribs matters more than you might think. Use heavy-duty aluminum foil for the best results. Regular foil tears easily and does not hold in moisture as well.
Here is how to wrap properly:
- Lay out a double layer of foil on your work surface.
- Place the ribs in the center, bone-side down.
- Pour about 1/4 cup of liquid into the center of the ribs.
- Fold the foil over the ribs, creating a tight seal.
- Roll the edges upward to prevent steam from escaping.
- Place the wrapped ribs seam-side up on a baking sheet.
Do not make the wrap too tight. You want the ribs to have a little room to expand as they cook. The steam needs space to circulate around the meat. A snug wrap is good, but crushing the ribs will squeeze out moisture and affect the texture.
Checking for Doneness
The best way to check if your oven ribs are done is the bend test. Pick up a rack from one end with tongs. If the meat cracks slightly but does not fall apart, the ribs are ready. They should have a slight bend in the middle.
You can also use a meat thermometer. The internal temperature should reach at least 195°F to 203°F. At this range, the collagen has fully broken down and the meat is tender. Do not rely solely on time, as every oven is different.
Pro Tips for Perfect Ribs Every Time
Common Mistakes to Avoid
Even experienced cooks make mistakes when making ribs. Here are some common errors and how to avoid them:
- Skipping the membrane removal: This leads to a chewy, unpleasant texture that no amount of seasoning can fix.
- Cooking at too high a temperature: High heat dries out the meat before the collagen can break down.
- Using too much sauce too early: Sugar in BBQ sauce burns at high temperatures. Apply sauce only in the last 15 to 20 minutes.
- Not letting the ribs rest: Cutting into ribs immediately causes the juices to run out, leaving dry meat.
- Overcrowding the pan: Give the ribs space so heat can circulate evenly around them.
Avoiding these simple mistakes will elevate your ribs from good to outstanding. Most of these errors come from rushing the process. Low and slow is not just a saying, it is the key to success.
Expert Insights
Professional pitmasters agree that the foil method produces incredibly tender ribs. The key is patience. When you wrap ribs in foil and cook them at a low temperature, you are essentially braising the meat in its own juices.
One pitmaster shared that he always adds a small handful of brown sugar to the foil before wrapping. This creates a light caramelization that adds a subtle sweetness to the meat. Another expert recommends spritzing the ribs with apple juice every hour during the unwrapped phase to keep the surface moist.
For those who want a deeper smoky flavor without a smoker, try adding a few wood chips to the foil before wrapping. Soak them in water for 30 minutes first. Place them on top of the ribs before sealing the foil. This adds a hint of smoke that complements the pork beautifully.
Quick Tips for Better Ribs
- Use a baking sheet with a rim to catch any drips.
- Line the baking sheet with foil for easy cleanup.
- Let ribs come to room temperature before cooking for more even results.
- Double-wrap the foil if your oven runs hot.
- Place a pan of water on the oven rack below the ribs to add humidity.
- Use a sharp knife to test tenderness, not just a thermometer.
- Save the foil juices and drizzle them over the ribs before serving.
Serving and Storing Your Ribs
Glazing and Saucing
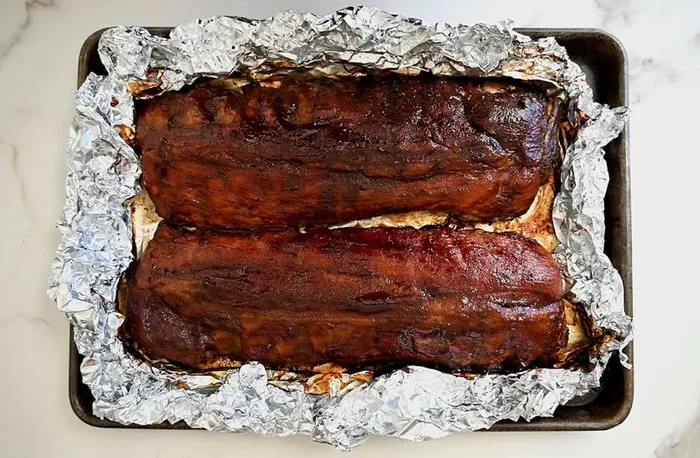
The final step in making foil wrapped baby back ribs in oven is adding the glaze or sauce. Remove the ribs from the oven and carefully unwrap the foil. The steam that escapes is full of flavor, so be gentle.
Brush a thin layer of your favorite BBQ sauce on all sides of the ribs. Place them back in the oven, unwrapped, for 10 to 15 minutes at 350°F. This caramelizes the sauce and gives the ribs a beautiful glossy finish.
Do not add too much sauce. You want a light coating, not a thick layer. The ribs already have plenty of flavor from the rub and the cooking juices. The sauce is just the finishing touch.
Let the ribs rest for at least 10 to 15 minutes before cutting. This allows the juices to settle back into the meat. Use a sharp knife or kitchen shears to cut between the bones. Serve on a platter with extra sauce on the side.
Leftover Storage Tips
Ribs taste even better the next day, which is great news if you are meal prepping. Store leftover oven baked ribs in an airtight container in the refrigerator. They will keep for up to 4 days.
To reheat, wrap the ribs in foil and warm them in the oven at 300°F for about 15 minutes. This keeps the meat moist and prevents the sauce from burning. Avoid reheating in the microwave, as it tends to dry out the ribs quickly.
You can also freeze cooked ribs for up to 3 months. Wrap them tightly in foil and place them in a freezer bag. Thaw overnight in the refrigerator before reheating.
Why This Method Beats the Competition
There are many ways to cook ribs, from grilling to smoking to boiling. Each method has its fans, but the foil oven method stands out for several reasons. It requires less equipment than smoking. It is more forgiving than grilling, where flare-ups can ruin a rack of ribs. And it produces results that rival any restaurant-quality plate.
The foil wrapping technique specifically solves the biggest challenge of oven ribs: moisture loss. By trapping steam, the meat stays juicy throughout the long cooking process. This is especially important for baby back ribs, which are naturally leaner and can dry out more easily than spare ribs.
Another advantage is consistency. When you use the oven, you control the temperature precisely. There are no hot spots from charcoal or gas flames. The heat wraps around the ribs evenly, resulting in perfectly cooked meat from edge to center every single time.
Common Questions About Oven Ribs
Can you cook ribs in foil without any liquid? Yes, but adding a small amount of liquid helps create steam and keeps the meat moist. Even a splash of water works in a pinch.
How do you know when ribs are done in the oven? The meat should be tender and pull back from the bone ends by about a quarter inch. The bend test and internal temperature of 195°F to 203°F are reliable indicators.
Can you use the same method for spare ribs? Absolutely. Spare ribs are fattier and take a bit longer, usually around 3.5 to 4 hours at 275°F. The foil method works great for both cuts.
Is it better to wrap ribs in foil or butcher paper? Foil creates a tighter seal and more steam, resulting in faster cooking and more tender meat. Butcher paper allows more smoke penetration but takes longer. For oven ribs, foil is the better choice.
What is the best BBQ sauce for oven ribs? A tangy, tomato-based sauce works well. Apply it during the last 10 to 15 minutes of cooking so it caramelizes without burning. Avoid sugary sauces earlier in the cook.
Can you prepare the rub the night before? Yes, and many experts recommend it. Apply the rub the night before, wrap the ribs in plastic wrap, and refrigerate overnight. The longer the rub sits on the meat, the deeper the flavor penetration.
Making foil wrapped baby back ribs in oven is one of the most rewarding things you can do in the kitchen. The process is simple, the results are impressive, and the leftovers are just as delicious the next day.
Start with quality ribs, remove the membrane, apply a flavorful rub, and let time do the work. The low heat and foil wrapping create the perfect environment for tender, juicy, fall-off-the-bone ribs. Once you master this method, you will never go back to overcooked, dry ribs again.
Grab a rack of ribs this weekend and give it a try. Your family and guests will be impressed. And you will have a new favorite way to cook ribs at home that works every single time.