How To Use Coleman Coffee Maker For The Best Morning Brew
Using a Coleman coffee maker is one of the easiest ways to enjoy fresh coffee outdoors or at home. This guide walks you through every step, from setup and brewing to cleaning and troubleshooting. Whether you are a camping enthusiast or just love a reliable coffee maker, you will find everything you need here.
Key Takeaways
- Easy Setup: Coleman coffee makers are simple to assemble and use, even for beginners.
- Great Brewing Tips: Learn the right water temperature, coffee grounds ratio, and brew time for the perfect cup.
- Outdoor Friendly: These coffee makers work great for camping and outdoor adventures where you need hot coffee without electricity.
- Easy Cleaning: Regular maintenance keeps your Coleman coffee maker performing well for years.
- Multiple Models: Coleman offers different types, from stovetop percolators to drip-style makers.
📑 Table of Contents
- How To Use Coleman Coffee Maker For The Best Morning Brew
- Understanding Your Coleman Coffee Maker
- Step-by-Step Guide To Using Your Coleman Coffee Maker
- Tips for the Perfect Cup of Camp Coffee
- Cleaning and Maintenance Tips
- Common Mistakes To Avoid
- Coleman Coffee Maker vs Other Portable Coffee Makers
- Final Thoughts
How To Use Coleman Coffee Maker For The Best Morning Brew
There is nothing better than waking up to a fresh cup of coffee, especially when you are out in the wild or enjoying a quiet morning at home. The Coleman coffee maker has been a trusted companion for campers, hikers, and coffee lovers for decades. It is simple, durable, and delivers a satisfying brew every single time.
In this guide, we will walk you through everything you need to know about using your Coleman coffee maker. From the first setup to the last sip, we have got you covered. You will learn the right way to fill it, brew your coffee, and keep it clean so it lasts for years. Let us get started.
If you have never used a camping coffee maker before, do not worry. Coleman designs these machines to be beginner-friendly. You do not need any special skills or fancy equipment. Just follow along, and you will be sipping hot coffee in no time.
Understanding Your Coleman Coffee Maker
Before you start brewing, it helps to know what you are working with. Coleman makes several types of coffee makers, and each one has its own charm. Let us break down the most common models so you can identify yours.
Types of Coleman Coffee Makers
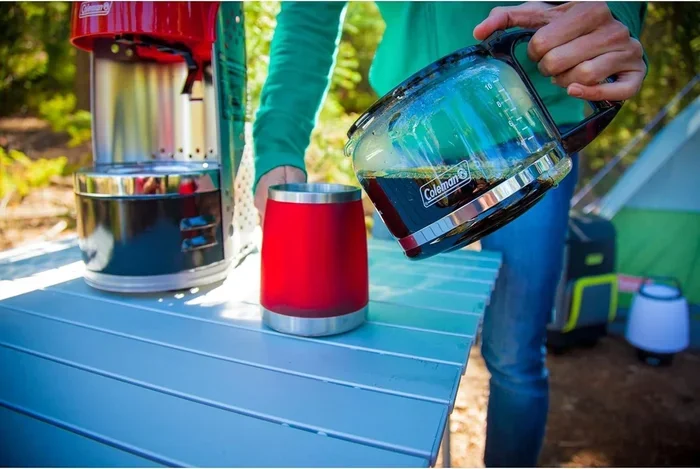
The most popular Coleman coffee makers fall into two main categories. The first is the stovetop percolator. This classic design uses heat from a stove or fire to cycle water through coffee grounds. It creates a strong, rich brew that many camping fans love.
The second type is the drip-style coffee maker. Some Coleman models run on electricity or battery power and work like a standard drip machine. These are great for car camping or backyard use where you have access to power.
There are also pour-over style Coleman options that use a simple gravity system. Hot water drips through a filter and coffee grounds into a pot below. These are the lightest and most portable options for backpackers.
Key Parts of a Coleman Coffee Maker
No matter which model you own, most Coleman coffee makers share these basic parts:
- Water reservoir — holds the water you will boil
- Brew basket — holds the coffee grounds or filter
- Glass or metal pot — collects the finished coffee
- Lid — keeps heat in during brewing
- Stove plate or base — for stovetop models, this sits on the burner
Knowing these parts makes the brewing process much easier. When you understand what goes where, everything flows smoothly.
Step-by-Step Guide To Using Your Coleman Coffee Maker
Now that you know your machine, let us get into the actual brewing process. Follow these steps for a perfect cup every time.
Step 1: Clean Your Coffee Maker Before First Use
Before you brew your first cup, give your Coleman coffee maker a good rinse. Wash all removable parts with warm water and a drop of dish soap. Rinse everything thoroughly. This removes any dust or residue from manufacturing and shipping.
For a deeper clean, you can use a dishwasher tablet without scrubbing to remove built-up oils or stains. Just drop a tablet in the water reservoir, fill with hot water, and let it sit. Rinse well before brewing.
Step 2: Fill the Reservoir With Fresh Water
Open the water reservoir and fill it with cold, fresh water. Use the measurement lines on the side to know how much water you are adding. A good rule of thumb is to match the water level to the number of cups you want to brew.
Just like you need to know how to measure a toaster oven for the right capacity, measuring water correctly for your Coleman coffee maker is key to a great brew.
Step 3: Add Coffee Grounds to the Basket
Place a coffee filter in the brew basket if your model uses one. Add ground coffee to the filter. A standard ratio is about two tablespoons of coffee grounds per six ounces of water. Adjust this based on how strong you like your coffee.
For a bolder cup, add a little more grounds. For a lighter cup, use a little less. Experiment until you find your perfect coffee strength.
Step 4: Heat and Brew
Place your Coleman coffee maker on the stove or heat source. For stovetop percolators, use medium heat. Let the water heat up and start cycling through the grounds. You will know it is working when you hear a bubbling sound.
For electric models, simply plug in the machine and turn it on. The brewing process usually takes about five to ten minutes. Do not leave it unattended, especially on a stove or open flame.
Step 5: Serve and Enjoy
Once the brewing cycle is complete, carefully remove the coffee maker from the heat. Let it sit for a minute or two so the grounds settle. Then pour your coffee into a mug and enjoy.
If you are camping and need your coffee to stay warm for a while, consider using a cozy or insulated mug. This keeps your hot water coffee at the perfect drinking temperature longer.
Tips for the Perfect Cup of Camp Coffee
Making great coffee with a Coleman maker is not just about following steps. A few extra tips can take your brew from good to amazing.
Use the Right Coffee Grounds
Freshly ground coffee always tastes better than pre-ground. If you are camping, bring a small portable grinder and grind your beans right before brewing. Use a medium grind for the best results with most Coleman models.
Avoid using very fine grounds, as they can clog the filter and make your coffee gritty. A medium-coarse grind works well for percolators and drip makers alike.
Control the Water Temperature
The ideal brewing temperature for coffee is between 195 and 205 degrees Fahrenheit. If you are using a stovetop percolator, bring the water to a boil and then reduce the heat slightly. This prevents the coffee from tasting bitter or burnt.
Too hot water can over-extract the coffee grounds and make your brew taste harsh. Too cool water will under-extract and leave your coffee weak and sour.
Preheat Your Coffee Maker
Before adding coffee grounds, pour a small amount of hot water through the system. This warms up the glass pot and the internal parts. Preheating helps maintain a consistent brewing temperature during the entire cycle.
Do Not Overfill the Basket
It is tempting to add extra coffee grounds for a stronger brew, but overfilling the basket can cause uneven extraction. The water needs room to flow through the grounds evenly. Stick to the recommended amount for the best results.
Keep Your Coffee Warm Without an Oven
One of the great things about a Coleman coffee maker is that it works in outdoor settings where you do not have an oven or electricity. If you want to keep your coffee warm after brewing, simply pour it into a thermos or insulated carafe. This is one of the best ways to keep food warm without an oven and enjoy hot coffee throughout the morning.
Cleaning and Maintenance Tips
Taking care of your Coleman coffee maker is essential for long-lasting performance. A clean machine brews better coffee and lasts for many seasons of outdoor adventures.
Clean After Every Use
After each brewing session, empty the used coffee grounds and rinse the basket and pot with warm water. Do not leave wet grounds sitting in the machine. This can cause mold and unpleasant odors.
For stovetop percolators, disassemble all removable parts and wash them by hand. Dry everything thoroughly before storing.
Deep Clean Monthly
Once a month, give your Coleman coffee maker a deep clean. Fill the reservoir with equal parts water and white vinegar. Run a brewing cycle without coffee grounds. The vinegar removes mineral buildup and hard water deposits.
After the vinegar cycle, run two to three cycles with plain water to rinse out any remaining taste. Your coffee maker will taste fresh and clean.
Remove Stains Without Scrubbing
If your glass pot has stubborn stains, you do not need to scrub hard. A dishwasher tablet without scrubbing works wonders. Drop a tablet into the pot, add warm water, and let it sit for a few hours. The stains will lift on their own.
This same trick works for the water reservoir and any other stained parts of your Coleman coffee maker.
Store Properly
When not in use, store your Coleman coffee maker in a cool, dry place. Make sure all parts are completely dry before packing it away. If you are storing it for the off-season, consider wrapping it in a cloth or bag to protect it from dust.
Common Mistakes To Avoid
Even experienced coffee makers make mistakes. Here are some common errors to watch out for when using your Coleman coffee maker.
Using the Wrong Amount of Coffee
Too much coffee grounds can clog the system and make your coffee taste overly bitter. Too little grounds will give you weak, watery coffee. Stick to the recommended ratio and adjust gradually until you find your sweet spot.
Ignoring Water Quality
The quality of water you use matters. If your water tastes bad, your coffee will taste bad too. When camping, use filtered or bottled water whenever possible. Avoid using water from questionable sources.
Brewing on Too High Heat
High heat may seem faster, but it can ruin your coffee. It causes the water to cycle too quickly through the grounds, leading to uneven extraction and a bitter taste. Use medium heat and let the machine do its work.
Skipping the Pre-Brew Rinse
Some people skip the step of rinsing the machine with hot water before brewing. This small step makes a big difference. It removes any dust or stale water from the system and preps the machine for optimal coffee brewing.
Not Replacing Worn Parts
Over time, rubber seals, filters, and other parts can wear out. If you notice leaks or slower brewing times, check the parts and replace anything that looks damaged. Using worn parts can affect the taste of your coffee and even cause safety issues.
Coleman Coffee Maker vs Other Portable Coffee Makers
How does a Coleman coffee maker compare to other portable options? Let us take a quick look.
| Feature | Coleman Stovetop Percolator | Electric Drip Maker | Pour-Over Cone |
|---|---|---|---|
| Power Source | Stove or fire | Electricity | Hot water only |
| Portability | High | Low | Very High |
| Brew Strength | Strong and bold | Medium | Clean and light |
| Ease of Use | Easy | Very Easy | Very Easy |
| Best For | Camping and fireside brewing | Car camping and home use | Backpacking and ultralight trips |
Each type has its strengths. The stovetop percolator is the go-to for serious campers who want bold coffee over an open flame. The electric drip maker is perfect for car camping where you have access to power. The pour-over style is ideal for backpackers who want to travel light.
If you love making coffee outdoors, you might also enjoy learning about how to keep food warm without an oven using similar principles. A thermos or insulated container works just as well for coffee as it does for soups and stews.
Final Thoughts
Using a Coleman coffee maker is one of the simplest and most rewarding ways to enjoy great coffee outdoors or at home. With the right technique, quality grounds, and a little practice, you can brew a cup that rivals any coffee shop. The key is to pay attention to the details — the water temperature, the coffee ratio, and the brewing time.
Keep your coffee maker clean, store it properly, and replace worn parts when needed. These small habits make a big difference in the long run. Your Coleman coffee maker is built to last, and with the care you give it, it will serve you well for many camping trips and morning routines to come.
So the next time you head out into the wild or want a reliable brew at home, reach for your Coleman coffee maker with confidence. You now have all the knowledge you need to make the best morning brew possible. Happy brewing!
Frequently Asked Questions
Can I use a Coleman coffee maker on a campfire?
Yes, Coleman stovetop percolators are designed to work on campfires and camp stoves. Just make sure to use medium heat and never leave it unattended. Keep the flame at a manageable level to prevent the glass pot from cracking.
What type of coffee grounds work best in a Coleman coffee maker?
A medium-coarse grind works best for most Coleman coffee makers. Avoid using very fine grounds, as they can clog the filter and make your coffee gritty. Freshly ground beans always produce the best flavor.
How do I clean my Coleman coffee maker without scrubbing?
You can use a dishwasher tablet without scrubbing to clean the glass pot and reservoir. Simply drop a tablet in, add warm water, and let it sit for a few hours. The stains will lift on their own, saving you time and effort.
Can I use a Coleman coffee maker for coffee while backpacking?
Yes, Coleman pour-over and lightweight percolator models are excellent for backpacking. They are portable, durable, and do not require electricity. Just bring along a small bag of coffee grounds and access to hot water.
Why does my Coleman coffee maker taste bitter?
Bitter coffee usually means the water is too hot or the brew time is too long. Use medium heat and remove the coffee maker from the heat as soon as brewing is complete. Also, make sure you are not using too many coffee grounds.
How often should I deep clean my Coleman coffee maker?
It is best to deep clean your Coleman coffee maker once a month. Use a water and white vinegar solution to remove mineral buildup. If you use your coffee maker frequently, you may need to clean it more often to maintain the best taste.