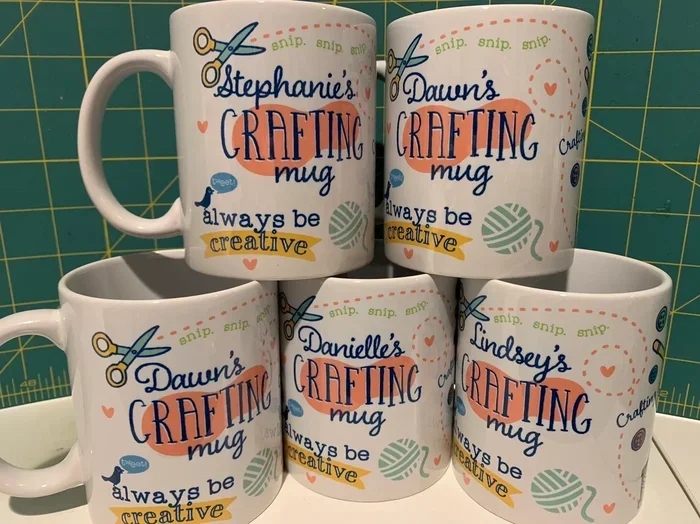
How To Make Your Own Personalized Coffee Mug at Home
Creating your own personalized coffee mug at home is easier than you think. With just a few simple materials and some creativity, you can craft custom drinkware that reflects your style or makes a perfect gift. This guide walks you through every method, from sublimation and hand-painting to clay crafting, so you can start your DIY coffee mug project today.
There is something truly special about sipping your morning coffee from a mug that you made yourself. A personalized coffee mug is more than just a drinking vessel. It is a statement piece, a daily reminder of your creativity, and often a heartfelt gift for someone you care about. Whether you are a seasoned crafter or a complete beginner, making your own custom mug at home is a rewarding experience that anyone can enjoy.
The beauty of creating a personalized coffee mug lies in the freedom it gives you. You choose the design, the colors, the text, and the style. No more settling for generic mugs from the store. With a few simple tools and some imagination, you can produce stunning custom drinkware that looks professional and feels uniquely yours. In this guide, we will explore every method, every tip, and every trick you need to know.
Over the years, DIY coffee mug crafting has exploded in popularity. People love the idea of making something practical and beautiful with their own hands. A custom coffee mug project is perfect for weekend crafting, family activities, or even starting a small side business. The methods we cover are beginner-friendly, budget-conscious, and produce results you will be proud to display in your kitchen.
Before we dive in, let us talk about what you will need. The supplies vary depending on the method you choose, but most projects require basic items like blank ceramic mugs, printing paper, special inks, or paint. You will also need access to an oven for curing and baking. The good news is that none of these steps are complicated. With patience and attention to detail, your first attempt will look amazing.
Key Takeaways
- Multiple Methods Available: You can personalize mugs using sublimation, hand-painting, clay building, or vinyl decal techniques.
- Affordable Materials: Most supplies are budget-friendly and available at craft stores or online.
- Oven Baking Is Key: Many methods require oven curing, similar to how you would brown flour in the oven at controlled temperatures.
- Easy Cleanup: Keeping your workspace clean is simple with the right techniques, much like cleaning an oven with a dishwasher tablet without scrubbing.
- Great Gift Idea: A handmade personalized mug makes a thoughtful and unique present for any occasion.
- Clay Mugs Are Possible: If you enjoy hands-on crafting, building a mug from clay connects to skills like making a clay oven at home.
📑 Table of Contents
- Why Make a Personalized Coffee Mug at Home
- Materials and Tools You Will Need
- Different Methods to Personalize Coffee Mugs
- Step-by-Step Guide to Creating Your Custom Mug
- Tips for Making Professional-Quality Personalized Mugs
- Caring for Your Personalized Coffee Mug
- Common Mistakes to Avoid
- Creative Ideas for Personalized Coffee Mug Designs
- Starting a Small Business with Personalized Mugs
- Conclusion
Why Make a Personalized Coffee Mug at Home
Making a personalized coffee mug at home offers benefits that go far beyond saving money. When you craft your own mug, you control every detail of the final product. Store-bought mugs often limit your choices to pre-made designs. But when you DIY, the possibilities are endless.
Here are some of the top reasons people love to create their own custom drinkware:
- Creative Expression: You can design a mug that matches your personality, your home decor, or your current mood. Try bold colors, funny quotes, or elegant patterns.
- Meaningful Gifts: A handmade mug shows thought and effort. Friends and family will treasure a custom coffee mug made just for them far more than a store-bought one.
- Cost Savings: Blank mugs and crafting supplies are affordable. One pack of blanks can produce multiple mugs, making each finished piece very cost-effective.
- Skill Building: Each project teaches you new techniques. Over time, your DIY coffee mug skills will improve, and you can tackle more complex designs.
- Eco-Friendly: Making your own mug reduces the need to buy mass-produced items. You can also reuse materials and minimize waste.
- Fun Activity: It is a wonderful way to spend quality time alone or with family. Kids especially love decorating their own mugs.
The satisfaction of holding a mug you created with your own hands is hard to beat. Every sip reminds you of the effort and love you put into the project. That is what makes personalize coffee cup crafting so special.
Materials and Tools You Will Need
Before you start any DIY coffee mug project, gather your supplies. Having everything ready prevents frustrating interruptions mid-project. The exact list depends on which method you choose, but here is a general overview of what you will need.
Basic Supplies for All Methods
- Blank ceramic mugs: White mugs work best for most methods because they show designs clearly. You can buy blank mugs in bulk online or at craft stores.
- Oven: Most personalization methods require baking or curing in an oven. Make sure your oven runs at a consistent temperature.
- Protective gloves: Some inks, paints, and adhesives can irritate your skin. Always wear gloves when handling chemicals.
- Soft cloths: You will need these for cleaning the mug surface before applying any design.
- Painter’s tape: This helps you create clean lines and protect areas you do not want painted.
Method-Specific Supplies
Each technique requires a few additional items. Here is a quick breakdown:
- Sublimation method: You need sublimation paper, sublimation ink, a sublimation printer, and heat-resistant tape.
- Hand-painting method: Get acrylic porcelain paint, fine-tip brushes, a paint palette, and clear sealant spray.
- Clay method: You need air-dry clay or kiln clay, sculpting tools, a rolling pin, and water for smoothing.
- Vinyl decal method: Pick up a vinyl cutter, adhesive vinyl sheets, transfer tape, and a weeding tool.
You do not need every single item right away. Start with one method that excites you, and build your supply collection over time. A simple personalize mugs at home kit can be assembled for under twenty dollars, making this hobby very accessible.
Different Methods to Personalize Coffee Mugs
There are several proven methods for creating a custom coffee mug at home. Each approach offers a different look, feel, and level of difficulty. Let us explore the most popular techniques so you can choose the one that fits your skill level and vision.
Sublimation Method
The sublimation method produces the most vibrant and durable results. It uses special ink that turns from solid to gas when heated, bonding permanently with the mug surface. This is the same technique used by professional mug manufacturers.
To use this method, you first design your artwork on a computer. Then you print it onto sublimation paper using a sublimation printer. After that, you wrap the printed paper around the mug and secure it with heat-resistant tape. Finally, you place the mug in the oven at around four hundred degrees Fahrenheit for several minutes. The heat causes the ink to sublimate and bond with the ceramic coating.
The result is a brilliant, full-color design that will not peel, fade, or scratch off easily. If you want the most professional-looking custom drinkware, sublimation is the way to go. The main downside is that you need a sublimation printer and special paper, which adds to the initial cost.
Hand-Painting Method
If you enjoy art and drawing, hand-painting is a wonderful way to create a personalized coffee mug. This method gives you complete artistic control and produces one-of-a-kind pieces. You use acrylic porcelain paint, which is specifically formulated to adhere to ceramic surfaces and withstand heat.
Start by cleaning your blank mug thoroughly. Then sketch your design lightly with a pencil if needed. Use fine-tip brushes for detailed work and wider brushes for filling in larger areas. Let your creativity flow. You can paint patterns, quotes, portraits, or abstract designs.
Once the paint is completely dry, you need to cure it in the oven. Follow the paint manufacturer’s instructions for temperature and time. Typically, you bake the mug at around three hundred degrees Fahrenheit for thirty minutes. After curing, apply a clear sealant spray to protect the design. Hand-painted mugs have a charming, handmade quality that makes them extra special.
Clay Building Method
For those who love working with their hands, building a mug from clay is the most hands-on approach. You can shape the entire mug yourself, from the body to the handle, giving you complete control over the form and thickness. This method connects to broader ceramic skills, much like learning how to make a clay oven at home.
You can use air-dry clay, which does not require a kiln, or traditional kiln clay if you have access to a kiln. With air-dry clay, you simply shape the mug, let it dry naturally over several days, and then paint and seal it. The process is slower but very rewarding.
Clay mugs have a rustic, artisanal look that store-bought mugs cannot replicate. Each piece is truly unique because of natural variations in the clay and the hand-building process. This method is perfect for people who enjoy the meditative quality of working with their hands.
Vinyl Decal Method
The vinyl decal method is excellent for people who want clean, precise designs without drawing or painting. You use a cutting machine, such as a Cricut or Silhouette, to cut your design out of adhesive vinyl. Then you weed away the excess vinyl, apply transfer tape, and place the decal onto the mug.
This method is very popular for creating matching sets of mugs or for designs with bold, clean lines. You can create text-based designs, simple logos, or geometric patterns. The vinyl acts as a protective layer over the mug surface, which adds durability.
After applying the decal, you can optionally bake the mug to help the vinyl adhere better. However, be careful with temperature settings, as too much heat can damage the vinyl. This method is fast, repeatable, and produces consistent, professional-looking results.
Step-by-Step Guide to Creating Your Custom Mug
Now that you understand the main methods, let us walk through a general step-by-step process. This guide works for most personalization techniques and will help you achieve the best results every time.
Step One: Choose Your Design
Start by deciding what you want on your mug. Think about the recipient if this is a gift, or your own personal style if it is for you. Popular coffee mug design ideas include:
- Funny quotes or sayings
- Family names and dates
- Favorite hobbies or interests
- Seasonal themes like holidays or birthdays
- Abstract patterns and geometric shapes
- Photos or illustrations printed via sublimation
Keep your design simple, especially for your first attempt. Complex designs can be overwhelming and may not translate well to a small curved surface like a mug. As you gain confidence, you can experiment with more intricate artwork.
Step Two: Prepare the Mug Surface
A clean surface is essential for any design to adhere properly. Wash the blank mug with warm soapy water and dry it completely. Avoid touching the area where you will apply the design with your bare fingers, as oils from your skin can interfere with adhesion.
If you are using the sublimation method, make sure the mug has a special polymer coating. Standard ceramic mugs will not work with sublimation ink. You can buy pre-coated sublimation blanks online or at craft supply stores.
Step Three: Apply Your Design
This step varies depending on your chosen method. For sublimation, wrap the printed paper around the mug and secure it. For hand-painting, apply your paint in thin, even layers. For vinyl, carefully place your cut decal onto the mug surface, smoothing out any air bubbles.
Take your time with this step. Rushing can lead to smudges, misalignment, or uneven application. Precision here makes a big difference in the final result.
Step Four: Cure or Bake the Mug
Most methods require oven baking to set the design permanently. Preheat your oven to the temperature recommended by your materials. For sublimation, this is typically around four hundred degrees Fahrenheit. For acrylic porcelain paint, it is usually around three hundred degrees Fahrenheit.
Place the mug on a baking sheet lined with parchment paper. Bake for the recommended time, usually between fifteen and thirty minutes. Use oven mitts to remove the mug and let it cool completely before handling.
If you are concerned about your oven getting dirty during the process, remember that keeping it clean is easy, much like how you can clean an oven with a dishwasher tablet without scrubbing afterward.
Step Five: Seal and Protect
For hand-painted mugs, apply a clear sealant spray once the paint has fully cured. This adds a protective layer that prevents chipping and fading. Hold the spray can about twelve inches from the mug and apply thin, even coats. Allow each coat to dry before applying the next.
Sublimation mugs and vinyl decal mugs usually do not need additional sealing, as the design is already permanently bonded. However, a light coat of food-safe sealant can add extra durability for mugs that will be washed frequently.
Tips for Making Professional-Quality Personalized Mugs
Even as a beginner, you can achieve results that look professional with a few key tips. These small adjustments make a huge difference in the quality and longevity of your finished personalized coffee mug.
Use High-Quality Blank Mugs
Not all blank mugs are created equal. Cheap mugs often have uneven coatings or porous surfaces that cause designs to bleed or crack. Invest in high-quality blanks from reputable suppliers. A smooth, well-coated mug gives your design the best foundation.
Preheat Your Oven Properly
Always preheat your oven before placing the mug inside. Consistent heat is crucial for even curing. Just like you would carefully monitor temperature when you brown flour in the oven, you need to maintain steady heat for mug curing. Fluctuating temperatures can cause designs to crack or peel.
Let Designs Dry Completely
Patience is your best friend in mug crafting. Whether you are painting or applying adhesive designs, make sure everything is fully dry before baking. Rushing the drying process can lead to smudges, bubbles, or peeling. Give your design at least twenty-four hours to air-dry before oven curing.
Test Your Oven Temperature
Not all ovens heat accurately. Use an oven thermometer to verify the actual temperature inside your oven. If your oven runs hot, it can damage your design. If it runs cool, the design may not cure properly. A simple thermometer takes the guesswork out of the process.
Create a Clean Workspace
Set up a dedicated crafting area that is clean and well-lit. Cover your work surface with newspaper or a silicone mat to protect it from spills and adhesive residue. A tidy workspace helps you focus and produces cleaner results.
Practice Before You Commit
If you are trying a new technique, practice on a spare mug first. This lets you refine your skills without wasting a perfect blank. Once you are confident, move on to your final piece with full assurance.
Caring for Your Personalized Coffee Mug
Your handmade personalized coffee mug deserves proper care to keep it looking beautiful for years. The way you clean and store your mug affects its longevity and the vibrancy of the design.
For sublimation and vinyl decal mugs, hand washing is always best. While many are labeled as dishwasher safe, the high heat and harsh detergents in a dishwasher can gradually degrade the design over time. Use warm water, mild soap, and a soft sponge to clean the interior and exterior gently.
For hand-painted mugs, hand washing is essential. The paint, even after sealing, can be vulnerable to the aggressive environment inside a dishwasher. Avoid soaking the mug for extended periods, as excess moisture can seep under the sealant and cause the paint to lift.
When storing your mugs, place them upright with soft cloth or paper towels between them to prevent scratching. If you stack them, use felt or foam dividers to protect the designs. Taking these simple precautions will keep your custom coffee mug looking vibrant and fresh.
If you ever need to deep clean your oven after a crafting session, the process is straightforward. A clean oven ensures better results for your next project. The good news is that modern cleaning methods make this quick and easy, much like using a dishwasher tablet to clean without the hassle of scrubbing.
Common Mistakes to Avoid
Even experienced crafters make mistakes sometimes. Knowing what to avoid saves time, materials, and frustration. Here are the most common errors people make when creating a personalized coffee mug:
- Skipping the surface cleaning: Oils and dust on the mug prevent designs from adhering properly. Always wash and dry the mug thoroughly before starting.
- Using the wrong type of mug: Not all ceramic mugs work with sublimation or oven baking. Make sure your blank mug is compatible with your chosen method.
- Overbaking: Leaving the mug in the oven too long or at too high a temperature can warp the mug or damage the design. Follow the recommended time and temperature exactly.
- Rushing the drying process: Applying designs before the previous layer is completely dry leads to smudging and peeling.
- Ignoring oven temperature accuracy: An uncalibrated oven can run hotter or cooler than the display shows. Always use a thermometer.
- Using non-food-safe materials: If the mug will be used for drinking, make sure all paints, inks, and sealants are food-safe and non-toxic.
Avoiding these mistakes will dramatically improve your results and make the entire crafting process more enjoyable. Each project is a learning opportunity, and soon you will be producing stunning DIY coffee mug creations with confidence.
Creative Ideas for Personalized Coffee Mug Designs
Coming up with a design can be the hardest part of the process. Here are some creative ideas to spark your inspiration and help you create mugs that people will love.
For Family and Friends
- Mugs with family names and a cozy family tree design
- Inside jokes or shared memories printed or painted on the mug
- Mugs featuring each family member’s favorite hobby or interest
- Seasonal mugs with holiday themes and warm messages
For Coworkers and Teachers
- Mugs with motivational quotes about coffee or productivity
- Custom mugs featuring the recipient’s job title or profession
- Mugs with fun team slogans or classroom themes
- Thank-you mugs for special occasions like retirements or graduations
For Yourself
- Mugs with your favorite song lyrics or book quotes
- Abstract designs in your favorite color palette
- Mugs featuring your own photography or artwork
- Seasonal designs that match your kitchen decor
The possibilities are truly endless. The best coffee mug design ideas come from your own interests and the people you are making the mug for. Do not be afraid to experiment with different styles and techniques until you find your signature look.
Starting a Small Business with Personalized Mugs
If you discover a passion for creating custom drinkware, you might consider turning your hobby into a small business. Many people have built successful ventures selling personalized mugs online through platforms like Etsy, eBay, or their own websites.
Start by perfecting your craft and building a portfolio of your best work. Offer a range of designs and customization options. Consider seasonal themes, pet portraits, and personalized names as popular product categories. Quality packaging and fast shipping will set you apart from competitors.
Marketing your mugs on social media platforms like Instagram and TikTok can generate a steady stream of customers. People love discovering unique, handmade products. With dedication and creativity, your personalized kitchen items business can grow from a hobby into a profitable side income.
Conclusion
Making your own personalized coffee mug at home is a fulfilling and creative endeavor that anyone can enjoy. Whether you choose sublimation, hand-painting, clay building, or vinyl decals, the process is accessible and the results are incredibly rewarding. You have the freedom to design something that is truly yours or to create a heartfelt gift that will be cherished for years.
Start with the method that excites you most, gather your supplies, and follow the steps outlined in this guide. Do not worry about perfection on your first attempt. Every mug you make will teach you something new and improve your skills. The joy of sipping coffee from a mug you crafted with your own hands is an experience like no other.
So grab your supplies, unleash your creativity, and start your next DIY coffee mug project today. Your perfect custom mug is waiting to be made.
Frequently Asked Questions
Can I use any mug for sublimation?
No, you need a mug with a special polymer coating. Standard ceramic mugs will not work with sublimation ink because the ink needs a specific surface to bond with permanently. Look for blanks labeled as sublimation-ready or polymer-coated for the best results.
Is it safe to drink from a hand-painted mug?
Yes, as long as you use acrylic porcelain paint that is labeled as food-safe and non-toxic. Always apply a clear sealant after painting and curing. Hand washing is recommended to preserve the design and ensure the mug remains safe for daily use.
How long does a personalized mug last?
A well-made personalized coffee mug can last for many years with proper care. Sublimation mugs are the most durable because the design is permanently bonded to the ceramic. Hand-painted mugs can also last a long time if you seal them properly and wash them by hand.
Do I need expensive equipment to start?
No, you can start with basic and affordable supplies. A pack of blank mugs costs just a few dollars, and basic painting supplies are widely available at craft stores. If you want to try sublimation, a budget sublimation printer can be found for under one hundred dollars.
Can I make mugs as gifts for special occasions?
Absolutely. Personalized mugs make wonderful gifts for birthdays, holidays, weddings, anniversaries, and teacher appreciation. Adding a personal touch like a name, photo, or inside joke makes the gift extra meaningful and memorable.
What is the best method for beginners?
The vinyl decal method and hand-painting method are the most beginner-friendly. They require minimal equipment and are easy to learn. Sublimation produces the most professional results but requires a sublimation printer and special paper, making it a slightly bigger investment to start.
=== FAQS ===
Can I use any mug for sublimation?
No, you need a mug with a special polymer coating. Standard ceramic mugs will not work with sublimation ink because the ink needs a specific surface to bond with permanently. Look for blanks labeled as sublimation-ready or polymer-coated for the best results.
Is it safe to drink from a hand-painted mug?
Yes, as long as you use acrylic porcelain paint that is labeled as food-safe and non-toxic. Always apply a clear sealant after painting and curing. Hand washing is recommended to preserve the design and ensure the mug remains safe for daily use.
How long does a personalized mug last?
A well-made personalized coffee mug can last for many years with proper care. Sublimation mugs are the most durable because the design is permanently bonded to the ceramic. Hand-painted mugs can also last a long time if you seal them properly and wash them by hand.
Do I need expensive equipment to start?
No, you can start with basic and affordable supplies. A pack of blank mugs costs just a few dollars, and basic painting supplies are widely available at craft stores. If you want to try sublimation, a budget sublimation printer can be found for under one hundred dollars.
Can I make mugs as gifts for special occasions?
Absolutely. Personalized mugs make wonderful gifts for birthdays, holidays, weddings, anniversaries, and teacher appreciation. Adding a personal touch like a name, photo, or inside joke makes the gift extra meaningful and memorable.
What is the best method for beginners?
The vinyl decal method and hand-painting method are the most beginner-friendly. They require minimal equipment and are easy to learn. Sublimation produces the most professional results but requires a sublimation printer and special paper, making it a slightly bigger investment to start.