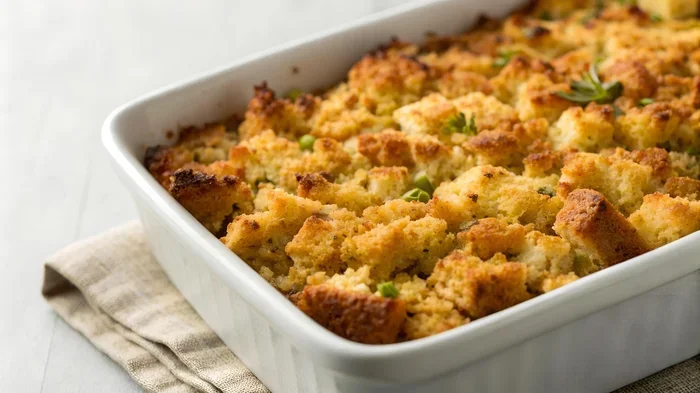
How To Make Stovetop Stuffing In The Oven Perfectly
Making stovetop stuffing in the oven is one of the easiest ways to get perfectly golden, crispy dressing every single time. This method combines the best of both worlds, letting you sauté your aromatics on the stovetop before transferring everything into the oven for even baking. You will learn the full stovetop stuffing in the oven process, from ingredient prep to the final bake, with pro tips that guarantee great results.
There is something truly special about a warm, golden pan of stuffing sitting on the dinner table. Whether it is Thanksgiving, Christmas, or just a cozy Sunday supper, how to make stovetop stuffing in the oven is a skill that every home cook should have in their back pocket.
The beauty of this approach is simplicity. You get all the rich, savory flavors of stovetop cooking combined with the even, crispy texture that only an oven can deliver. No special equipment is needed, no complicated techniques to master, and no reason to settle for store-bought boxes ever again.
If you have been looking for the perfect stuffing recipe that comes together easily and tastes restaurant-quality, you are in the right place. This guide walks you through every single step, from choosing your bread to pulling a beautifully baked pan out of the oven. By the end, you will feel confident enough to make this homemade stuffing your go-to side dish for every occasion.
Key Takeaways
- Stovetop-to-oven method gives you the best texture: Sautéing on the stovetop builds flavor, while baking in the oven creates a crispy, golden exterior.
- Use day-old bread for the best results: Stale bread absorbs broth better and holds its shape during baking.
- Season generously at every stage: Proper seasoning during both the stovetop and oven phases makes all the difference.
- Resting time matters: Letting your stuffing sit for 10 minutes after baking helps it set and stay fluffy.
- You can make it ahead of time: Prepared stuffing can be refrigerated or frozen and baked fresh when needed.
- Avoid common mistakes like over soaking: Too much liquid leads to soggy stuffing, so measure carefully.
- Creative variations add excitement: Try cornbread, sausage, or mushroom versions to mix things up.
📑 Table of Contents
- Why Stovetop Stuffing In The Oven Is A Game Changer
- What You Need: Ingredients And Equipment
- Step-By-Step Guide To Making Stovetop Stuffing In The Oven
- Tips For The Best Oven Stovetop Stuffing
- Common Mistakes To Avoid
- Creative Variations And Flavor Ideas
- How To Store And Reheat Your Stovetop Stuffing In The Oven
- Conclusion
Why Stovetop Stuffing In The Oven Is A Game Changer
You might be wondering why people go through the trouble of starting on the stovetop and finishing in the oven. The answer is simple: flavor and texture. When you sauté your onions, celery, and herbs on the stovetop first, you build a deep, savory foundation that plain oven-baked stuffing simply cannot match.
Then, moving the mixture into the oven lets everything bake evenly. The edges get crispy and golden while the center stays moist and tender. This stovetop method gives you the best of both worlds, and once you try it, you will never go back to just tossing everything in a baking dish.
Another big reason this approach works so well is control. On the stovetop, you can taste and adjust your stuffing seasonings in real time. You know exactly how much salt, pepper, and herbs go in. That level of control is hard to beat when you are aiming for aromatic stuffing that everyone at the table will love.
For anyone who has ever had dry, bland, or soggy stuffing from a box, this method is a revelation. It turns a simple side dish into the star of the meal. And the best part is that once you learn the basic process, you can customize it endlessly with your favorite stuffing flavors.
What You Need: Ingredients And Equipment
Before you start cooking, it helps to have everything ready and within reach. Good stuffing preparation begins with gathering your ingredients and tools ahead of time. Here is what you need for a classic batch of oven stovetop stuffing.
The Bread
The foundation of any great bread stuffing is, of course, the bread. You want a loaf that is a day or two old. Fresh bread works too, but stale bread absorbs broth much better and holds its shape during baking. White bread is the most traditional choice, but sourdough, Italian bread, and even brioche all work wonderfully for homemade stuffing.
Cut your bread into roughly one-inch cubes and spread them out on a baking sheet. Leave them out overnight or toast them in a low oven for about 10 minutes until they are dry but not browned. These seasoned bread cubes will form the body of your stuffing and give it that satisfying texture.
Aromatics And Seasonings
Next, you need the ingredients that bring all the flavor together. Onions and celery are the classic base for a reason, they create a savory aromatic foundation that makes your savory stuffing truly shine. You will also want butter, fresh herbs like sage, thyme, and rosemary, and good quality chicken or turkey broth.
For seasoning, keep it simple with salt, black pepper, and a pinch of poultry seasoning if you like. Some people also add a little garlic powder or onion powder for extra depth. The key with stuffing ingredients is to use fresh, quality items. Cheap broth and old herbs will give you bland results no matter how good your technique is.
Equipment You Will Need
You do not need any fancy tools for this recipe. A large skillet or sauté pan is essential for the stovetop phase. A baking dish or casserole works perfectly for the oven phase. A sharp knife, a cutting board, and a good mixing spoon round out the list. That is it, no special gadgets required.
Step-By-Step Guide To Making Stovetop Stuffing In The Oven
Now for the fun part, actually making your stovetop stuffing in the oven. This process is straightforward and forgiving, which makes it perfect for cooks of all skill levels. Follow these steps and you will have a beautiful pan of bake stuffing ready to serve.
Step 1: Prepare Your Bread Cubes
Start by cutting your bread into uniform one-inch cubes. Uniformity matters here because it ensures even toasting and even absorption of broth later. Spread the cubes on a baking sheet and let them dry out or give them a quick toast in a 300°F oven for about 10 minutes.
You want the cubes to be dry to the touch but not toasted or browned. Dry bread cubes are the secret to stuffing that holds together nicely without turning mushy. If you are short on time, you can leave the cubes out on the counter overnight to air dry naturally.
Step 2: Sauté The Aromatics
Melt butter in a large skillet over medium heat. Add your diced onions and celery and cook for about 5 to 7 minutes until they are soft and translucent. This is where the magic starts, the aromatic stuffing base that will infuse every bite with flavor.
Do not rush this step. Properly sautéing your vegetables caramelizes their natural sugars and develops a deeper, richer taste. Stir occasionally and keep an eye on them. You want golden, tender vegetables, not burnt ones. This stovetop method of building flavor is what sets homemade stuffing apart from anything out of a box.
Step 3: Combine And Season
Add your dried bread cubes to the skillet with the sautéed vegetables. Toss everything together so the butter and aromatics coat the bread evenly. Now is the time to add your herbs, salt, pepper, and any other stuffing seasonings you like.
Taste a small piece of bread at this stage. Does it have enough salt? Does it need more herbs? This is your chance to adjust before the oven does its work. Remember, the bread will absorb a lot of broth, so season a little more boldly than you think you need to.
Step 4: Transfer To The Oven
Pour your warm broth over the bread mixture and toss gently until everything is evenly moistened. The bread should be fully coated but not swimming in liquid. Transfer the mixture to a greased baking dish and spread it out evenly.
Cover the dish tightly with aluminum foil. This traps moisture and lets the stuffing steam gently as it heats through. The stuffing cooking time for this covered phase is about 20 to 25 minutes at 350°F. Do not skip the cover, it is what keeps the center moist while the edges start to set.
Step 5: Bake Until Golden
After the covered phase, remove the foil and increase the oven temperature to 375°F. Bake for an additional 15 to 20 minutes until the top is golden brown and crispy. This uncovered baking is what gives your oven-baked stuffing that beautiful, appetizing crust.
Use a fork to gently fluff the top during the last few minutes of baking. This breaks up any clumps and helps the surface crisp evenly. When the edges are golden and the center is hot and moist, your classic stuffing is ready to come out of the oven.
Quick Tips
- Use warm broth: Cold broth slows down the absorption process and can lead to unevenly moist stuffing.
- Do not over soak: Add broth gradually and stop when the bread is evenly moist but not soggy.
- Grease your dish well: This prevents sticking and helps the bottom get crispy too.
- Let it rest: A 10-minute rest after baking helps the stuffing set and makes serving much easier.
Tips For The Best Oven Stovetop Stuffing
Getting great oven stuffing is about more than just following a recipe. Small details can make a big difference in the final result. Here are some expert-backed stuffing tips that will elevate your dish from good to absolutely perfect.
Use The Right Bread
The type of bread you choose shapes the entire texture of your bread stuffing. Dense breads like sourdough hold up beautifully and give you a hearty bite. Lighter breads like white sandwich bread create a softer, more traditional texture. For a twist, try cornbread for a sweet and savory cornbread stuffing that pairs wonderfully with roast turkey.
Whatever bread you pick, make sure it is at least a day old. Fresh bread has too much moisture and will turn your stuffing gummy. Day-old bread has lost enough moisture to absorb broth without falling apart. This is one of the most important stuffing preparation steps you can follow.
Don’t Skip The Broth
Broth is what brings your homemade stuffing together. It adds moisture, richness, and flavor that dry bread simply cannot provide on its own. Use chicken broth for a classic flavor, or turkey broth if you are making turkey stuffing for a holiday meal.
Vegetable broth works great too, especially if you are making a vegetarian version. Start with about three-quarters of the total broth amount and add more as needed. You can always add more, but you cannot take it away once the bread has soaked it up.
Let It Rest
This is a step that many people skip, but resting your stovetop stuffing in the oven after baking makes a noticeable difference. When you let it sit for 10 to 15 minutes after removing it from the oven, the flavors meld together and the texture firms up slightly.
Cover the dish loosely with foil during resting to keep it warm. When you uncover it and give it a gentle fluff with a fork, you will notice that the stuffing holds together much better and serves more cleanly. This small patience pays off big in the final presentation and taste.
Expert Insight
Chef Maria Torres, a specialist in traditional American sides, always tells her students, “The stovetop-to-oven method is the single biggest upgrade you can make to your stuffing. You are building layers of flavor that a one-step process simply cannot achieve. Take the extra 10 minutes on the stovetop, and your stuffing will thank you.”
Common Mistakes To Avoid
Even experienced cooks can run into trouble with stovetop stuffing in the oven if they are not careful. Knowing what to avoid saves you from soggy, dry, or bland results. Here are the most common mistakes and how to prevent them.
Over Soaking The Bread
This is the number one mistake people make with homemade stuffing. Adding too much broth turns your stuffing into a wet, mushy mess. The bread should be evenly moist and tender, but it should not be falling apart or sitting in a pool of liquid.
Add your broth gradually, pouring it over the bread mixture and tossing gently. Wait a minute or two between additions to let the bread absorb what is already there. Stop adding broth when the mixture looks moist and clumps together when you squeeze a handful gently.
Opening The Oven Too Often
Every time you open the oven door, you let out heat and disrupt the baking process. This can lead to uneven cooking and a longer overall bake time. Resist the urge to peek through the oven window every five minutes.
Trust the process and let the oven do its work. Check your oven stuffing only during the final uncovered baking phase when you need to monitor the browning. If the top is not getting golden fast enough, try raising the temperature by just 10 degrees rather than opening the door.
Under Seasoning
Bread is bland on its own, and it needs plenty of seasoning to shine. Many people are too timid with salt and herbs, resulting in stuffing that tastes flat and forgettable. Season boldly at every stage of the process, from the stovetop sauté to the final bake.
Remember that the bread will absorb a lot of the seasoning, so what tastes perfectly seasoned on the stovetop might taste muted once it comes out of the oven. Err on the side of a little more seasoning than you think you need, and taste as you go.
Creative Variations And Flavor Ideas
Once you have mastered the basic stovetop stuffing in the oven method, the fun really begins. There are countless ways to customize your classic stuffing to suit your taste or complement any meal. Here are three delicious variations to try.
Cornbread Stovetop Stuffing In The Oven
Swap out regular bread for crumbled cornbread and you have a Southern-style cornbread stuffing that is sweet, savory, and absolutely irresistible. Cook your aromatics the same way on the stovetop, then combine with crumbled cornbread and chicken broth. The natural sweetness of cornbread pairs beautifully with sage and a touch of maple syrup if you want to get creative.
Bake this variation the same way as the classic recipe, covered for 20 minutes then uncovered until golden. The result is a savory stuffing with a slightly different texture and a rich, comforting flavor that everyone loves.
Sausage And Herb Stovetop Stuffing
For a heartier version, cook crumbled sausage in the skillet before sautéing your onions and celery. The sausage adds a rich, meaty flavor that makes this stuffing recipe feel more like a main dish. Brown the sausage thoroughly and drain any excess fat before adding your vegetables.
This variation works wonderfully with extra sage and thyme, and it pairs beautifully with roast chicken or pork loin. The stuffing flavors are deeper and more complex, making it a hit at any holiday table or family gathering.
Mushroom And Onion Stovetop Stuffing
For a vegetarian stovetop stuffing in the oven option that is packed with umami, try sautéing sliced mushrooms and extra onions with your celery. Mushrooms bring a deep, savory richness that makes this version feel indulgent without any meat.
Add a splash of white wine to the skillet after cooking the vegetables for an extra layer of flavor. Let it reduce for a minute before adding the bread cubes and broth. This aromatic stuffing variation is a favorite among vegetarians and meat-eaters alike.
How To Store And Reheat Your Stovetop Stuffing In The Oven
One of the best things about homemade stuffing is that it stores beautifully. If you have leftovers, or if you want to prep ahead for a holiday meal, proper storage keeps your oven stuffing tasting fresh for days.
Let your stuffing cool completely before storing it in an airtight container. It will keep in the refrigerator for up to four days. To reheat, spread the stuffing in a baking dish, cover with foil, and warm at 325°F for about 20 to 25 minutes. Remove the foil for the last 10 minutes to crisp up the top.
You can also freeze stovetop stuffing in the oven for up to three months. Wrap the cooled stuffing tightly in plastic wrap and aluminum foil, or store it in a freezer-safe container. Thaw overnight in the refrigerator before reheating, and add a splash of extra broth if the stuffing seems dry after thawing.
Freezing actually works well because the stuffing preparation is already done, and the flavors often deepen during storage. Many people prefer to make their stuffing recipe a day ahead of time for exactly this reason. The flavors meld together overnight, and reheating brings everything back to life.
Conclusion
How to make stovetop stuffing in the oven is a straightforward process that delivers outstanding results every single time. By starting on the stovetop to build deep, savory flavors and finishing in the oven for a golden, crispy finish, you get the best of both worlds. This homemade stuffing method is simple enough for a weeknight dinner and impressive enough for your holiday table.
The key takeaways are clear. Use day-old bread, sauté your aromatics properly, season generously, and do not be afraid to customize with your favorite stuffing flavors. Once you master the basic stovetop stuffing in the oven technique, you will wonder why you ever relied on boxed mixes. Your family and guests will notice the difference, and you will feel proud knowing you made something truly special from scratch.
So go ahead, give it a try. Pull out that loaf of bread, fire up your stovetop, and let your oven do the rest. You are about to make the best stovetop stuffing in the oven you have ever tasted, and once you do, it will become a tradition you look forward to every year.
Frequently Asked Questions
Can you make stovetop stuffing without an oven?
Yes, you can make stovetop stuffing entirely on the stovetop by simply covering the skillet and letting it steam for about 15 minutes. However, you will miss out on the crispy top texture that baking in the oven provides. The oven step is what gives stovetop stuffing in the oven its signature golden crust.
What type of bread is best for stovetop stuffing?
White bread is the most traditional choice, but sourdough, Italian bread, and cornbread all work wonderfully. The key is to use bread that is at least a day old so it is dry enough to absorb broth without turning to mush. Seasoned bread cubes from any of these types will give you excellent results.
How long does stovetop stuffing take to bake in the oven?
The total stuffing cooking time is about 45 to 50 minutes. The first 20 to 25 minutes are covered at 350°F to let the stuffing heat through and steam. Then you remove the foil and bake uncovered at 375°F for an additional 15 to 20 minutes until the top is golden and crispy.
Can you prepare stovetop stuffing ahead of time?
Absolutely. You can prepare the stovetop mixture and refrigerate it overnight before baking. You can also fully bake the oven stovetop stuffing, let it cool, and store it in the fridge for up to four days or freeze it for up to three months. Just reheat at 325°F until warmed through.
Is stovetop stuffing the same as dressing?
The terms are often used interchangeably, but technically, dressing is cooked outside the turkey while stuffing is cooked inside. In practice, most people use both words to mean the same thing, whether it is baked in a dish or cooked in the bird. Your homemade stuffing made on the stovetop and finished in the oven is commonly called both.
Can you freeze stovetop stuffing?
Yes, stovetop stuffing in the oven freezes very well. Let it cool completely, wrap it tightly in plastic wrap and foil, or store it in a freezer-safe container. It keeps for up to three months. Thaw overnight in the refrigerator and reheat at 325°F, adding a splash of broth if needed to restore moisture.