How To Make Percolated Coffee Taste Good Every Time
Percolated coffee can taste amazing when you master the basics of grind size, water temperature, and brewing time. This guide shows you exactly how to make percolated coffee taste good using easy, proven methods. Whether you use a stovetop percolator or an electric one, these tips will transform your morning cup into something truly special.
There is nothing quite like the rich aroma of percolated coffee filling your kitchen. But let us be honest. Sometimes that same coffee can turn out bitter, harsh, or just plain disappointing. If you have ever wondered why your percolator coffee does not taste as good as it should, you are not alone. Many coffee lovers struggle with this classic brewing method.
The good news is that making percolated coffee taste good is easier than you think. A few simple adjustments to your routine can completely transform your cup. In this guide, we will walk you through everything you need to know. From choosing the right coffee grounds to mastering water temperature, we have got you covered. By the end, you will know exactly how to make percolated coffee taste good every single time.
Percolated coffee has a long and proud history. Before drip machines and single-serve pod brewers took over, the percolator was king. It uses a simple process of cycling boiling water through coffee grounds repeatedly. This creates a bold, full-bodied cup that many people still prefer today. But the very thing that makes percolated coffee strong can also make it bitter if you are not careful.
Key Takeaways
- Use the Right Grind Size: A medium-coarse grind prevents over-extraction and bitter flavors in your percolated coffee.
- Control Water Temperature: Keeping water between 195°F and 205°F ensures optimal extraction and a smooth cup.
- Don’t Over-Brew: Limiting percolation time to 5-7 minutes stops your coffee from turning harsh and bitter.
- Clean Your Percolator Regularly: Residual oils and mineral buildup ruin the flavor of every brew.
- Use Fresh, Quality Beans: Freshly roasted and properly stored coffee beans make a noticeable difference in taste.
- Filter Your Water: Good water quality is one of the most overlooked factors in great-tasting percolated coffee.
📑 Table of Contents
Understanding How a Percolator Works
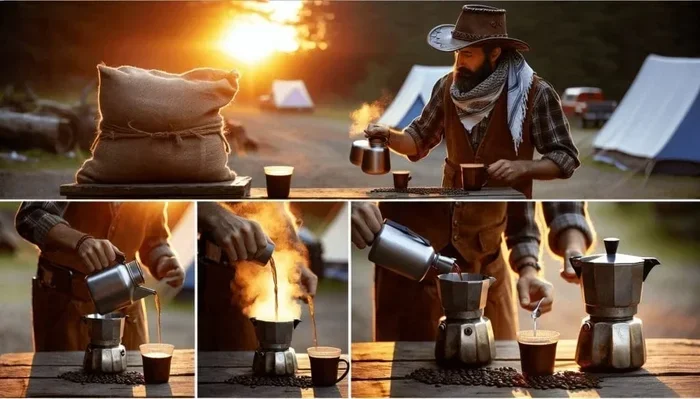
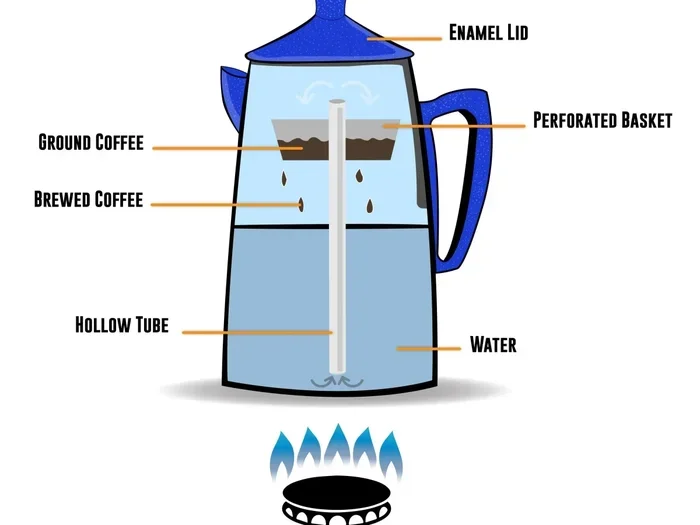
Before we dive into the tips, it helps to understand what is happening inside your coffee maker. A percolator works by pushing hot water up through a tube and over the coffee grounds. The water then drips back down into the pot. This cycle repeats over and over during the brewing process.
The Percolation Cycle
Each time the water cycles through the grounds, it extracts more flavor. This is called coffee extraction. When done correctly, extraction brings out the wonderful oils and flavors in your beans. When done incorrectly, it pulls out too much. That is when your coffee starts to taste bitter and harsh.
Think of it like steeping a tea bag. A short steep gives you a light, pleasant flavor. Leave it too long and it becomes bitter and unpalatable. The same principle applies to percolator coffee. The key is finding the right balance.
Electric vs. Stovetop Percolators
Not all percolators are the same. Electric percolators heat the water automatically and often have built-in timers. Stovetop percolators sit directly on a burner and require more attention. Both can produce excellent coffee, but they do require slightly different approaches. Understanding your specific coffee maker helps you tailor your brewing process for the best results.
Electric models are more convenient and harder to over-brew because many have automatic shutoffs. Stovetop models give you more control over the process, which experienced coffee drinkers often prefer. Either way, the principles we cover in this article apply to both types.
Choosing the Right Coffee Grounds
The foundation of great-tasting percolated coffee starts before you even turn on the heat. Your choice of coffee grounds matters more than most people realize. Using the wrong grind size or stale beans can ruin even the best percolator.
Grind Size Matters
For percolators, you want a medium-coarse grind. This is coarser than what you would use for a drip machine but finer than a French press grind. Here is why it matters. A fine grind has more surface area exposed to water. In a percolator, the water passes through the grounds multiple times. If the grind is too fine, you end up over-extracting the coffee. The result is a bitter, harsh cup that nobody wants to drink.
A medium-coarse grind allows water to flow through at the right speed. It extracts the good flavors without pulling out the bitter compounds. Think of it like a sieve. The water needs enough room to move through the grounds and carry the flavor with it.
Freshness of Your Coffee Beans
Always use freshly roasted coffee beans whenever possible. Beans that have been sitting on a shelf for months lose their flavor and aroma. Look for a roast date on the bag rather than an expiration date. Ideally, you should grind your beans within 15 minutes of brewing. This preserves the oils that give percolated coffee its rich, satisfying taste.
Store your beans in an airtight container away from heat and light. Do not keep them in the freezer unless you are storing them for a very long time. Freezer storage can introduce moisture, which degrades the quality of your beans over time.
How Much Coffee to Use
A good rule of thumb is to use about two tablespoons of ground coffee for every six ounces of water. You can adjust this based on your personal preference for coffee strength. Some people like their percolated coffee bold and intense. Others prefer a milder cup. Start with the standard ratio and adjust from there until you find your perfect coffee flavor.
| Water Amount | Coffee Grounds | Strength |
|---|---|---|
| 6 oz (1 cup) | 2 tablespoons | Standard |
| 12 oz (2 cups) | 4 tablespoons | Standard |
| 6 oz (1 cup) | 2.5 tablespoons | Strong |
| 12 oz (2 cups) | 5 tablespoons | Strong |
Mastering Water Temperature and Quality
Water is the backbone of your cup of coffee. It makes up over 98 percent of what you drink. So the quality and temperature of your water have a huge impact on the final taste. This is one of the most important steps in learning how to make percolated coffee taste good.
The Ideal Water Temperature
You want your water between 195°F and 205°F. Water that is boiling (212°F) is too hot. It extracts bitter compounds from the grounds too quickly. Water that is too cool will under-extract and leave your coffee tasting weak and sour.
If you do not have a thermometer, bring your water to a boil and then let it sit for about 30 seconds. This brings it down to the ideal range. For stovetop percolators, you want to start with hot water rather than cold. This speeds up the process and reduces the time the water spends cycling through the grounds.
Why Water Quality Makes a Difference
Tap water contains chlorine and other minerals that can affect the taste of your coffee. Using filtered water makes a noticeable difference. It removes impurities without stripping away the minerals that help bring out the natural flavors in your beans.
Some people swear by using spring water for their coffee brewing routine. Others use simple carbon filters. Whatever you choose, avoid distilled water. It is too pure and can make your coffee taste flat because there are no minerals to interact with the coffee grounds.
Perfecting the Brewing Process
Now that you have the right grounds and the right water, it is time to focus on the actual brewing process. This is where most people go wrong. The way you handle your percolator during brewing has a huge impact on the final taste.
Don’t Over-Percolate
This is the single biggest mistake people make with percolators. The machine keeps cycling water through the grounds over and over. If you let it go too long, you strip away the pleasant flavors and pull out the bitter ones. The sweet spot is usually between 5 and 7 minutes of total percolation time.
Many older percolators do not have timers. In that case, pay attention to the sound. When the percolator starts making a bubbling or gurgling sound, it is working. Once the bubbling slows down or becomes very frequent, it is time to remove it from the heat. Listen for the change in sound as your cue to stop brewing.
Preheat Your Percolator
Before you add your grounds and water, preheat your percolator with hot water. This warms up the metal or glass and helps maintain a consistent temperature during brewing. Temperature fluctuations during the coffee extraction process can lead to uneven flavors. Some of the grounds get brewed too hot while others get brewed too cool.
Simply fill your percolator with hot water, let it sit for a minute, and then dump that water out before adding fresh water and grounds. This small step makes a real difference in the quality of your cup.
Keep the Lid On
It might be tempting to peek at your coffee while it brews, but try to resist. Every time you lift the lid, you release heat and steam. This drops the temperature inside the percolator and can affect the brewing process. Keep the lid on and trust the process. Your patience will be rewarded with a better-tasting cup.
Use the Right Amount of Coffee
We mentioned the ratio earlier, but let us emphasize it again. Too little coffee and your brew will be weak and watery. Too much and you risk clogging the percolator and creating a muddy, over-extracted cup. Stick to the recommended ratio and adjust slightly based on your taste preferences.
Cleaning and Maintenance for Better Taste
This might seem like an obvious point, but clean equipment makes better coffee. Over time, oils from the coffee build up inside your percolator. Mineral deposits from your water accumulate on the heating element and inside the tubes. All of this affects the flavor of your next brew.
Regular cleaning keeps your percolator in top shape. After each use, disassemble the parts and wash them with warm, soapy water. Pay special attention to the tube and basket where coffee grounds sit. Rinse thoroughly to remove all soap residue.
For deeper cleaning, you can run a solution of water and white vinegar through a brewing cycle. This removes mineral buildup and stale coffee oils. Rinse with plain water afterward to remove any vinegar taste. Keeping your percolator clean is one of the simplest and most effective ways to improve the taste of your coffee.
If you deal with tough residue on other kitchen equipment, you might already know that cleaning solutions exist for various appliances. For instance, some people use dishwasher tablets for tough oven cleaning jobs without scrubbing. The same principle applies to your percolator. A good deep clean every few weeks keeps everything running smoothly and tasting fresh.
Also, consider the environment where you brew. If your kitchen gets very hot, your percolator may lose heat faster during the brewing process. Try to brew in a cool, draft-free area. This helps maintain the stable temperature that percolated coffee needs for the best extraction.
Common Mistakes That Ruin Percolated Coffee
Even experienced coffee drinkers make mistakes. Knowing what to avoid is just as important as knowing what to do. Here are the most common errors that lead to bad-tasting percolated coffee.
Using Pre-Ground Coffee That Is Too Old
Pre-ground coffee starts losing its flavor almost immediately after grinding. If you buy ground coffee from the store and it has been sitting on the shelf for weeks, it is not going to taste very good. Always grind your beans fresh if possible. If you must use pre-ground, buy smaller quantities and store them in an airtight container.
Using Boiling Water Directly
We mentioned this in the temperature section, but it deserves repeating. Pouring boiling water directly onto coffee grounds extracts too many bitter compounds. Let the water cool for 30 seconds after boiling before using it in your percolator.
Leaving Coffee on the Heat Too Long
Once brewing is complete, do not leave your percolated coffee sitting on the heat source. The continued heat continues to extract compounds from the grounds, making the coffee increasingly bitter. Transfer your finished coffee to a warm carafe or insulated mug right away. If you need to keep it warm, look for ways to maintain temperature without continued heating.
Keeping beverages warm without an oven or direct heat source is a common challenge in the kitchen. There are insulated containers and warming plates designed specifically for this purpose. The key is to remove the coffee from the heat source as soon as brewing is complete.
Skipping the Preheating Step
It is tempting to just add cold water and grounds and start brewing. But skipping the preheat step means your percolator has to work harder to reach the right temperature. This can extend the brewing time and lead to uneven extraction. A quick preheat takes only a minute and pays off in better flavor.
Expert Tips for the Perfect Cup
Once you have the basics down, these expert tips will take your percolated coffee to the next level. These are the small details that separate a good cup from a great one.
Experiment with Different Roast Levels
Medium roasts tend to work best in percolators because they have a balanced flavor profile. Dark roasts can become overly bitter when percolated due to the repeated extraction cycles. Light roasts may come through too thin and acidic. Try a medium roast first and then experiment from there to find what suits your taste.
Add a Pinch of Salt
This might sound strange, but a tiny pinch of salt added to the grounds before brewing can reduce bitterness. Salt neutralizes the bitter compounds in coffee without making it taste salty. It is a trick used by professional baristas and home coffee enthusiasts alike.
Grind Your Own Beans
If you have not already, invest in a simple burr grinder. Grinding your own beans just before brewing gives you control over the grind size and freshness. This single change can dramatically improve the taste of your percolator coffee. You will notice the difference in aroma and flavor right away.
Try Cold Brew Concentrate for Smooth Coffee
If you love the bold flavor of percolated coffee but find it too bitter, consider making a cold brew concentrate and diluting it with hot water. Cold brewing extracts fewer bitter compounds, resulting in a smoother, sweeter cup. You can heat the cold brew concentrate to your desired drinking temperature for a unique twist on traditional percolated coffee.
Key Takeaways
- Use a Medium-Coarse Grind: This prevents over-extraction and keeps your coffee smooth and balanced.
- Control Your Water Temperature: Aim for 195°F to 205°F for the best extraction and flavor.
- Limit Brewing Time to 5-7 Minutes: Over-percolation is the fastest way to ruin your coffee.
- Clean Your Percolator Regularly: Fresh, clean equipment is essential for great-tasting brews.
- Use Filtered Water and Fresh Beans: Quality ingredients make a noticeable difference in every cup.
- Preheat Before Brewing: This simple step ensures even extraction and a better-tasting result.
Conclusion
Making percolated coffee taste good is all about understanding the process and paying attention to the details. You do not need expensive equipment or complicated techniques. You just need the right grind size, clean water, proper temperature, and careful timing. These fundamentals work whether you use a vintage stovetop percolator or a modern electric model.
Start by making one change at a time. Try a fresh batch of beans with a medium-coarse grind. Pay attention to the percolation time. Notice how the flavor improves. Once you taste the difference, you will never go back to your old way of making percolator coffee again.
The beauty of percolated coffee is in its simplicity and bold flavor. With these tips, you can unlock the full potential of your percolator and enjoy a rich, satisfying cup every morning. Your coffee routine does not have to be complicated. Sometimes the simplest adjustments make the biggest difference.
So go ahead. Brew yourself a fresh cup. Follow these steps, trust the process, and savor every sip. Your perfect percolated coffee is waiting for you.
Frequently Asked Questions
Why Does My Percolated Coffee Taste Bitter?
Bitter percolated coffee is usually caused by over-extraction. This happens when you brew for too long, use water that is too hot, or grind your beans too finely. Try reducing your brewing time to 5-7 minutes, using water between 195°F and 205°F, and switching to a medium-coarse grind. These changes should eliminate the bitterness and give you a smoother cup.
Can I Reuse Coffee Grounds in a Percolator?
You can, but the second brew will be much weaker and less flavorful. The first pass extracts most of the desirable compounds from the grounds. If you do reuse them, expect a milder cup with less aroma. For the best taste, always use fresh grounds for each brew.
How Often Should I Clean My Percolator?
You should clean your percolator after every use with warm, soapy water. For a deeper clean that removes mineral buildup and old coffee oils, run a vinegar and water solution through a brewing cycle once a week. Regular cleaning keeps your coffee tasting fresh and prevents flavor contamination between brews.
Is Percolated Coffee Stronger Than Drip Coffee?
Yes, percolated coffee is generally stronger and bolder than drip coffee. This is because the water cycles through the grounds multiple times, extracting more flavor compounds. Some people love this intensity, while others find it too strong. You can adjust the coffee-to-water ratio to control the strength to your liking.
What Type of Coffee Beans Work Best for Percolators?
Medium roast beans tend to work best in percolators because they offer a balanced flavor profile that holds up well to the repeated extraction process. Dark roasts can become overly bitter, and light roasts may taste too thin. Experiment with different roasts to find what you enjoy most in your percolated coffee.
Can I Use a Percolator on an Induction Stove?
It depends on the percolator. Traditional stovetop percolators made of stainless steel or aluminum work on induction stoves, but you need to check that the base is compatible with induction heating. Some percolators have a magnetic base designed for induction cooktops. Electric percolators obviously do not need a stove at all and work with any standard outlet.