How To Make Dried Orange Slices In Your Oven Step By Step
Making dried orange slices in your oven is one of the simplest and most rewarding kitchen projects you can try. This guide walks you through every step, from choosing the best oranges to pulling out perfectly crispy, sweet chips. You will learn the ideal temperature, timing, and prep tips that guarantee great results every single time. Whether you want a healthy snack, a natural garnish, or a home fragrance idea, this method works beautifully. Follow along and discover how easy it is to dehydrate oranges right in your own kitchen.
There is something truly magical about how to make dried orange slices in oven. It sounds like a fancy kitchen skill, but honestly, it is one of the easiest things you can do. All you need is a simple home oven, a few fresh oranges, and a little patience. The result is a crispy, naturally sweet treat that looks beautiful and tastes amazing. Once you try this method, you will wonder why you never started sooner.
Dried orange slices have become incredibly popular in recent years. People use them as snack chips, decorative garlands, cocktail garnishes, and even natural air fresheners. They make wonderful gifts too. A small jar of homemade dried orange slices tied with a ribbon looks far more thoughtful than anything store-bought. The best part is that you do not need any special equipment. Your regular kitchen oven handles the job perfectly.
If you have been curious about oven dried fruit or wanted to try dehydrate oranges at home, this is the perfect place to start. This guide covers everything from picking the right oranges to storing your finished slices. You will find practical tips, common mistakes to avoid, and creative ideas for using your dried orange slices. Let us dive into the full step by step process.
Key Takeaways
- Use thin, even slices: Cutting your oranges between 1/8 and 1/4 inch thick ensures they dry evenly and don’t burn in the oven.
- Low and slow is the secret: Setting your oven between 200°F and 250°F keeps the natural sugars from caramelizing too fast and preserves the bright citrus flavor.
- Pat slices dry before baking: Removing surface moisture with a paper towel speeds up the drying process and helps prevent uneven results.
- Flip halfway through: Turning your orange slices midway through baking promotes consistent dehydration on both sides for a uniform crisp finish.
- Store properly for long shelf life: Keeping dried orange slices in an airtight container at room temperature can preserve them for several weeks, or longer in the fridge.
- Many uses beyond snacking: Dried orange slices make gorgeous garnishes, natural air fresheners, tea additions, and beautiful craft decorations for your home.
📑 Table of Contents
- What You Need Before You Start
- How To Prep Your Oranges for Drying
- Setting Up Your Oven for Dehydrating
- Step By Step Drying Process
- How To Know When Your Orange Slices Are Done
- Creative Ways To Use Your Dried Orange Slices
- Storing Your Dried Orange Slices Properly
- Common Mistakes To Avoid
- Expert Tips for Perfect Dried Orange Slices Every Time
- Why You Should Try Making Dried Orange Slices Today
What You Need Before You Start
Before you turn on the oven, it helps to gather everything you need. Having all your tools and ingredients ready makes the whole process smoother and more enjoyable. Here is what you will need for making dried orange slices in oven.
Choosing the Right Oranges
The type of orange you pick matters more than you might think. Navel oranges work great because they are seedless and have thick, flavorful peels. Blood oranges are another excellent choice. They look stunning when dried, with deep red and orange tones that make every slice pop. Valencia oranges and mandarin oranges also dry well and offer a slightly sweeter flavor profile.
Try to pick organic oranges if possible. Since you will be eating the peel, you want to avoid fruits that have been heavily treated with wax or pesticides. If organic is not available, wash your oranges thoroughly under warm water and use a vegetable brush to remove any surface residue. The citrus fruit quality directly affects the final taste and appearance of your dried slices.
Essential Tools and Supplies
You do not need much equipment for this project. Here is a simple list of what you will want on hand:
- Sharp knife or mandoline slicer: A mandoline makes it easy to get perfectly even slices, which is key for uniform drying.
- Cutting board: A sturdy surface keeps your countertops safe and makes prep faster.
- Paper towels or clean kitchen towel: You will use these to pat the slices dry before baking.
- Parchment paper or silicone baking mat: These prevent the slices from sticking and make cleanup a breeze.
- Baking sheet or oven tray: A flat, rimmed sheet works best for even heat distribution.
- Oven mitts: You will be handling hot trays, so keep these nearby.
- Airtight container for storage: Mason jars, ziplock bags, or sealed plastic containers all work well.
That is really all you need. No fancy citrus dehydrator required. Your oven does the job just fine, and you probably already own everything on this list.
How To Prep Your Oranges for Drying
Proper prep is the step most people skip, and it makes a huge difference. Taking a few extra minutes to prepare your oranges correctly leads to better texture, more even drying, and a far more appealing final product. This is where the real secret to perfect dried citrus slices lives.
Slicing the Perfect Thickness
Slice your oranges into rounds that are between 1/8 inch and 1/4 inch thick. This range is the sweet spot. Slices that are too thick will take much longer to dry and may still feel chewy in the center. Slices that are too thin will crumble and burn easily.
If you are using a knife, take your time and try to keep each slice the same thickness. A mandoline slicer is a fantastic tool for this because it gives you consistent results every time. Just be careful when handling it, as mandolines are very sharp.
Pro tip: Try to use oranges that are similar in size. This helps the slices dry at a more consistent rate. If you notice one orange is much larger or smaller than the others, adjust the slice thickness accordingly.
Removing Seeds and Patting Dry
Check each slice for seeds and remove them with the tip of your knife. Seeds can add a bitter taste and they do not dry well, so it is worth taking the extra few seconds to pick them out.
Once your slices are cut and seeded, lay them out on a clean kitchen towel or several layers of paper towels. Gently pat the top of each slice to remove surface moisture. This step might seem small, but it actually helps the drying process move along faster. The less surface water on the slices, the less time they need in the oven.
Some people like to lightly blot the slices with a paper towel on both sides. This is a good habit to build, especially if your oranges are particularly juicy. The goal is simply to remove the excess liquid sitting on the surface before they go onto the baking sheet.
Setting Up Your Oven for Dehydrating
This is the part where many beginners make mistakes, so pay close attention. Drying oranges in oven requires a specific approach that is different from regular baking. You are not trying to cook the oranges. You are trying to remove moisture slowly and gently. That is the key to getting crispy, flavorful orange chips that stay bright in color.
Ideal Temperature Range
The best temperature for drying orange slices is between 200°F and 250°F. This low heat allows the water inside the fruit to evaporate gradually without cooking or caramelizing the sugars too quickly. If your oven runs hot, aim for the lower end of this range, around 200°F.
Here is why temperature matters so much for oven dried fruit:
- Too high (above 275°F): The outside of the slices will brown or burn before the inside dries out. You will end up with crispy edges and a chewy, moist center.
- Too low (below 175°F): The drying process takes far too long, which can lead to mold growth if the slices sit too long before fully drying.
- Just right (200°F to 250°F): The moisture escapes steadily, leaving you with evenly dried, slightly crisp slices that still hold their shape and vibrant color.
Most home ovens have hot spots, so consider rotating your trays halfway through the process. This small step goes a long way toward achieving consistent results across all your dehydrated orange rings.
Using Parchment Paper and Rack Placement
Line your baking sheet with parchment paper or a silicone baking mat. This prevents the slices from sticking and makes cleanup much easier. Do not place the slices directly on the bare metal tray, as they will likely fuse to the surface.
Place the oven rack in the upper third of your oven. This position allows hot air to circulate more evenly around the slices. If you are drying a large batch and need to use two trays, you can place one on the upper rack and one on the lower rack. Just remember to swap the trays and rotate them every 30 minutes for even drying.
Step By Step Drying Process
Now for the fun part. This is where your kitchen fills with the most wonderful, fresh citrus aroma. The step by step drying process is simple, but there are a few details that make all the difference in the final quality of your dried orange slices.
Loading the Oven
Arrange your orange slices in a single layer on the prepared baking sheet. Do not overlap them or stack them. Each slice needs direct exposure to the hot air circulating inside the oven. If you have a lot of slices, use multiple baking sheets and rotate them as needed.
Leave a small gap between each slice. This might seem like wasted space, but it allows air to flow around every piece. Better airflow means faster, more even drying. Think of it like giving each slice its own little workspace in the oven.
Timing and Flipping
Most oven dried fruit takes between 2 and 4 hours to fully dry, depending on slice thickness and your oven’s heat. Here is a general timeline to follow:
- First hour: Check on your slices at the 60-minute mark. You may see some moisture pooling on the surface. This is normal.
- Second hour: Flip each slice carefully using tongs or a spatula. This exposes the other side to direct heat and promotes even dehydration.
- Third hour: Check for doneness. The slices should feel dry to the touch and look slightly shrunken.
- Fourth hour (if needed): Thicker slices may need extra time. Continue checking every 30 minutes until they reach your desired crispness.
Set a timer and check on your dried citrus slices regularly. Every oven is different, and the drying time can vary based on humidity levels in your kitchen and the specific model of your oven.
Adjusting Heat Throughout
Some ovens run hotter than the dial indicates. If you notice your slices browning too quickly, lower the temperature by 10 to 15 degrees. You can also prop the oven door open slightly with a wooden spoon to allow moisture to escape. This trick works wonders in humid climates or when you are drying a particularly large batch.
Remember, the goal is gentle, slow moisture removal. Rushing this process with high heat will ruin the texture and flavor of your homemade dried fruit. Patience is truly your best tool here.
How To Know When Your Orange Slices Are Done
Knowing when dehydrate oranges are fully dry can be tricky the first time around. Everyone’s oven behaves differently, and orange varieties vary in juice content. But there are clear signs that tell you your orange chips are ready to come out.
Visual and Texture Cues
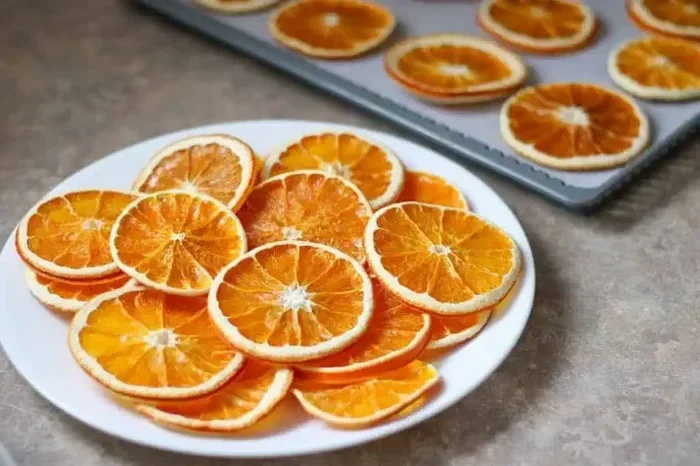
Look at the color of your slices. Properly dried dried orange slices should be lighter in color than fresh ones, with a slightly translucent quality. They should not be dark brown or black anywhere, as that indicates burning.
Touch the surface of a slice. It should feel dry and slightly leathery, not sticky or wet. If you press the center of a thicker slice, it should not feel moist or soft. The edges might curl slightly, which is perfectly normal and actually a good sign that moisture is escaping evenly.
The Snap Test
This is the most reliable way to check for doneness. Let a slice cool for a minute, then try to bend it gently. A fully dried slice will snap cleanly in half. If it bends or feels flexible, it needs more time in the oven.
Do the snap test on a few slices from different parts of the baking sheet. This helps you confirm that all the slices are drying at the same rate. If some are done and others are not, simply remove the finished ones and give the rest more time.
Once your dried fruit snacks pass the snap test, remove them from the oven and let them cool completely on the baking sheet. They will continue to firm up as they cool, so do not judge their final texture while they are still warm.
Creative Ways To Use Your Dried Orange Slices
The beauty of making dried orange slices in oven is that the possibilities go far beyond just snacking. Once you have a batch of beautiful, crispy slices, you will find yourself using them in all sorts of creative ways. Here are some of the best ideas.
As a Natural Garnish
Dried orange slices make the most gorgeous garnish for cocktails, mocktails, and hot drinks. Drop a slice into a mug of hot cocoa, tea, or mulled wine. It adds a pop of color and a subtle citrus aroma that elevates the whole drink. Dried citrus garnish also looks stunning on dessert plates, wedding cakes, and holiday platters.
Many coffee shops and restaurants use dried orange wheels as a simple but elegant finishing touch. You can create the same look at home for a fraction of the cost. Arrange them on a platter, hang them from a string as a garland, or place them around the rim of a serving tray.
In Cooking and Baking
Crushed dried orange chips add a burst of bright citrus flavor to all kinds of recipes. Try grinding them into a powder and sprinkling over oatmeal, yogurt, or ice cream. You can also chop them finely and fold them into muffin batter, cookie dough, or pancake mix.
Dried orange slices work beautifully in orange peel recipes like homemade marmalade, candied orange peel, or citrus sugar. Simply blend dried slices with granulated sugar and let it sit for a week. The result is a fragrant, citrus-infused sugar that is perfect for baking and sweetening drinks.
Making Orange Tea and Infusions
One of the most popular uses for dehydrated orange rings is in herbal teas and hot infusions. Drop a slice or two into hot water and let it steep for 5 to 10 minutes. The warm water releases the natural oils in the peel, creating a soothing, aromatic beverage that is both flavorful and caffeine-free.
You can also combine dried orange slices with other ingredients like cinnamon sticks, cloves, and star anise for a custom citrus tea blend. This makes a wonderful winter warmer or a thoughtful gift for friends and family.
Decorative Crafts and Home Fragrance
Dried orange slices have become a staple in natural home décor. String them together with twine or ribbon to create a rustic garland for your mantle or Christmas tree. You can also place them in a bowl on your coffee table for a simple, fragrant centerpiece.
For a natural home fragrance idea, simmer dried orange slices in a pot of water on the stove with cinnamon and vanilla. Your entire house will smell incredible, and it is a completely natural alternative to synthetic air fresheners. This method is especially popular during the fall and winter months when people love warm, cozy scents in their homes.
Storing Your Dried Orange Slices Properly
Proper storage is key to keeping your dried orange slices fresh and crispy for as long as possible. The biggest enemy of dried fruit is moisture, so you need to keep your slices away from humidity and air exposure.
Store your finished dried fruit snacks in an airtight container at room temperature. Mason jars with tight-fitting lids work perfectly. You can also use ziplock bags, but squeeze out as much air as possible before sealing. For longer storage, keep the container in a cool, dark place like a pantry or cupboard.
When stored correctly, homemade oven dried fruit stays good for about 2 to 3 weeks at room temperature. If you want them to last even longer, store the container in the refrigerator, where they can stay fresh for up to 2 months. You can also freeze dried orange slices for up to 3 months. Just make sure they are completely dry before freezing, or they may develop ice crystals.
Avoid storing your slices in direct sunlight or near heat sources, as this can cause them to become brittle or lose their flavor. A cool, dry, and dark storage spot is the ideal environment for preserving your natural fruit dehydration results.
Common Mistakes To Avoid
Even though making dried orange slices in oven is simple, there are a few common pitfalls that can ruin your results. Here are the mistakes to watch out for.
- Slices that are too thick: Uneven thickness leads to some slices drying out while others stay moist. Use a mandoline or be very deliberate with your knife cuts.
- Overcrowding the baking sheet: Stacking or overlapping slices blocks airflow and creates uneven drying. Give each slice plenty of space.
- Using too high a temperature: High heat burns the outside before the inside dries. Stick to the 200°F to 250°F range for best results.
- Skipping the flip: Flipping your slices halfway through ensures both sides dry evenly. Do not skip this step.
- Not letting slices cool completely before storing: Trapped warmth creates condensation inside the container, which leads to mold and spoilage.
- Using non-organic oranges without washing: Pesticides and wax coatings on conventional oranges can affect the taste and are not something you want to consume on the peel.
Avoiding these simple mistakes will save you time, ingredients, and frustration. A little attention to detail goes a long way when it comes to baking dried oranges at home.
Expert Tips for Perfect Dried Orange Slices Every Time
After making dried orange slices many times, I have gathered some tips that take the process from good to great. Here are a few expert-level suggestions that will help you get the best possible results.
First, experiment with different orange varieties. Each type offers a unique flavor and color when dried. Blood oranges give you a dramatic deep red hue. Cara Cara oranges offer a beautiful pinkish tone with a slightly berry-like sweetness. Mixing varieties on the same baking sheet can create a stunning visual effect.
Second, consider adding a light dusting of cinnamon or a spritz of lemon juice before drying. Cinnamon adds a warm, cozy flavor that pairs beautifully with citrus. A tiny squeeze of lemon juice on the slices before baking can help preserve their bright color and add a tangy twist. These small additions transform basic dried citrus slices into something truly special.
Third, keep a drying journal. Note the oven temperature, drying time, and variety of orange you used each time. Over time, you will build a personal reference guide that tells you exactly how long to dry oranges in your specific oven. This is a habit that serious natural fruit dehydration enthusiasts swear by.
Finally, do not throw away your leftover orange peels or ends. You can simmer them in water with sugar to make a simple candied orange peel syrup, or dry them separately for use in potpourri and sachets. Zero waste and maximum flavor.
Why You Should Try Making Dried Orange Slices Today
Making dried orange slices in oven is one of those rare kitchen projects that is easy, affordable, and deeply satisfying. You do not need expensive equipment or advanced cooking skills. A few oranges, your home oven, and about three hours of time are all you need to create something beautiful and delicious.
These dried fruit snacks are naturally sweet, completely free of added sugar, and packed with vitamin C and fiber. They are a healthier alternative to processed snacks and a wonderful way to use up oranges that are getting close to going bad. Instead of letting fruit go to waste, you turn it into something that lasts and tastes incredible.
The sensory experience alone is worth trying. Your kitchen will smell like fresh citrus while the slices dry in the oven. The warm, sweet aroma that fills your home is something no store-bought product can replicate. Once you start making oven dried fruit, it becomes a regular part of your kitchen routine.
So go ahead and grab a couple of oranges from your fridge. Follow the steps in this guide, and within a few hours, you will have a batch of crispy, flavorful dried orange slices ready to enjoy. They make a wonderful snack, a beautiful decoration, and a heartfelt homemade gift. Start today and discover just how simple and rewarding it is to dehydrate oranges in your own oven.
Frequently Asked Questions
Can I use a microwave instead of an oven to dry orange slices?
Yes, you can, but the results are not as consistent. Microwaves dry unevenly and can burn the edges quickly. If you must use a microwave, place slices on a microwave-safe plate lined with a paper towel and heat in short 30-second intervals, checking frequently. However, for the best texture and flavor, the oven method is far superior.
How long do dried orange slices last?
When stored in an airtight container at room temperature, they stay fresh for 2 to 3 weeks. In the refrigerator, they can last up to 2 months. Frozen dried orange slices can last for 3 months or more. Always make sure they are completely dry before storing to prevent moisture buildup.
Do I need to peel the oranges before slicing them for drying?
No, you do not need to peel them. The peel is the most flavorful part and it dries beautifully. Just wash the oranges thoroughly, slice them into rounds, and remove any seeds. The peel adds color, texture, and a concentrated citrus flavor to the final product.
Can I use a food dehydrator instead of the oven?
Absolutely. A food dehydrator is actually the traditional tool for this task and gives very consistent results. Set it to 130°F to 135°F and dry for 6 to 8 hours. However, using your oven is a great alternative if you do not own a dehydrator, and the results are just as delicious.
Why are my dried orange slices sticky even after baking?
Sticky slices usually mean they are not fully dried. The internal moisture has not fully escaped. Try returning them to the oven for another 30 to 60 minutes at a lower temperature. Also make sure you are not overcrowding the baking sheet, as poor airflow is a common cause of sticky results.
Can I add sugar or spices before drying the orange slices?
Yes, you can. A light sprinkle of cinnamon sugar or a dusting of chili powder adds a wonderful flavor dimension. You can also brush the slices lightly with honey before drying for extra sweetness. Just be aware that adding sugar or honey will slightly shorten the shelf life, so store them in the refrigerator if you use sweeteners.
=== CONCLUSION ===
How to make dried orange slices in oven is a simple, rewarding, and endlessly versatile kitchen project that anyone can do. From choosing the right oranges and slicing them to the perfect thickness, to setting the right oven temperature and knowing when they are done, every step is easy to follow and deeply satisfying. The process takes just a few hours, and the results are something you can enjoy for weeks.
Dried orange slices are not just a snack. They are a garnish, a tea ingredient, a home fragrance, and a craft supply all in one. Once you start making your own dried citrus slices, you will find new ways to use them every single week. They make wonderful gifts, beautiful decorations, and healthy treats that the whole family will love.
So grab some fresh oranges, preheat your oven, and give this method a try. Once you see how easy it is to dehydrate oranges at home, you will never go back to store-bought versions. The flavor, the aroma, and the satisfaction of creating something beautiful from a simple fruit is truly special. Happy drying!