How To Prepare T Bone Steak In Oven For Juicy Results
T Bone Steak In Oven cooking is simple and reliable. This guide shows you how to pick the best cut, season it lightly, and achieve a perfect crust. You’ll learn a foolproof oven method that delivers juicy, tender steak without any fuss.
Cooking a T Bone Steak In Oven is easier than you think. You don’t need a grill or a fancy kitchen. With just a few simple steps, you can enjoy a juicy, tender steak right at home. This method gives you control over the heat. It also lets you achieve a perfect pink center every time.
The oven method works well for thick cuts. It cooks the steak evenly from edge to edge. You get a beautiful crust after a quick sear. Many home cooks prefer this approach. It’s reliable and hard to mess up. Whether you’re a beginner or a seasoned cook, you’ll love the results.
In this guide, I’ll walk you through everything. You’ll learn how to pick the best steak. I’ll show you the seasoning basics. Then I’ll give you a clear, step-by-step cooking plan. You’ll also discover common mistakes to avoid. By the end, you’ll feel confident. You’ll know exactly how to prepare T bone steak in oven for juicy results.
Key Takeaways
- Thick-cut steaks work best: Choose at least 1.5 inches for even cooking and a great crust.
- Room temperature is key: Let the steak sit out for 45 minutes before cooking.
- Sear first, then oven: This two-step method builds a flavorful crust and cooks the inside evenly.
- Use a meat thermometer: It removes all guesswork and ensures perfect doneness.
- Rest the steak for 5–7 minutes: This locks in juices and keeps the meat tender.
- Cast iron is the ideal pan: It holds heat well and gives a beautiful sear.
📑 Table of Contents
Why Oven-Cooked T Bone Steak Is a Game-Changer
Grilling is great, but the oven offers something special. It gives you consistent heat. It also reduces the stress of flare-ups. You can cook a perfect steak even in winter. The oven method is gentle yet effective.
The Benefits of Oven Cooking
- Even cooking: Heat surrounds the steak. No hot spots.
- Easy temperature control: You set it and forget it.
- Less mess: No charcoal or gas flames to manage.
- Works for any cut: T bone, porterhouse, or bone-in ribeye all do well.
The oven also allows you to use a simple pan. A cast iron skillet is ideal. It holds heat well. You can sear the steak on the stovetop first. Then you move it into the oven. This two-step process creates a delicious crust.
When to Use This Method
Use the oven method for steaks that are at least 1.5 inches thick. Thinner cuts can dry out. A thick T bone steak needs slow, steady heat. The oven cooks it gently. You avoid burning the outside. This is perfect for bone-in steaks too. The bone adds extra flavor. It also helps the steak stay juicy.
Comparison: Oven vs. Grill
| Factor | Oven Method | Grill Method |
|---|---|---|
| Heat control | Precise and even | Can have hot spots |
| Weather dependence | Works indoors, any season | Requires outdoor setup |
| Crust formation | Great with a hot sear | Excellent from direct flame |
| Ease for beginners | Very easy | Requires more attention |
| Best for thick cuts | Yes, 1.5 inches or more | Yes, but needs careful timing |
The oven method gives you a gentle, even cook. A grill provides a smoky flavor, but it’s harder to control. For a reliable, juicy result, the oven is hard to beat.
Key Takeaways
- Oven cooking ensures even doneness: No more gray bands.
- It’s beginner-friendly: Hard to overcook with a thermometer.
- Works year-round: No need to fire up the grill.
Picking the Best T Bone Steak
The quality of your steak matters a lot. A great cut starts with good beef. You don’t need the most expensive option. But you do need to know what to look for.
What to Look for at the Butcher
- Marbling: Look for thin white lines of fat. These melt during cooking. They add flavor and juiciness.
- Color: The meat should be bright red. The fat should be creamy white.
- Thickness: Aim for 1.5 to 2 inches. This thickness cooks evenly.
- Bone-in cut: The T bone separates the strip loin and tenderloin. It’s a signature feature.
Many people confuse T bone and porterhouse. Both have a T-shaped bone. The difference is the size of the tenderloin. A porterhouse has a larger tenderloin. It’s often seen as a premium cut. But a T bone is just as delicious. For oven cooking, either works well.
Thickness Matters
A thin steak will overcook in the oven. It won’t have time to develop a crust. A thick steak gives you a buffer. The outside can sear while the inside stays pink. I recommend buying a steak that is at least 1.5 inches thick. If you can find 2 inches, even better. That’s the sweet spot for oven-baked steak perfection.
Key Takeaways
- Choose well-marbled beef: It stays juicy during cooking.
- Go thick: 1.5 inches minimum for even results.
- Don’t fear the bone: It enhances flavor.
Prep Work: Seasoning and Bringing Steak to Room Temperature
Preparation is the secret to a great steak. You can’t rush this step. Taking a little extra time makes a big difference. This phase sets the foundation for juicy results.
Simple Seasoning Blend
Keep it simple. A T bone steak doesn’t need a lot. You just need salt and pepper. That’s it. But the way you apply them matters.
- Take your steak out of the fridge 45 minutes before cooking.
- Pat it dry with paper towels. Moisture is the enemy of a good crust.
- Generously coat both sides with coarse salt.
- Add freshly cracked black pepper.
- Optional: add a tiny bit of garlic powder or smoked paprika.
Some people like to add garlic butter later. That’s a finishing touch. The salt draws out moisture at first. That’s okay. The moisture will be reabsorbed. This process seasons the meat deeply. It also helps create a beautiful crust.
Why Room Temperature Is Crucial
A cold steak going into a hot oven cooks unevenly. The outside overcooks before the inside warms up. By bringing the steak to room temperature, you ensure even cooking. The heat penetrates more uniformly. This is a key step for oven-baked steak success. Don’t skip it.
Quick Tips
- Pat dry thoroughly: Use a clean towel. Press gently.
- Season 45 minutes ahead: This gives the salt time to work.
- No oil on the steak: Oil goes on the pan, not the meat.
Key Takeaways
- Simple seasoning is best: Salt, pepper, and time.
- Room temp steak cooks evenly: 45 minutes out of the fridge.
- Dry surface equals better crust: Pat it dry.
Oven Method: Step-by-Step Cooking Guide
Now for the fun part. This is where your T bone steak comes to life. Follow these steps closely. You’ll get consistent results every time.
Preheat and Pan Selection
Start by preheating your oven. Set it to 400°F (200°C). While the oven heats, place a cast iron skillet on the stovetop. Cast iron is the best pan for this job. It retains heat incredibly well. It also gives you a great sear. If you don’t have cast iron, use a heavy oven-safe skillet.
Searing Before the Oven
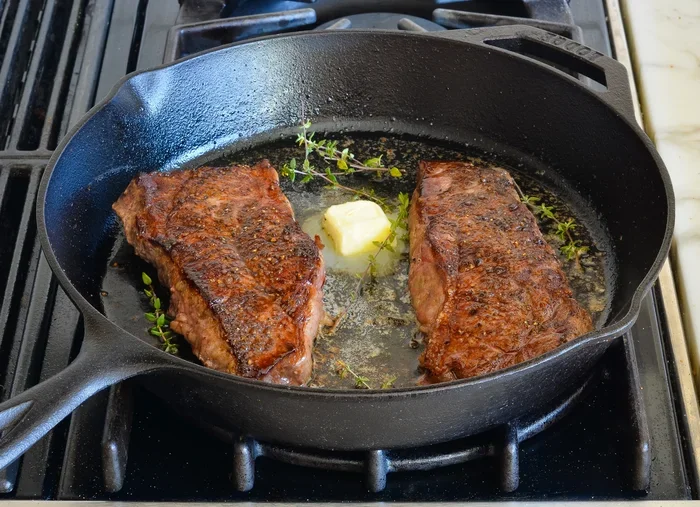
Add a small amount of high-smoke-point oil to the pan. Avocado oil or vegetable oil works well. Let the pan get very hot. You’ll see a shimmer in the oil. Carefully place the steak in the pan. You should hear a satisfying sizzle. Sear each side for about 2 minutes. This creates a flavorful crust. Don’t move the steak around. Let it sit. The crust will form naturally.
Oven Temperature and Time Table
After searing, transfer the skillet directly into the preheated oven. The oven does the rest of the work. Here’s a simple guide based on doneness and thickness. Use a meat thermometer for accuracy.
| Doneness | Internal Temperature | Oven Time (after searing) |
|---|---|---|
| Rare | 120–125°F (49–52°C) | 6–8 minutes |
| Medium Rare | 130–135°F (54–57°C) | 8–10 minutes |
| Medium | 140–145°F (60–63°C) | 10–12 minutes |
| Medium Well | 150–155°F (65–68°C) | 12–14 minutes |
| Well Done | 160°F+ (71°C+) | 14–16 minutes |
These times are for a 1.5-inch thick steak. Adjust for thicker cuts. The oven method is forgiving. You can always add a few more minutes. Just check the temperature often.
Checking Doneness with a Thermometer
A meat thermometer is your best friend. Insert it into the thickest part of the steak. Avoid touching the bone. The bone conducts heat differently. It can give a false reading. Pull the steak out a few degrees before your target temp. The temperature will rise during resting. This is called carryover cooking. It’s important for juicy results.
Expert Insights
Chef Michael Smith says, “The oven method takes the guesswork out of steak. You get a perfect crust and a consistent pink center. It’s the most reliable technique for home cooks.”
Key Takeaways
- Sear first, then oven: This two-step method builds flavor.
- Use a meat thermometer: It’s the only way to be sure.
- Adjust times for thickness: Thicker steaks need more time.
The Sear and Rest: Finishing Like a Pro
The final steps are just as important as the cooking. A good sear and a proper rest make all the difference. Don’t rush this part.
Getting the Perfect Crust
After the steak comes out of the oven, let it rest on the pan. You can give it a quick second sear if you like. Place the skillet back on the stovetop over high heat. Sear each side for 30 seconds. This adds extra color and crunch. It’s optional but worth trying. The crust should be dark and flavorful.
Resting the Steak
Resting is non-negotiable. When a steak cooks, the juices move toward the center. If you cut right away, those juices run out. You end up with a dry steak. Let the steak rest for 5 to 7 minutes. Tent it loosely with aluminum foil. This keeps the heat in. The juices redistribute evenly. When you cut, they stay inside the meat. That’s what makes a steak truly juicy.
Quick Tips
- Use a wire rack: If you have one, rest the steak on it. It keeps the bottom from getting soggy.
- Don’t skip the rest: Five minutes minimum. Seven is better.
- Add garlic butter after resting: Melt a pat on top just before serving. It adds richness.
Key Takeaways
- Resting locks in juices: Patience pays off.
- A second sear adds crunch: Try it for extra texture.
- Garlic butter is a great finish: Keep it simple.
Common Mistakes to Avoid and Expert Tips
Even experienced cooks make mistakes. Knowing what to avoid saves you from a tough steak. Here are the most common errors and how to fix them.
Common Mistakes
- Starting with a cold steak: This leads to uneven cooking. The outside overcooks while the inside stays cold. Always bring the steak to room temperature.
- Overcrowding the pan: Sear one steak at a time. Crowding drops the pan temperature. You won’t get a good crust.
- Skipping the thermometer: Eye-balling doneness is unreliable. A thermometer takes the guesswork out. It ensures perfect results every time.
- Cutting too soon: Resting is essential. Cutting early releases all the juices. Your steak will be dry.
- Using the wrong oil: Olive oil has a low smoke point. It burns in a hot pan. Use avocado oil or vegetable oil instead.
Quick Tips for Success
- Dry the steak thoroughly: Moisture is the enemy of a crust.
- Preheat the pan before adding oil: A hot pan sears immediately.
- Let the steak rest at room temp for 45 minutes: This is the golden rule.
- Use a sharp knife for slicing: It cuts cleanly against the grain.
Expert Insights
According to culinary instructor Sarah Jenkins, “The biggest mistake home cooks make is not resting the steak. They’re eager to dig in. But five minutes of patience makes the difference between good and great.” She also recommends using a cast iron skillet. “It holds heat so well that it finishes the cooking evenly. No hot spots, no gray bands.”
Key Takeaways
- Avoid cold starts: Room temperature is key.
- Don’t skip the thermometer: It’s your best tool.
- Rest the steak: Patience yields juiciness.
Conclusion
Cooking a T Bone Steak In Oven is a simple, reliable method. It gives you juicy, tender steak without the stress of grilling. You have full control over the heat. You can achieve perfect doneness every time. Start with a quality cut. Season it simply. Sear it well. Cook it in the oven with confidence. Let it rest properly. Follow these steps, and you’ll have a restaurant-quality meal at home.
The oven method works for any occasion. It’s perfect for a weeknight dinner. It’s also great for a special dinner. Once you master this technique, you’ll never go back to overcooked steak. Practice makes perfect. So grab a T bone steak, preheat your oven, and enjoy the process. You deserve a juicy, delicious steak.
Frequently Asked Questions
What is the best oven temperature for T bone steak?
400°F (200°C) is the ideal temperature. It cooks the steak evenly and helps develop a nice crust after searing. Always preheat the oven before placing the steak inside.
How long should I cook a T bone steak in the oven?
It depends on the thickness and desired doneness. For a 1.5-inch steak, expect 8–12 minutes after searing. Use a meat thermometer to check the internal temperature. This ensures perfect results every time.
Do I need to sear the steak before putting it in the oven?
Yes, searing first is recommended. It creates a flavorful crust through the Maillard reaction. Sear each side for about 2 minutes in a hot cast iron skillet. Then transfer the skillet directly into the oven.
Can I use a regular baking sheet instead of a skillet?
A cast iron skillet is best because it retains heat well. If you must use a baking sheet, place a wire rack on it. This allows air to circulate underneath and promotes even cooking.
How long should I rest the steak after cooking?
Rest the steak for 5 to 7 minutes. Tent it loosely with aluminum foil. This lets the juices redistribute throughout the meat. Cutting too soon will cause the juices to run out, leaving the steak dry.
What is the difference between T bone and porterhouse for oven cooking?
The main difference is the size of the tenderloin. A porterhouse has a larger tenderloin portion. Both cuts work well in the oven. Choose based on your preference for more tenderloin or strip loin.