Simple Guide To Install Water Line To Your Coffee Maker
Installing a water line to your coffee maker is easier than most people think. This guide walks you through every step, from gathering tools to testing the connection. You will learn how to plumb your coffee maker safely and enjoy fresh coffee on demand without refilling the tank ever again.
There is nothing quite like walking into your kitchen and having fresh coffee ready in seconds. Installing a water line to coffee maker setup makes that dream a reality. Instead of filling the reservoir every single morning, your machine gets water automatically. This simple upgrade saves time and makes your daily routine smoother.
Many people think installing a direct water connection is a job for a professional plumber. The truth is, most homeowners can handle this project in under an hour. With the right tools and a clear guide, you will have your coffee maker plumbed in no time. This article covers everything you need to know about how to install water line to coffee maker setups at home.
Whether you have a built-in machine or a standard countertop model, a direct water connection changes the game. You will never run out of water mid-brew again. Let us walk through the entire process together.
Key Takeaways
- Easy DIY Project: Most homeowners can install a coffee maker water line in under an hour with basic tools.
- Right Tools Matter: Having an adjustable wrench, plumber’s tape, and a saddle valve ready prevents delays and frustration.
- Test Before Brewing: Always check every connection for leaks and run a test cycle before making your first cup.
- Regular Maintenance Keeps It Running: Flushing the line monthly and checking connections quarterly extends the life of your setup.
- Filtered Water Improves Taste: Connecting your line to a water filter removes impurities and enhances coffee flavor.
- No Professional Needed: The installation process is straightforward enough for beginners to handle confidently.
📑 Table of Contents
What Is A Coffee Maker Water Line And Why Install One?
A coffee maker water line is a small tube that connects your machine directly to your home water supply. Instead of manually filling the tank, water flows in automatically whenever you brew. This setup is common in under-counter coffee machines and built-in kitchen units.
There are several reasons why homeowners choose to install a direct water connection:
- Convenience: You never have to refill the water tank again.
- Consistent brewing: Your machine always has the right amount of water ready.
- Cleaner operation: A direct line often connects to a water filter, improving taste.
- Time savings: Morning routines become faster and smoother.
The coffee maker water line installation process is straightforward. Most kits come with everything you need. The key is knowing what to expect before you start. A direct water connection to your coffee maker is a small change that delivers big benefits every single day.
Tools And Materials You Will Need
Before you begin, gather everything you need. Having all your tools ready prevents frustrating delays. Here is a complete list of what you will need for this project.
Essential Tools
- Adjustable wrench – for tightening fittings securely
- Plumber’s tape (Teflon tape) – ensures leak-free connections
- Tubing cutter – for clean cuts on copper or braided tubing
- Drill with hole saw bit – if you need to drill through a cabinet or countertop
- Level – to make sure your machine sits evenly
- Bucket and towels – for catching any water spills
Materials Needed
- Water supply line kit – usually includes tubing and connectors
- Saddle valve – this clamps onto your existing water line to create a tap point
- Copper or braided tubing – the flexible line that runs to your coffee maker
- T-fitting or shut-off valve – allows you to turn water off to the machine
- Water filter (optional) – improves the taste of your coffee
Most coffee maker installation kits include the saddle valve, tubing, and connectors. Check what comes in your kit before buying extra parts. If you are unsure about sizes, measure your existing water line before shopping.
One thing many people overlook is checking your home’s water pressure. Most coffee makers work best with moderate pressure. If your home has very high or very low pressure, you may need a pressure regulator. This small addition protects your machine and ensures consistent water flow every time you brew.
Step By Step Guide To Install Water Line To Coffee Maker
Now let us get into the actual installation. Follow these steps carefully, and you will have a working water line in no time. Each step builds on the previous one, so do not skip ahead.
Step 1: Choose Your Water Source
First, decide where your water line will connect. The most common source is the cold water line under your kitchen sink. Some people also tap into the line that supplies their ice maker or refrigerator water dispenser.
Make sure the source is a cold water line. Hot water can damage internal components of your coffee maker. Check that the shut-off valve for that line is easily accessible. You will need to turn the water off during installation.
If you are tapping into an existing ice maker line, make sure it is not already under heavy use. A busy ice maker line may not provide enough water pressure for consistent brewing. A dedicated line is always the best choice for optimal performance.
Step 2: Turn Off The Water Supply
This step cannot be stressed enough. Always turn off the water before you start working. Locate the shut-off valve under your sink and turn it clockwise to close it. Then open the faucet to release any remaining water pressure.
Place your bucket and towels underneath the work area. Even with the valve closed, some residual water will drip out. Being prepared saves you from a messy cleanup later. This is a simple habit that prevents water damage in your kitchen.
Step 3: Install The Saddle Valve
The saddle valve is the piece that taps into your existing water line without cutting it. Here is how to install it properly:
- Find a straight section of copper or plastic water line under your sink.
- Use the saddle valve template that comes in your kit to mark the drill hole.
- Drill through the marked spot on the water line carefully.
- Place the saddle valve over the hole and tighten the bolts with your adjustable wrench.
- Insert the valve pin into the opening and turn it clockwise to pierce the line.
Once the saddle valve is in place, connect the tubing to the valve outlet. Use plumber’s tape on the threaded connections to prevent leaks. Hand-tighten first, then give it a quarter turn with your wrench. Do not overtighten, as this can crack the fitting and cause bigger problems.
Step 4: Run The Tubing To Your Coffee Maker
Now you need to route the tubing from the saddle valve to your coffee maker. Measure the distance carefully and cut your copper or braided tubing to size.
Use a tubing cutter for clean, straight cuts. Rough edges can cause leaks or blockages. If you are running the line through a cabinet wall, drill a hole slightly larger than the tubing diameter. Use a level to ensure the line runs straight and avoids kinks.
Secure the tubing along its path with adhesive cable clips. These keep the line neat and prevent it from moving around. Make sure there are no sharp bends in the tubing, as these can restrict water flow and reduce brewing performance. A smooth, straight path is the key to reliable operation.
Step 5: Connect The Line To Your Coffee Maker
Most coffee makers with a water line connection have an inlet valve on the back or bottom of the machine. Locate this valve and attach the tubing securely.
Use the connector that came with your kit. Apply plumber’s tape to any threaded connections. Push the tubing firmly onto the connector until it seats fully. Some connectors have a small collet or clamp that locks the tubing in place.
Double-check every connection before moving on. A loose fitting now means a leak later, and water damage in your kitchen is no fun. Take your time with this step to ensure a secure, lasting connection.
Testing And Troubleshooting Your Water Line Installation
With everything connected, it is time to test your work. This is the most exciting part of the process, but also the most important. Do not skip this step.
How To Test Your Installation
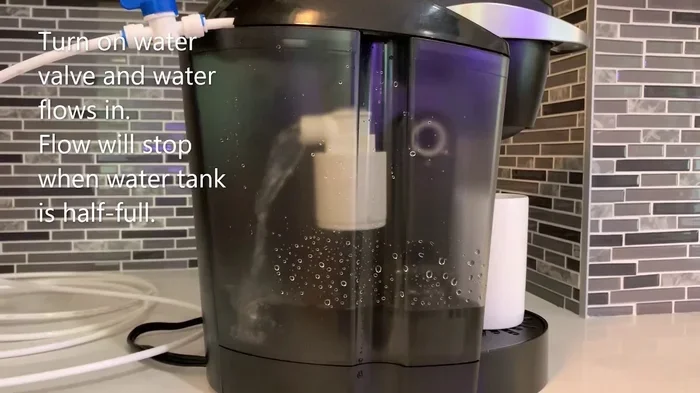
First, turn the shut-off valve back on slowly. Let the water flow for a few seconds to clear any debris from the line. Then check every connection point for leaks. Look for drips, moisture, or water stains around the fittings.
Run a test brew cycle with an empty machine. Watch the water travel from the saddle valve, through the tubing, and into the coffee maker reservoir. Listen for any unusual sounds like gurgling or hissing, which could indicate a blockage or air pocket.
If you notice any leaks, turn off the water immediately. Tighten the fitting or replace the washer. Plumber’s tape often solves small seepage issues. Let the connection dry completely before turning the water back on.
Common Problems And Solutions
Sometimes things do not go perfectly on the first try. Here are the most common issues and how to fix them:
- Low water flow: Check for kinks in the tubing or a clogged saddle valve. Straighten any bends and flush the line with clean water.
- Leaking at connections: Disassemble the fitting, apply fresh plumber’s tape, and reconnect. Make sure the tape wraps in the direction of the thread.
- Air in the line: Run several brew cycles without coffee grounds. This pushes air out and fills the line completely with water.
- Saddle valve not piercing properly: Remove and reposition it on a different section of the water line. Make sure you are drilling into a straight, accessible portion of the pipe.
Keep in mind that your water pressure plays a big role in how well the system works. If your home has very low pressure, the coffee maker may not fill the reservoir properly. A simple pressure gauge from any hardware store can help you diagnose this issue quickly.
For broader kitchen appliance care, maintaining clean connections and proper water flow helps extend the life of all your machines. If you also own a Kitchenaid oven, learning how to use Aqualift self clean on Kitchenaid oven can help you keep your entire kitchen running smoothly and free of grease buildup.
Maintenance Tips For Your Coffee Maker Water Line
Installing the water line is only half the battle. Regular maintenance keeps your system working flawlessly for years. A well-maintained water line means better-tasting coffee and fewer repair calls down the road.
Regular Cleaning Schedule
Set a reminder to check your water line connections every three months. Look for any signs of corrosion, moisture, or wear on the tubing. Catching small issues early prevents bigger problems and costly repairs later.
Flush the water line with clean water every month. This removes any mineral buildup or sediment that may collect inside the tubing. Simply disconnect the line from the coffee maker and run water through it for a minute or two. This quick habit goes a long way toward protecting your investment.
Replacing Filters And Components
If you installed a water filter on your line, replace the filter cartridge according to the manufacturer’s schedule. A clogged filter reduces water flow and can affect the taste of your coffee. Most filters last between two and six months depending on your home’s water quality.
Check the saddle valve periodically. Over time, the piercing needle can wear down or become clogged with mineral deposits. If you notice reduced water flow, the saddle valve may need cleaning or replacement. Keeping spare parts on hand makes this job quick and easy.
Keeping Your Kitchen Clean
A clean kitchen helps your coffee maker and all your appliances last longer. Spills around the water line connections can cause corrosion over time. Wipe up any water splashes promptly and keep the area under your sink dry and well-ventilated.
Speaking of kitchen cleaning, if you are looking for easy ways to keep your oven spotless, you can learn how to clean oven with dishwasher tablet without scrubbing. This simple trick saves you time and keeps your oven looking brand new without harsh chemicals or elbow grease.
Also, if you ever need to work on other kitchen appliances, knowing basic repair skills helps. For instance, if your oven igniter fails, you can learn how to replace LG oven igniter yourself and save money on service calls. Similarly, understanding how to unlock LG oven after self clean prevents frustration when the lock mechanism sticks after a cleaning cycle.
Winter Maintenance
If your kitchen gets cold in winter, pay extra attention to your water line. Freezing temperatures can cause water inside the tubing to expand and crack the line. Insulate any exposed sections of tubing with foam pipe insulation. This inexpensive material is available at any hardware store and can save you from costly repairs during the cold months.
Conclusion
Installing a water line to your coffee maker is one of the best upgrades you can make for your morning routine. It brings convenience, consistency, and a touch of luxury to your daily coffee experience. With the right tools, a clear plan, and a little patience, almost anyone can complete this project successfully.
Remember to take your time at each step. Turn off the water before you start, use plumber’s tape on every threaded connection, and test thoroughly before you brew your first cup. Regular maintenance keeps your system running smoothly for years to come.
The process of how to install water line to coffee maker is simpler than most people expect. Once you have it set up, you will wonder how you ever lived without it. Your mornings will never be the same again. So grab your tools, follow this guide, and enjoy the convenience of a plumbed coffee maker starting today.
Frequently Asked Questions
Can I Install A Water Line To Any Coffee Maker?
Not all coffee makers are designed for a direct water line connection. Most built-in and under-counter models come with a water inlet valve specifically for this purpose. Check your machine’s manual or look for a water inlet port on the back or bottom of the unit. If your coffee maker does not have one, you may need to purchase a model that supports plumbed water connections.
Do I Need A Professional Plumber To Install A Coffee Maker Water Line?
In most cases, you do not need a professional. The installation is straightforward and requires only basic tools like an adjustable wrench and plumber’s tape. However, if you are uncomfortable working with water lines or your home has unusual plumbing, hiring a licensed plumber is a smart choice. A professional can also ensure your installation meets local building codes and safety standards.
What Size Tubing Do I Need For A Coffee Maker Water Line?
Most coffee maker water line kits use 1/4-inch tubing, either copper or braided stainless steel. Check the specifications of your machine and your installation kit before purchasing tubing. Using the wrong size can lead to leaks or poor water flow. When in doubt, measure your existing water line and match the diameter exactly.
How Do I Prevent Leaks In My Coffee Maker Water Line?
The best way to prevent leaks is to use plumber’s tape on all threaded connections and to tighten fittings firmly but not excessively. Overtightening can crack fittings and cause worse leaks than a loose connection. Also, make sure all tubing cuts are clean and straight, and check every connection during your regular maintenance routine.
Can I Use The Same Water Line For My Coffee Maker And Ice Maker?
Yes, many homeowners tap into the same water line for both appliances. However, you should install a shut-off valve or T-fitting for each connection point. This allows you to turn off water to one appliance without affecting the other. A saddle valve for each appliance keeps things independent and easy to manage.
Does A Direct Water Line Improve Coffee Taste?
It can, especially if you connect your water line to a filtration system. Filtered water removes chlorine, minerals, and impurities that can affect the flavor of your coffee. Even without a filter, a direct line ensures a consistent water supply, which leads to more consistent brewing results every time you make a pot.