How To Use A Kitchenaid Toaster Oven With Confidence
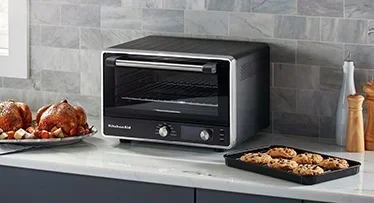
Learning how to use a Kitchenaid Toaster Oven is easier than you think. This guide walks you through every setting, feature, and technique to get the most out of your countertop oven. From toasting bread to baking cookies and broiling steaks, you will master your Kitchenaid toaster oven in no time.
Key Takeaways
- Know Your Controls: Understanding the digital display and dial settings makes using your Kitchenaid Toaster Oven simple and fun.
- Perfect Toast Every Time: Adjust the toast shade, rack position, and bagel setting for consistent results.
- Bake and Roast Like a Pro: Use convection mode and the right temperature for evenly baked goods and roasted meals.
- Broil with Confidence: The broil function gives you restaurant-quality browning at home.
- Air Fry Your Favorites: The air fry mode delivers crispy results with less oil.
- Keep It Clean: Regular crumb tray cleaning and interior wiping extend the life of your oven.
- Use Preset Functions: Save time with built-in cooking presets for common tasks.
📑 Table of Contents
- Getting Started With Your Kitchenaid Toaster Oven
- Understanding the Controls and Settings
- Toasting Bread and Bagels Perfectly
- Baking and Roasting with Your Kitchenaid Toaster Oven
- Broiling and Air Frying Made Easy
- Cleaning and Maintaining Your Kitchenaid Toaster Oven
- Expert Tips for Getting the Most from Your Kitchenaid Toaster Oven
- Final Thoughts
Getting Started With Your Kitchenaid Toaster Oven
So you just got a Kitchenaid Toaster Oven. Congratulations! You are about to discover how versatile a countertop oven can be. Whether you are replacing a tired old toaster or upgrading your kitchen setup, this guide covers everything you need to know.
A Kitchenaid Toaster Oven is more than just a toaster. It bakes, roasts, broils, and even air fries. The key is learning what each function does and how to use them correctly. Once you get the hang of it, you will wonder how you ever cooked without one.
Before you start cooking, take a few minutes to get familiar with your new appliance. Unbox it carefully and remove all packaging materials. Wash the crumb tray and cooking racks with warm soapy water. This first step keeps your food tasting clean and fresh from day one.
Place your Kitchenaid Toaster Oven on a flat, heat-resistant surface. Keep it away from walls and other appliances that could block airflow. Good ventilation is essential for safe and efficient operation. Give the oven at least four inches of space on all sides.
Now plug it in and turn it on. The digital display will light up, and you are ready to explore. Let us walk through the controls and settings so you feel confident from the start.
What Comes in the Box
Most Kitchenaid Toaster Oven models come with a few essential parts. You will find the oven body, a crumb tray, one or two cooking racks, and a baking pan. Some models also include an air fry basket. Check your manual to confirm what is included with your specific model.
Keep the user manual in a safe place. It contains model-specific details about capacity, wattage, and warranty information. You will refer back to it more often than you think.
Understanding the Controls and Settings
The control panel on a Kitchenaid Toaster Oven might look busy at first glance. But once you break it down, it is quite intuitive. Most models feature a digital display, a mode dial, and temperature and time controls.
The mode dial lets you select different cooking functions. You will typically find options like toast, bake, broil, air fry, and defrost. Each mode adjusts the cooking settings automatically to suit the task. This takes the guesswork out of meal preparation.
The digital display shows your selected time and temperature. Use the plus and minus buttons to adjust these values. Some Kitchenaid Toaster Oven models also have preset buttons for common foods like pizza, cookies, and pastries.
Toast Mode
Toast mode is the most-used function on any Kitchenaid Toaster Oven. When you select this mode, the oven uses top heating elements to brown bread evenly. You can control the shade level from light to dark using the shade dial.
For regular slices of bread, place them on the center rack. For bagels, use the bagel setting, which toasts the cut side while warming the outer crust. This small difference makes a big impact on texture and taste.
Bake Mode
Bake mode uses both top and bottom heating elements for even heat distribution. This is your go-to mode for cookies, cakes, and casseroles. The Kitchenaid Toaster Oven heats up quickly, so you can often reduce the temperature slightly compared to a full-size oven.
A convection setting within bake mode circulates hot air around the food. This promotes even cooking and reduces hot spots. If your model has a convection fan, use it for best results when baking multiple trays.
Broil Mode
Broil mode uses only the top heating element at high intensity. It is perfect for melting cheese, browning the tops of casseroles, or cooking thin cuts of meat. Place food on the top rack for closest proximity to the heat source.
Always watch food closely when broiling. The intense heat can go from perfectly browned to burnt in seconds. Use a cooking time of two to five minutes and check frequently.
Air Fry Mode
The air fry mode is one of the standout features of a Kitchenaid Toaster Oven. It circulates superheated air around food to create a crispy exterior without submerging it in oil. Think French fries, chicken wings, and roasted vegetables.
Use the air fry basket for best results. It elevates food and allows air to flow freely underneath. Shake the basket halfway through cooking for even crispiness. This mode uses less energy than a deep fryer, making it a healthier and more efficient choice.
Defrost Mode
The defrost setting uses low heat and sometimes a fan to thaw frozen food safely. It is great for frozen vegetables, bread, and pre-made meals. Using this mode instead of microwaving helps preserve texture and flavor.
Toasting Bread and Bagels Perfectly
Toasting might seem simple, but a few small adjustments make a huge difference. The Kitchenaid Toaster Oven gives you more control than a standard pop-up toaster, and that is a good thing.
Start by selecting the toast mode on your Kitchenaid Toaster Oven. Choose your desired shade level. Light shades work well for delicate breads, while darker shades suit hearty whole-grain loaves.
Place slices on the center rack, spaced slightly apart. This allows hot air to circulate around each piece. Close the door and press start. The oven will beep when your toast is ready.
For bagels, use the bagel function. This setting toasts the cut sides more intensely while gently warming the rounded outer side. It is a small feature that makes a noticeable difference in every bite.
If you like your toast extra crispy, try using the convection setting with toast mode. The fan helps brown the surface more evenly and removes moisture for that satisfying crunch.
Quick Toast Tips
- Use the shade dial to fine-tune darkness for each batch.
- Do not overcrowd the rack. Give each slice room to breathe.
- Remove toast immediately after the beep to prevent burning.
- Use the defrost setting if your bread is frozen, then toast normally.
- Reheat day-old bread for a few seconds to restore freshness.
Baking and Roasting with Your Kitchenaid Toaster Oven
One of the best things about a Kitchenaid Toaster Oven is its baking capability. It handles cookies, muffins, small pizzas, and even roasted chicken with impressive results. The compact size means your food cooks faster than in a conventional oven.
When baking, always preheat your oven first. Most Kitchenaid Toaster Oven models heat up in just a few minutes. Use the bake mode and set your desired temperature. The digital display makes it easy to monitor and adjust.
Place your baking pan or sheet on the center rack. This position allows the most even heat flow. If you are baking multiple trays, rotate them halfway through for consistent browning.
Baking Cookies and Pastries
Cookies are one of the easiest things to bake in a Kitchenaid Toaster Oven. The small batch size is perfect for a few dozen cookies at a time. Set the temperature to 350 degrees Fahrenheit and bake for eight to twelve minutes.
Use a light-colored baking sheet to prevent over-browning. Dark pans absorb more heat and can burn the bottoms of your cookies. If you only have dark pans, reduce the temperature by about 25 degrees.
For pastries like croissants or puff pastry, use the convection setting if available. The circulating air helps layers puff up evenly and develop a golden color.
Roasting Vegetables and Meats
Roasting in a Kitchenaid Toaster Oven produces beautifully caramelized vegetables and juicy meats. Toss your ingredients with olive oil, salt, and pepper, then spread them in a single layer on the baking pan.
Roasting vegetables at 400 degrees Fahrenheit works well for most produce. Root vegetables like potatoes and carrots take about 25 to 30 minutes. Softer vegetables like zucchini and bell peppers need only 15 to 20 minutes.
For chicken or small roasts, use the bake or convection bake mode. A whole chicken breast typically roasts in 20 to 25 minutes at 375 degrees Fahrenheit. Always use a meat thermometer to check for safe internal temperatures.
Using the Cooking Rack and Pan
The position of your rack matters more than you might think. For even baking, keep food on the middle rack. For crispy pizza bottoms, place the pan on the lower rack. For browning the top of a casserole, move to the upper rack.
The non-stick interior of most Kitchenaid Toaster Oven models makes cleanup a breeze. However, always use parchment paper or a silicone mat to protect the surface and prevent sticking.
Broiling and Air Frying Made Easy
Broiling and air frying are two functions that set the Kitchenaid Toaster Oven apart from a basic toaster. Both techniques deliver restaurant-quality results with minimal effort.
When broiling, always preheat the oven on broil mode for three to five minutes. This ensures the top heating element reaches peak temperature. Place your food on the upper rack, about two to four inches from the element.
Broiling works wonderfully for melting cheese on sandwiches, browning the top of lasagna, or cooking thin fish fillets. Keep a close eye on your food because broiling is fast and intense.
Air Frying Tips
The air fry mode on a Kitchenaid Toaster Oven uses rapid convection to mimic deep-fried results with a fraction of the oil. Here are some tips to get the best output.
- Do not overcrowd the air fry basket. Leave space between items for air circulation.
- Shake or flip food halfway through the cook time.
- Lightly spray food with oil for extra crispiness. A little goes a long way.
- Use the air fry temperature and time recommendations in your manual as a starting point.
- Let the basket cool before washing it to preserve the non-stick coating.
Popular air fry recipes include French fries, chicken tenders, mozzarella sticks, and roasted chickpeas. The Kitchenaid Toaster Oven handles all of these with excellent texture and flavor.
Comparing Cooking Modes
Here is a quick comparison of the main cooking modes on a Kitchenaid Toaster Oven to help you choose the right one for every meal.
| Mode | Best For | Heat Source | Typical Time |
|---|---|---|---|
| Toast | Bread, bagels, English muffins | Top element | 1-4 minutes |
| Bake | Cookies, cakes, casseroles | Top and bottom elements | 10-30 minutes |
| Broil | Melting cheese, browning meats | Top element only | 2-5 minutes |
| Air Fry | French fries, wings, roasted snacks | Convection fan + top element | 10-20 minutes |
| Defrost | Frozen vegetables, bread, meals | Low heat + fan | 5-15 minutes |
Cleaning and Maintaining Your Kitchenaid Toaster Oven
Keeping your Kitchenaid Toaster Oven clean ensures it performs well for years. A clean oven also cooks food more evenly and prevents unwanted flavors from transferring between meals.
Always unplug the oven before cleaning. Let it cool completely first. Never immerse the main unit in water. Instead, wipe the exterior with a damp cloth and mild dish soap.
Cleaning the Crumb Tray
The crumb tray catches all the bread crumbs and food debris that fall to the bottom of the oven. Remove it regularly, ideally after every few uses. Wash it with warm soapy water and dry it thoroughly before reinserting.
A full crumb tray can become a fire hazard if left unchecked. Make it a habit to check the tray before each use. This simple step keeps your oven safe and running smoothly.
Wiping the Interior
For the interior walls and floor, use a soft sponge with warm water. Avoid abrasive scrubbers that could damage the non-stick coating. If food is stuck, let it soak with a damp cloth for a few minutes before wiping it away.
For stubborn grease spots, mix baking soda with a little water to form a paste. Apply it gently, let it sit for ten minutes, then wipe clean. This natural method works without harsh chemicals.
Cleaning the Racks and Pan
The cooking racks and baking pan can be washed separately in warm soapy water. For tough baked-on residue, soak them in hot water for 15 to 20 minutes first. A non-abrasive scrubber helps remove any remaining bits.
Replacing Parts
Over time, you may need to replace the crumb tray or racks. Kitchenaid offers replacement parts directly through their website and authorized retailers. Using genuine parts ensures the best fit and performance.
Common Mistakes to Avoid
- Never use metal utensils on the non-stick interior. Use silicone or wooden tools instead.
- Do not line the bottom of the oven with aluminum foil. It blocks airflow and can cause overheating.
- Avoid using the oven with damaged cords or plugs. Replace them immediately.
- Do not leave the oven unattended during broiling or air frying.
- Always remove packaging materials before first use.
Expert Tips for Getting the Most from Your Kitchenaid Toaster Oven
Now that you know the basics, here are some expert tips that take your Kitchenaid Toaster Oven skills to the next level.
- Use the convection setting for roasting. The circulating air cooks food faster and more evenly than standard bake mode.
- Invest in a small wire rack. Elevating food on a rack allows air to flow underneath, creating crispier results.
- Preheat every time. Even though the oven heats up fast, a short preheat ensures consistent cooking temperatures.
- Experiment with rack positions. Moving the rack up or down changes how much heat your food receives. Try different positions to find what works best.
- Use the timer wisely. Set the timer a minute or two less than you think you need. You can always add more time, but you cannot undo overcooking.
- Batch cook for meal prep. The compact size is perfect for preparing individual portions. Roast vegetables, bake protein, and warm sides all at once.
- Keep a cooking log. Note down temperatures and times that work well for your favorite recipes. This saves you time and guesswork in the future.
Why Choose a Kitchenaid Toaster Oven?
The Kitchenaid Toaster Oven stands out for its build quality, consistent performance, and intuitive design. It is an energy-efficient alternative to heating a full-size oven for small meals. Whether you are a student in a dorm, a busy professional, or a parent cooking for a family, this appliance fits seamlessly into any kitchen.
The wide range of cooking modes means one appliance handles many tasks. You can toast breakfast, bake lunch, roast dinner, and air fry snacks. It replaces multiple countertop appliances and saves valuable kitchen space.
Kitchenaid is a trusted brand known for durable, well-designed kitchen appliances. Their toaster ovens come with solid warranties and responsive customer support. This gives you peace of mind and long-term value for your investment.
Final Thoughts
Using a Kitchenaid Toaster Oven with confidence comes down to understanding its features and practicing a few techniques. Once you master the toast shade, bake temperature, broil timing, and air fry settings, you will cook with ease and creativity.
Start with simple recipes and gradually try more complex dishes. Each meal you prepare builds your skills and confidence. The Kitchenaid Toaster Oven is a versatile tool that grows with you in the kitchen.
Keep this guide handy for reference. Bookmark it, share it with friends, and come back anytime you want to try a new cooking method. With the right knowledge and a little practice, your Kitchenaid Toaster Oven will become the most-used appliance in your kitchen.
Now go ahead and fire it up. Your next great meal is just a setting away.
Frequently Asked Questions
What temperature should I use to bake cookies in a Kitchenaid Toaster Oven?
Most cookies bake well at 350 degrees Fahrenheit in a Kitchenaid Toaster Oven. Because these ovens heat up quickly, you may need to reduce the temperature by 25 degrees for delicate recipes. Always check your cookies a few minutes early to avoid overbaking.
Can I use aluminum foil in a Kitchenaid Toaster Oven?
You can use small pieces of foil to line the baking pan, but never cover the oven floor or block the ventilation holes. Covering airflow can cause overheating and damage the appliance. Always check your user manual for specific foil usage guidelines.
How long does it take to air fry in a Kitchenaid Toaster Oven?
Air frying times vary by food type and quantity. French fries typically take 10 to 15 minutes at 400 degrees Fahrenheit. Chicken wings need about 18 to 22 minutes. Shake the basket halfway through for even crispiness. Start with the recommended settings in your manual and adjust as needed.
Is the Kitchenaid Toaster Oven energy efficient?
Yes, a Kitchenaid Toaster Oven uses significantly less energy than a full-size oven. Because it heats up faster and cooks smaller portions, it consumes less electricity overall. This makes it an excellent choice for energy-conscious households and everyday meal preparation.
How often should I clean the crumb tray?
You should empty and clean the crumb tray after every few uses, or more often if you toast frequently. A full crumb tray can become a fire risk and affect oven performance. Making this a quick habit keeps your Kitchenaid Toaster Oven running safely and efficiently.
Can I reheat pizza in a Kitchenaid Toaster Oven?
Absolutely. Reheating pizza in a Kitchenaid Toaster Oven gives you a crispy crust that a microwave cannot match. Use bake mode at 375 degrees Fahrenheit for about five to seven minutes. Place the pizza on the center rack for even heating and a perfectly crispy bottom.