How To Make A Wood Burning Pizza Oven In Your Backyard
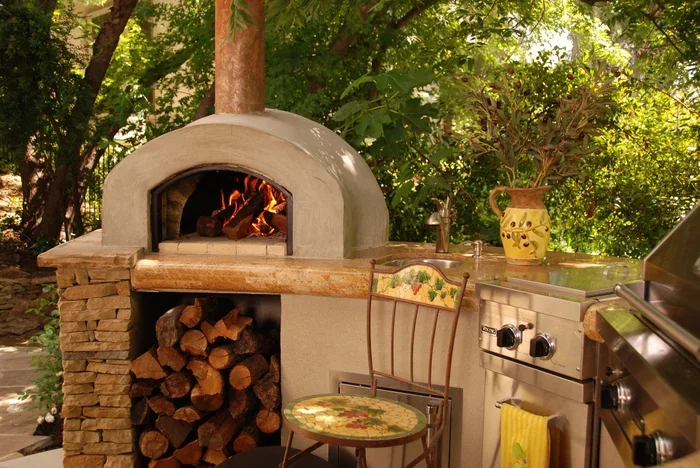
Building a wood burning pizza oven in your backyard is easier than you think. This guide covers everything from choosing materials to curing your oven, so you can start making authentic Neapolitan-style pizza at home. You’ll learn simple steps, cost-saving tips, and how to achieve perfect pizza oven temperatures.
There is something magical about pulling a blistered, charred crust out of your own wood burning pizza oven. The smell of wood smoke, the roar of the fire, and the taste of a freshly baked backyard pizza are pure joy. If you have ever dreamed of making Neapolitan-style pizza at home, this guide is for you.
You do not need a fancy workshop or years of experience. With some basic tools, a weekend of effort, and the right materials, you can create a stunning DIY pizza oven that will last for decades. I will walk you through every step, from picking the perfect spot in your yard to lighting the first fire.
Whether you are a seasoned backyard cook or a complete beginner, this pizza oven build will give you the confidence to craft beautiful, blistered pizzas. Let us dive into the world of outdoor cooking and turn your dream into reality.
Key Takeaways
- You Can Build It Yourself: A backyard pizza oven project is manageable with basic tools and patience.
- The Right Materials Matter: Refractory bricks and proper insulation make or break your DIY pizza oven.
- Curing Is Crucial: Slow, gradual heating prevents cracks and ensures a long-lasting wood fired oven.
- Design Affects Performance: Dome shape, door size, and chimney placement control heat and airflow.
- You Save Money: Building your own outdoor pizza oven costs a fraction of a pre-made unit.
- Pizza Perfection Is Possible: A well-built wood burning pizza oven reaches 900°F for restaurant-quality crust.
📑 Table of Contents
Why Build A Wood Burning Pizza Oven?
The Joy Of Backyard Pizza
A wood fired pizza oven transforms your backyard into an Italian pizzeria. The intense, even heat from a wood burning pizza oven cooks a pizza in just 60 to 90 seconds. The result is a crust that is crispy on the outside, chewy on the inside, and topped with perfectly melted cheese. No backyard is complete without a dedicated pizza oven build that becomes the centerpiece of outdoor gatherings.
Beyond pizza, a wood fired oven can bake bread, roast vegetables, and slow-cook meats. It is a versatile outdoor kitchen appliance that brings people together. The ritual of tending a fire and sharing food creates memories that last a lifetime.
Cost Savings Vs Store-Bought
Buying a pre-made outdoor pizza oven can cost anywhere from $1,000 to $5,000 or more. A DIY pizza oven using standard materials costs a fraction of that. You control the quality of every component, which means you can build a professional-grade pizza oven construction for under $500. The savings are significant, and the satisfaction of cooking on something you built yourself is priceless.
| Option | Cost Range | Customization | Durability |
|---|---|---|---|
| Store-Bought Pizza Oven | $1,000 – $5,000+ | Low | High |
| DIY Wood Burning Pizza Oven | $200 – $800 | High | High (if built right) |
| Portable Pizza Oven Kit | $300 – $1,200 | Medium | Medium |
Planning Your Backyard Pizza Oven Build
Choosing The Right Spot
Pick a flat, level area in your backyard that is away from overhanging trees and wooden fences. A backyard pizza oven needs clearance on all sides. I recommend at least 10 feet from your house and 5 feet from any combustible materials. Think about wind direction too; you want the smoke to drift away from your seating area, not into your face.
Consider proximity to your kitchen. You will want easy access to bring out toppings, plates, and drinks. A spot near a patio or deck makes the experience more enjoyable. If you plan to use the oven year-round, choose a location that gets some sun in winter but offers shade in summer.
Designing Your Pizza Oven
Before you start mixing mortar, sketch out your pizza oven plans. The classic dome shape is the most efficient for heat retention and airflow. A refractory pizza oven dome should be about 42 inches in diameter for a family-sized oven. The base needs to be sturdy and level. Decide on the door height; a door that is about 63% of the dome’s interior height works best for optimal draft.
Think about the chimney too. A proper chimney pulls smoke out and feeds oxygen to the fire. You can use a metal flue pipe or build a brick chimney. The pizza oven base can be made from concrete blocks, brick, or even stacked stone. I like using concrete blocks because they are affordable and easy to work with.
Essential Materials For A DIY Pizza Oven
Gathering the right materials is the key to a successful pizza oven build. Using cheap, non-heat-resistant materials will lead to cracks and failure. You need refractory bricks, which can withstand extreme temperatures without spalling. Regular house bricks will explode when heated. Do not skip this step.
| Material | Purpose | Estimated Cost |
|---|---|---|
| Refractory Bricks | Dome and floor lining | $150 – $300 |
| Refractory Cement | Mortar for high heat | $40 – $60 |
| Insulating Concrete | Vermiculite mix for insulation | $30 – $50 |
| Firebricks (for floor) | Durable cooking surface | $60 – $100 |
| Metal Chimney Pipe | Ventilation | $30 – $50 |
| Steel Door | Draft control | $20 – $40 |
| Sand and Perlite | Insulation layer | $20 – $30 |
Refractory Bricks And Cement
Refractory cement is specially formulated to handle thermal shock. It stays flexible under extreme heat, which prevents cracking. Mix it according to the package directions; it should be thick like peanut butter. Use it to bond the refractory bricks together. For the oven floor, use firebricks that are dense and have low porosity. They radiate heat evenly and last for years.
Insulation And Venting
Insulation is what makes a wood burning pizza oven efficient. Without it, heat escapes quickly and you waste fuel. I use a mix of vermiculite, Portland cement, and water to create a thick insulation layer over the dome. This keeps the heat inside and allows the oven to stay hot for hours. The pizza oven chimney should be at least 12 inches above the dome opening. A proper chimney creates the draft needed for a clean, smoke-free burn.
Building A Wood Burning Pizza Oven
Building The Base
Start by constructing a solid pizza oven base. I use concrete blocks stacked in a square or rectangle. The base should be at least 48 inches wide and 48 inches deep. Fill the interior with concrete or compacted gravel for stability. Let it cure for at least 48 hours before adding the dome. A weak base will settle and crack your entire pizza oven construction.
On top of the base, lay a layer of insulating concrete. This is a mix of vermiculite, cement, and water. Spread it about 2 inches thick. This layer prevents the heat from the dome from baking the base and cracking the blocks. It also acts as a heat shield for your patio.
Shaping The Dome
The dome is the heart of your backyard pizza oven. I build it using a sand form. Pack damp sand into a dome shape on top of the insulation layer. The sand should be packed firmly but not too wet. You will build the brick layers on top of this sand. Once the mortar dries, you simply brush the sand out through the open doorway. It is a clever trick that every pizza oven tutorial uses.
Lay the first ring of refractory bricks directly on the base. Use refractory cement as mortar. Stagger the joints like laying regular bricks. Continue building up, cutting bricks to fit the curve as the dome narrows. The dome should be about 12 to 14 inches thick for good heat retention. Use a spirit level frequently to keep the dome even.
Adding The Door And Chimney
Cut a doorway in the front of the dome. The opening should be about 63% of the dome’s interior height. This ratio ensures proper airflow. You can use a piece of curved steel or build a brick arch for the pizza oven door. The door controls the draft and keeps heat inside. A tight seal is important, so use a strip of fiberglass or ceramic rope around the edges.
For the pizza oven chimney, attach a metal flue pipe to the top of the dome. The pipe should extend at least 12 inches above the dome and be angled slightly outward to prevent rain from entering. You can build a decorative brick surround around the chimney, but make sure the metal pipe is the actual exhaust path. Test the draft by lighting a small piece of paper inside the oven with the door open. The smoke should pull upward immediately.
Curing And Testing Your Wood Fired Oven
The Curing Process
Curing is the most important step in building a wood burning pizza oven. Rushing this process causes cracks and ruins the mortar. Start by building a very small fire inside the oven using only a few twigs and kindling. Let it burn for 2 to 3 hours. The goal is to drive out any remaining moisture in the mortar and insulation very slowly.
Over the next 5 to 7 days, gradually increase the fire size. Each day, add a little more wood and let the oven burn for several hours. On the final day, you can have a full, hot fire for 4 to 5 hours. This slow curing process bonds the refractory cement and makes the oven strong. I always tell friends: patience here saves you from a cracked dome later.
Achieving The Right Temperature
A well-cured wood fired pizza oven can reach temperatures above 900°F. For a classic Neapolitan pizza, you want the dome to be white hot and the floor around 800°F to 900°F. Use an infrared thermometer to check the floor temperature. Push the fire to the back of the oven and let it burn for 20 to 30 minutes. Then sweep the embers out with a broom. The oven is ready when the dome turns from black to a white ash color.
If you want to bake bread or roast vegetables, let the oven cool down to 500°F to 600°F. A wood burning pizza oven is incredibly versatile once you understand how to control the heat. The residual heat stored in the dome and floor acts like a thermal battery, giving you hours of cooking time.
Expert Tips For Perfect Wood Burning Pizza Oven Performance
Quick Tips
- Use a pizza peel: A long-handled wooden peel makes it easy to slide the pizza in and out of the oven.
- Keep a spray bottle: A light mist of water on the pizza helps create a crispy crust without burning the cheese.
- Rotate the pizza: Turn the pizza every 30 seconds for even cooking because the oven floor has hot and cool spots.
- Use seasoned hardwood: Oak, maple, or fruitwood burns clean and produces great flavor. Avoid pine or resinous woods.
- Build a small fire first: Always start with kindling and gradually add larger logs to avoid thermal shock.
Common Mistakes To Avoid
- Skipping insulation: Without proper insulation, your oven loses heat fast and wastes wood. Always use the vermiculite mix.
- Using regular mortar: Standard Portland cement cracks under high heat. Only use refractory cement rated for pizza ovens.
- Making the doorway too large: A big door lets heat escape and ruins the oven’s ability to reach high temperatures.
- Rushing the cure: A hot fire too soon will crack the dome. Follow the slow, gradual curing schedule.
- Ignoring the chimney: A blocked or short chimney causes smoke to billow into your face and creates creosote buildup.
Key Takeaways For Success
Building a wood burning pizza oven is a rewarding project that anyone can do. The key is to take your time, use the right materials, and follow the curing process carefully. A well-built DIY pizza oven will serve your family for decades and become the envy of the neighborhood. Remember to keep the dome thick, the insulation tight, and the fire controlled. With these principles, you will enjoy perfect pizza oven temperatures every time you fire it up.
Once you master the basics, you can experiment with different dough recipes and toppings. The wood fired oven becomes a creative outlet and a source of pride. Invite friends over, play some music, and enjoy the fruits of your labor. There is nothing quite like sharing a pizza baked in your very own backyard pizza oven.
In the end, the pizza oven construction process teaches patience and craftsmanship. You will learn to read the fire, understand heat dynamics, and appreciate the art of outdoor cooking. So grab your tools, gather your materials, and start your wood burning pizza oven journey today. Your future self—and your taste buds—will thank you.
Frequently Asked Questions
How long does it take to build a wood burning pizza oven?
A basic DIY pizza oven can be built in a weekend if you have help and all materials ready. The curing process adds 5 to 7 more days, so plan for about two weeks before your first pizza. The actual construction takes 16 to 24 hours of active work.
What kind of bricks do you use for a pizza oven?
You must use refractory bricks or firebricks. Regular house bricks contain air pockets that expand and explode under high heat. Refractory bricks are dense and designed to withstand temperatures above 1,000°F without cracking.
Can I build a wood burning pizza oven on a wooden deck?
Yes, but you need a proper heat shield. Place a layer of insulating concrete and a non-combustible base like concrete blocks between the oven and the wood. Keep the oven at least 10 feet from any combustible surface and never leave a fire unattended on a deck.
How hot does a wood burning pizza oven get?
A well-built wood fired pizza oven can reach 800°F to 900°F for Neapolitan-style pizza. For slower cooking like bread or roasts, you can let the oven cool to 500°F to 600°F. The pizza oven temperature is controlled by how much wood you add and how long you let the fire burn.
Do I need a chimney for my backyard pizza oven?
Yes, a pizza oven chimney is essential for proper draft and smoke control. Without it, smoke will linger around your face and the fire will burn inefficiently. A simple metal flue pipe works perfectly and can be built into a decorative brick surround.
How much does it cost to build a DIY pizza oven?
A wood burning pizza oven built from scratch typically costs between $200 and $800, depending on the materials you choose. Using concrete blocks for the base and purchasing refractory bricks in bulk keeps the cost low. The savings compared to a store-bought unit are substantial.