How to Make a Solar Oven for Kids in Your Backyard
Learning how to make a solar oven for kids is one of the best backyard science projects you can do with your children. This hands-on activity teaches kids about renewable energy, basic physics, and eco-friendly cooking while they build something real with their own hands. With simple household materials like a cardboard box, aluminum foil, and plastic wrap, you can create a working solar cooker in under an hour. The project is safe, affordable, and perfect for summer fun or a school science fair. Your kids will be thrilled to cook real food using nothing but sunlight.
Have you ever thought about cooking food using nothing but sunlight? How to make a solar oven for kids is a question many parents ask, and the answer is simpler than you think. A homemade solar oven is one of the most fun and educational projects you can do with your children this summer. It combines science, creativity, and a real snack at the end. Best of all, you probably already have most of the supplies sitting in your garage or kitchen.
Building a DIY solar oven with your kids opens up a world of learning. Children get to see how the sun’s energy works in real time. They touch, build, and experiment. And when they take their first bite of a warm, sun-cooked treat, the excitement is unmatched. This guide walks you through every step in a way that is easy to follow and full of fun.
Whether you want a weekend project, a school science fair idea, or just a way to keep the kids busy outdoors, a backyard solar oven fits the bill perfectly. Let us dive in and build one together.
Key Takeaways
- Easy to build: You only need a few household items to create a working solar oven for kids.
- Great STEM activity: Children learn about solar energy, heat transfer, and renewable power while building.
- Safe and supervised: With basic safety tips, kids can cook simple snacks like s’mores or nachos.
- Budget-friendly: The entire project costs almost nothing using items you already have at home.
- Eco-friendly lesson: Kids discover how clean energy works without any fuel or electricity.
- Perfect for summer: A sunny day is all you need to start this fun outdoor project.
- Science fair ready: This project makes an excellent school science fair presentation.
📑 Table of Contents
- What Is a Solar Oven and Why Do Kids Love It?
- Materials You Will Need to Build a Solar Oven
- Step-by-Step Guide to Building a Solar Oven
- How to Use Your Solar Oven Safely
- Fun Recipes You Can Cook in a Solar Oven
- Science Lessons Kids Learn From Solar Cooking
- Tips to Get the Most Out of Your Solar Oven
- Why This Project Is Perfect for Summer and Beyond
- Conclusion
What Is a Solar Oven and Why Do Kids Love It?
Understanding Solar Energy for Kids
A solar oven uses sunlight to create heat. The basic idea is simple. You trap the sun’s rays inside a box or container. The inside gets hot, and that heat cooks your food. No electricity. No gas. Just pure sunshine.
Kids love this concept because it feels like magic. They watch the sun do real work. They see their food warm up and even cook. It is one of the best outdoor activities for kids that actually teaches something valuable.
A solar cooker works because of a few basic science principles. The dark interior of the oven absorbs sunlight and turns it into heat. The clear cover lets light in but traps the heat inside. The reflective surface bounces more sunlight into the box. Together, these parts create a mini cooking machine powered by the sun.
Why This Project Matters for Children
Teaching kids about renewable energy for kids is more important than ever. Climate change and sustainability are big topics. But you do not need a textbook to explain them. A solar oven experiment does the job beautifully.
Children learn that the sun is a powerful energy source. They understand why using clean energy matters. And they feel proud of building something useful with their own hands. This kind of hands-on learning sticks with them far longer than any lecture ever could.
It also builds curiosity. Kids start asking questions. Why does the inside get hot? What happens on a cloudy day? Can we cook different foods? These questions lead to deeper learning and real scientific thinking.
Materials You Will Need to Build a Solar Oven
Basic Household Supplies
The beauty of this project is how simple the materials are. You do not need to buy anything fancy. Here is what you will need:
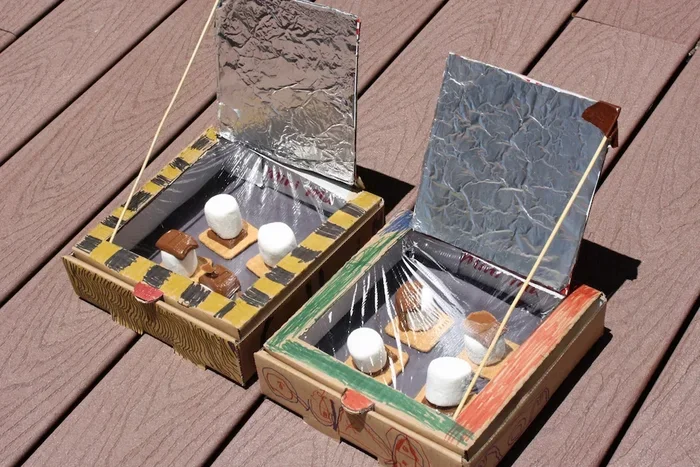
- A cardboard pizza box or any large cardboard box — this is the main body of your oven.
- Aluminum foil — this acts as a reflector to bounce sunlight into the box.
- Plastic wrap or a clear plastic bag — this creates a window that lets sunlight in and traps heat.
- Black construction paper or black paint — dark surfaces absorb heat better than light ones.
- Newspaper or straw — used for insulation to keep the heat inside.
- Tape or glue — to hold everything together.
- A ruler, scissors, and a box cutter — for cutting and measuring.
- A stick or dowel — to prop the reflector flap open.
Optional Extras That Make It Better
You can add a few extra items to improve your homemade solar oven:
- A thermometer — so kids can measure the temperature inside the oven.
- A small wire rack — to hold food above the dark surface.
- Dark-colored cookware — a small black pot works great for cooking.
- Charcoal briquettes (optional) — some builders place a few inside to boost heat, though this is not always needed.
All of these items are cheap and easy to find. A full solar oven DIY kit should cost you less than five dollars in most cases.
Step-by-Step Guide to Building a Solar Oven
Step 1: Prepare the Pizza Box
Start with a clean cardboard pizza box. Open the lid and keep it attached at one side — this will be your oven door. Use a ruler to measure about one inch from the front edge of the lid. Draw a square on the lid, leaving about one inch of border on the other three sides.
Carefully cut along three sides of the square using a box cutter. Leave the back side attached so the flap can open. This flap is your reflector window. It is the most important part of the entire design.
Step 2: Line the Inside with Reflective Foil
Now take your aluminum foil and cover the inside of the flap you just cut. Smooth the foil flat so it reflects as much sunlight as possible. Use tape or glue to secure it. Make sure there are no wrinkles — the smoother the foil, the better the reflection.
You can also line the inside bottom of the box with aluminum foil. This helps bounce extra sunlight onto the food. The more light you can direct into the box, the hotter it gets.
Step 3: Create a Heat Absorber
Cut a piece of black construction paper to fit the bottom of the box. Glue it down flat. The black paper absorbs sunlight and converts it into heat. This is what actually warms up your food.
Some builders like to paint the inside bottom of the box with black acrylic paint instead. Either method works well. The key is to use a dark color. Light colors reflect heat away, which is the opposite of what you want.
Step 4: Add Insulation
Line the inside walls of the box with newspaper or straw. This creates a layer of insulation that keeps the heat from escaping. Pack the newspaper in snugly but do not block the opening where the plastic wrap will go.
Good insulation is one of the secrets to a successful solar oven for kids. Without it, the heat escapes too fast and your oven will not reach cooking temperatures.
Step 5: Cover the Opening with Plastic Wrap
Stretch a layer of plastic wrap tightly over the hole you cut in the lid. Tape it down on all sides to seal it. This clear cover works like a greenhouse window. Sunlight passes through it easily, but the heat has trouble getting back out.
Make sure the plastic wrap is smooth and free of wrinkles. Any gaps will let heat escape. You can even add a second layer of plastic wrap for better insulation.
Step 6: Set Up the Reflector Flap
Prop the foil-covered flap open using a stick or wooden dowel. Angle it so it reflects sunlight straight through the plastic window and into the box. You may need to adjust the angle throughout the day as the sun moves.
This is the part that makes the whole system work. The reflector sends extra sunlight into the oven, which raises the temperature significantly. Without it, your oven would still work, but much more slowly.
Step 7: Place Your Food Inside and Wait
Set your food on the black paper or on a small wire rack inside the oven. Close the lid and make sure the plastic wrap is sealed. Point the reflector flap directly at the sun.
Now comes the hardest part for kids — waiting. Depending on the sun strength and what you are cooking, it can take anywhere from 20 minutes to over an hour. Use this time to talk about solar power for children and why patience is part of the process.
How to Use Your Solar Oven Safely
Safety Tips for Kids
Safety is always important, even with a low-heat project like this. Here are some simple rules to follow:
- Always have an adult present. Even though the oven is low-risk, adult supervision is essential.
- Do not look directly at the reflected sunlight. The foil can create a bright glare that hurts eyes.
- Use oven mitts or thick gloves. The inside of the oven can get surprisingly warm.
- Place the oven on a flat, stable surface. A table or the ground works well. Avoid uneven ground where it might tip over.
- Never leave the oven unattended for long periods. Check on it regularly and adjust the flap as the sun moves.
Common Mistakes to Avoid
Here are some mistakes that can ruin your solar oven experiment:
- Using wrinkled foil. Wrinkles scatter the light instead of reflecting it. Smooth the foil out carefully.
- Leaving gaps in the plastic wrap. Even small gaps let heat escape and lower the temperature.
- Not angling the reflector toward the sun. The oven will not work well if the flap is not aimed correctly.
- Cooking on a cloudy day. Solar ovens need direct sunlight. A cloudy sky will not provide enough energy.
- Overfilling the box. Leave space inside for the heat to circulate around the food.
Fun Recipes You Can Cook in a Solar Oven
Easy Recipes for Young Kids
Not all foods work well in a solar oven. You want simple, thin, or small items that cook quickly. Here are some great options:
- S’mores: Place graham crackers, chocolate, and marshmallows on a piece of foil. The oven melts everything perfectly.
- Warm nachos: Spread tortilla chips on foil, add cheese, and let the sun melt it.
- Hot dogs: Skewer a hot dog and prop it upright inside the oven. It takes about 30 to 45 minutes.
- Toasted cheese sandwiches: Assemble a sandwich on foil and let the sun warm the cheese until it melts.
- Reheated pizza: Place a slice on foil and watch the cheese get bubbly.
What Works and What Does Not
Understanding what foods cook well helps set the right expectations. Here is a quick comparison:
| Works Well in a Solar Oven | Does Not Work Well |
|---|---|
| Thin foods like cheese and chocolate | Thick meats like whole chicken |
| Small snacks like nachos and s’mores | Foods that need high, fast heat |
| Warm drinks like cocoa | Baked goods that need even heat all around |
| Reheated leftovers | Raw frozen foods |
| Vegetables wrapped in foil | Foods requiring boiling water |
Keep your expectations realistic. A homemade solar oven will not reach the temperatures of a regular oven. But it will warm food and melt cheese beautifully. Kids find that just as exciting.
Science Lessons Kids Learn From Solar Cooking
Heat Transfer and Energy Conversion
Building and using a solar oven for kids teaches real science concepts. Children see heat transfer in action. They observe how light energy converts into thermal energy. They learn that dark colors absorb heat while light colors reflect it.
These are concepts that align with STEM activities for kids and elementary science standards. Teachers often use this project in classrooms because it covers so many learning goals in one hands-on activity.
Renewable Energy and Environmental Awareness
This project opens the door to bigger conversations about the environment. Kids learn that the sun provides endless energy. They understand that we do not need to burn fossil fuels to cook food. This builds early awareness of green energy for children and why it matters for our planet.
You can extend the lesson by asking questions. What happens if we use a bigger box? Would a different color paper work better? What about using two reflectors instead of one? These questions encourage the scientific method and critical thinking.
Perfect for Science Fairs
A solar oven experiment makes an outstanding science fair project. Kids can measure temperatures at different times of day. They can test different materials and compare results. They can present their data with charts and graphs.
Judges love projects that are creative, hands-on, and educational. A homemade solar oven ticks every box. It shows initiative, scientific thinking, and real-world application of energy concepts.
Tips to Get the Most Out of Your Solar Oven
Maximize Heat and Cooking Speed
Want your DIY solar oven to work even better? Try these pro tips:
- Paint the inside of the box black. Black surfaces absorb more heat than any other color.
- Use a second layer of plastic wrap. This creates a double-glazed effect that traps more heat inside.
- Angle the reflector flap precisely toward the sun. Use a stick to prop it at the right angle and adjust it every 15 to 20 minutes.
- Place the oven on a dark surface. A dark table or patch of ground absorbs extra heat and radiates it into the oven.
- Preheat the oven before adding food. Let it sit in the sun for 10 to 15 minutes with the lid closed before placing food inside.
Best Weather and Timing
The best conditions for using a backyard solar oven are clear skies and direct sunlight. Summer months work best in most regions. The ideal temperature outside is above 75°F (24°C) with little to no wind.
Wind cools the oven down quickly. If it is breezy, try placing the oven behind a wall or using a windbreak. Even a large piece of cardboard propped up on the windward side can make a big difference.
Why This Project Is Perfect for Summer and Beyond
Summer is the ideal time to build a solar oven. The days are long, the sun is strong, and kids are out of school looking for fun projects. But you can use your solar oven for kids any time there is bright sunshine.
Spring and fall can work too, as long as the sky is clear. Even on a cool but sunny day, the oven can reach surprising temperatures. Winter is harder in cold climates, but on a bright winter day, it still works better than most people expect.
This project also connects beautifully to other summer activities. Pair it with a picnic. Make it part of a camping trip. Use it during a neighborhood science day. The possibilities are endless, and the learning never stops.
One of the best things about a homemade solar oven is that it gets kids away from screens. They go outside, they build, they experiment, and they eat something they made themselves. That combination is hard to beat. It builds confidence, curiosity, and a genuine love for learning.
Conclusion
How to make a solar oven for kids is a question with a wonderfully simple answer. With a cardboard box, aluminum foil, plastic wrap, and a little patience, your children can build a real working oven that cooks food using nothing but sunlight. This project is affordable, safe, educational, and endlessly fun.
It teaches kids about solar energy, heat transfer, and sustainability in the most hands-on way possible. It gives them a sense of accomplishment when they see their food cooked by the sun. And it creates memories that last far longer than the snack itself.
So grab your supplies, head to the backyard, and start building. Your kids will thank you for it — especially when they take that first bite of a sun-cooked s’more. The best part is, once you build one, you will want to make improvements and try new recipes every single time.
A DIY solar oven is more than a craft project. It is a doorway into understanding how energy works, why clean power matters, and what kids can create with their own two hands. Start today, and watch your children light up with curiosity and pride.
Frequently Asked Questions
Can a solar oven really cook food?
Yes, a homemade solar oven can absolutely cook food. It will not reach the high temperatures of a regular oven, but it can warm food, melt cheese, and cook thin items like hot dogs or nachos. The key is using direct, strong sunlight and following the building steps carefully.
What temperature can a homemade solar oven reach?
A simple cardboard solar oven can reach temperatures between 150°F and 200°F (65°C to 93°C). With better insulation and a well-angled reflector, some models can go even higher. This is enough to warm and cook many simple foods.
How long does it take to cook food in a solar oven?
Cooking time depends on the sun strength and what you are making. S’mores might take 20 to 30 minutes. A hot dog could take 45 minutes to an hour. On a very sunny day with a well-built oven, results come faster. Cloudy days will slow everything down significantly.
One of the best parts of learning how to make a solar oven for kids is teaching patience. The slow process itself becomes a lesson in how solar energy works over time.
Is a solar oven safe for young children?
Yes, a solar oven is very safe for children of all ages. There are no open flames, no electricity, and no harmful fumes. The inside gets warm but not dangerously hot. Adult supervision is still recommended, especially during the cutting steps and when handling warm food.
Can you use a solar oven on a cloudy day?
Solar ovens work best in direct sunlight. On a cloudy day, they will not reach cooking temperatures because the clouds block and scatter the sun’s rays. A bright but overcast day might warm the oven slightly, but it will not cook food reliably. Clear, sunny days give the best results.
What age is this project best for?
This project works well for children ages 5 and up. Younger kids can help with decorating and placing food inside. Older kids can take the lead on cutting and assembling the oven with minimal help. It is a great STEM activity for kids across many age groups and skill levels.