How To Cook Christmas Pudding In The Oven Perfectly
Learning how to cook Christmas pudding in the oven is easier than you think, and it saves you from standing over a steaming pot for hours. This guide walks you through every step, from mixing the batter to pulling out a perfectly rich, moist pudding on Christmas Day. You will discover the best ingredients, oven settings, and timing tricks that guarantee a show-stopping holiday dessert your whole family will love.
There is something truly magical about a homemade Christmas pudding sitting on the holiday table, all glossy and golden, waiting to be sliced and shared. For many families, this rich, fruity dessert is the grand finale of the Christmas feast, and it carries decades of tradition in every bite. But here is the thing — not everyone has a large steaming pot or the patience to stand over a boiling kettle for hours.
Cooking Christmas pudding in the oven changes everything. It is simpler, more hands-off, and produces equally stunning results. Whether you are a first-time baker or a seasoned cook looking for a easier method, this guide will show you exactly how to make a beautiful, flavorful pudding right in your oven. Let us dive in and make this Christmas baking season your best one yet.
Key Takeaways
- Oven baking is a simpler alternative to traditional steaming and still delivers an authentic, rich Christmas pudding.
- The right ingredients matter — use quality dried fruits, fresh citrus zest, and a splash of brandy for the best flavor.
- Low and slow cooking at around 140°C (285°F) ensures a moist, evenly cooked pudding every time.
- Covering the pudding with parchment and foil prevents the top from burning while it cooks through.
- Resting and reheating are just as important as the baking process for the perfect texture.
- Avoid common mistakes like overfilling the basin, skipping the parchment, or opening the oven too often.
- Serve with brandy butter or cream to elevate your Christmas pudding from great to unforgettable.
📑 Table of Contents
- Why Baking Christmas Pudding in the Oven Works So Well
- Essential Ingredients for the Perfect Christmas Pudding
- Step-by-Step Guide to Cooking Christmas Pudding in the Oven
- Tips for Getting the Perfect Texture and Flavor
- Common Mistakes to Avoid When Baking Christmas Pudding
- Serving and Storing Your Christmas Pudding
- Frequently Asked Questions
- Conclusion
Why Baking Christmas Pudding in the Oven Works So Well
Traditionally, Christmas pudding is steamed on the stovetop. That method has been around for centuries, and it certainly produces a delicious result. But oven baking has become a popular alternative for good reason. When you cook Christmas pudding in the oven, you get more even heat distribution, which means fewer hot spots and a more consistent texture from edge to center.
Oven baking also frees up your stovetop for preparing the rest of the Christmas dinner. Instead of managing a heavy pot of bubbling water, you can pop the pudding into the oven and focus on roasting the turkey or making the gravy. The gentle, surrounding heat of the oven slowly cooks the dense batter, allowing the flavors of the dried fruits, spices, and alcohol to meld together beautifully.
Steaming vs. Baking: What Is the Difference?
Both methods produce a classic Christmas pudding, but there are a few differences worth knowing. Steaming gives the pudding a slightly denser, more compact texture because the steam surrounds it evenly. Baking in the oven can produce a slightly lighter top layer, especially if you do not cover it tightly. Many home cooks find that the oven method is more forgiving and easier to monitor.
Here is a quick comparison to help you decide which method suits you best:
- Steaming: Traditional method, very dense texture, requires a steamer or large pot, takes about 6-8 hours.
- Baking: Easier to manage, slightly lighter texture, uses a simple baking dish or pudding basin, takes about 2-3 hours.
- Combination: Some recipes start with steaming and finish in the oven for the best of both worlds.
For most home cooks, baking Christmas pudding in the oven is the most practical choice. It requires less equipment, less monitoring, and delivers a wonderfully rich result every single time.
Essential Ingredients for the Perfect Christmas Pudding
The beauty of Christmas pudding lies in its ingredients. Every element contributes to the deep, complex flavor that makes this dessert so special. You do not need fancy equipment or hard-to-find items — just a good selection of quality ingredients and a little patience.
The Fruit Mix
The heart of any Christmas pudding is the fruit. A traditional recipe calls for a mix of dried fruits such as raisins, currants, sultanas, and chopped dried apricots or prunes. Some cooks also add glace cherries or candied peel for extra sweetness and color. The key is to use a generous amount — the fruit should make up at least half of the total mixture.
Soak your dried fruits in brandy, rum, or orange juice a day or two before you plan to bake. This step infuses them with moisture and flavor, and it is what gives a great Christmas pudding that signature richness. If you are not a fan of alcohol, apple juice or strong black tea works just as well.
The Base and Binders
Next, you need a base to hold everything together. Fresh breadcrumbs are the traditional choice, and they give the pudding a tender, moist crumb. Some recipes use crushed biscuits or cake crumbs for a slightly different texture. For the binder, eggs are essential — they help the mixture set as it cooks and give the pudding its structure.
Suet is another traditional ingredient. It is a type of beef fat that creates a wonderfully light, fluffy texture in the pudding. If you prefer a vegetarian or vegan version, vegetable shortening or vegetable suet works perfectly as a substitute.
The Flavor Boosters
What truly makes a Christmas pudding shine is the seasoning. Ground cinnamon, nutmeg, allspice, and a pinch of cloves create that warm, festive spice profile we all associate with the holidays. Freshly grated citrus zest — orange and lemon — adds a bright, zesty note that cuts through the richness of the dried fruits.
Do not forget the treacle or molasses. This dark, sticky sweetener adds depth and a subtle bitterness that balances the sweetness of the fruit and sugar. A generous splash of brandy or dark rum ties everything together and gives the pudding that classic boozy kick. If you are cooking for children, you can reduce the alcohol or leave it out entirely.
Step-by-Step Guide to Cooking Christmas Pudding in the Oven
Now for the part you have been waiting for — actually making and baking the pudding. Follow these steps carefully, and you will have a show-stopping Christmas dessert that will have everyone asking for seconds.
Step 1: Prepare Your Pudding Basin
Start by greasing your pudding basin or heatproof baking dish generously with butter. This ensures the pudding slides out easily after baking. Cut a circle of parchment paper and a piece of aluminum foil, both slightly larger than the opening of your basin. You will use these to cover the pudding during cooking.
Some people like to line the basin with a circle of parchment at the bottom as well. This extra step makes unmolding much easier and prevents any sticking. Take a moment to set up your workspace before you start mixing — it makes the whole process smoother and more enjoyable.
Step 2: Mix the Pudding Batter
In a large mixing bowl, combine your soaked dried fruits, breadcrumbs, suet, eggs, sugar, flour, and all the spices. Stir everything together until it is well combined. The mixture should be thick but moist — if it seems too dry, add a splash more orange juice or brandy. If it is too wet, sprinkle in a little more breadcrumbs.
Take your time with this step. Make sure there are no dry pockets of flour or spices hiding at the bottom of the bowl. A well-mixed batter cooks evenly and develops a consistent flavor throughout the pudding.
Step 3: Fill and Cover the Basin
Spoon the batter into your prepared basin, filling it about two-thirds full. The pudding will rise during cooking, so leaving some space at the top is essential. Press the mixture down gently with the back of a spoon to remove any large air pockets.
Place the parchment circle on top of the batter, then cover with the aluminum foil. Crease the foil loosely to allow for expansion, and secure it with kitchen string. Make a small pleat in the center of the foil cover — this acts as a vent and allows steam to escape during baking.
Step 4: Bake in the Oven
Place the covered basin on a baking tray — this catches any drips and makes it easier to move the pudding in and out of the oven. Preheat your oven to 140°C (285°F) for a conventional oven or 120°C (250°F) for a fan-forced oven.
Bake the pudding for about 2 to 2.5 hours. The low temperature is key here — it slowly cooks the dense batter without drying it out. After the first hour, carefully remove the foil cover and check the pudding. If the top is browning too quickly, place a loose piece of foil over it to protect it.
The pudding is done when a skewer inserted into the center comes out clean and the top is firm to a gentle press. The internal temperature should reach at least 75°C (165°F) for food safety.
Step 5: Rest and Unmold
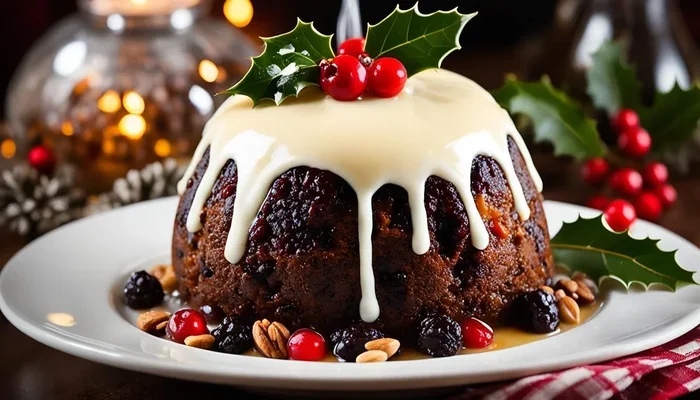
Once baked, remove the pudding from the oven and let it rest for at least 10 minutes before unmolding. Carefully run a knife around the edge of the basin, then invert it onto a serving plate. Lift the basin away gently, and your Christmas pudding should slide out beautifully.
Let the pudding cool for a few minutes before slicing. A warm pudding is easier to cut into neat, even portions. If you are preparing this ahead of time, you can let it cool completely, wrap it tightly, and store it for up to a week.
Tips for Getting the Perfect Texture and Flavor
Baking a Christmas pudding is not complicated, but a few small details can make a big difference in the final result. Here are some expert tips that will elevate your pudding from good to absolutely perfect.
Use Quality Ingredients
The flavor of your Christmas pudding depends entirely on the quality of your ingredients. Choose good-quality dried fruits from a bulk store or a reputable brand. Fresh spices make a noticeable difference compared to pre-ground ones — invest in whole spices and grind them yourself if you can. The same goes for your citrus zest; use fresh oranges and lemons rather than bottled juice.
Do Not Skip the Resting Time
Many traditional recipes call for the pudding to rest for several days before it is baked. This allows the flavors to develop and deepen, and the alcohol to penetrate the dried fruits fully. If you have the time, prepare the batter a week or two before Christmas and store it in the refrigerator. The longer it rests, the better it tastes.
Reheat Leftovers Properly
Christmas pudding is one of those rare desserts that tastes even better the next day. If you have leftovers, wrap them tightly and store them in the refrigerator. To reheat, steam the pudding for 1-2 hours or warm it in the oven at 150°C (300°F) for about 30 minutes. Reheating brings back the moisture and refreshes the flavors beautifully.
Add a Splash of Fresh Spirit Before Serving
Just before you serve the pudding, warm a small amount of brandy or rum and pour it over the top. Then, carefully light it with a long match. The flames will burn off the raw alcohol taste and leave behind a warm, fragrant aroma that is pure Christmas magic. This theatrical moment never fails to impress your guests.
Common Mistakes to Avoid When Baking Christmas Pudding
Even experienced bakers can run into trouble when making Christmas pudding. Knowing what to avoid saves you from a dry, dense, or unevenly cooked result. Here are the most common mistakes and how to steer clear of them.
Overfilling the Basin
It is tempting to fill the basin right to the top, but the pudding expands significantly during cooking. Filling it more than two-thirds full will cause the batter to overflow, creating a mess in your oven and ruining the shape of your pudding. Leave plenty of room for rising.
Using Too High a Temperature
Baking at too high a temperature is the fastest way to ruin a Christmas pudding. The outside will burn while the inside remains raw and undercooked. Always stick to the low temperature recommended in your recipe — patience is the secret ingredient here. A slow, gentle bake is what gives the pudding its characteristic moist, dense texture.
Forgetting to Cover the Pudding
Leaving the pudding uncovered for the entire baking time will cause the top to dry out and darken too much. Always use the parchment and foil cover, and only remove the foil during the last 30 minutes of baking if you want a slightly caramelized top.
Not Soaking the Fruits Long Enough
If you mix the pudding and bake it the same day, the dried fruits will not have absorbed enough liquid. The result is a pudding that tastes flat and lacks depth. Give the fruits at least a few hours to soak, and overnight is even better. This simple step makes a noticeable difference in the final flavor.
Opening the Oven Door Too Often
Every time you open the oven door, you let out heat and create temperature fluctuations. This can cause the pudding to sink or cook unevenly. Resist the urge to peek — trust the process and only check the pudding when the timer goes off.
Serving and Storing Your Christmas Pudding
A perfectly baked Christmas pudding deserves the right accompaniments and proper storage to keep it at its best. Here is everything you need to know about serving and storing your holiday dessert.
Classic Serving Suggestions
The most traditional way to serve Christmas pudding is with a generous pour of warm brandy butter. To make brandy butter, simply mix softened butter with powdered sugar and a good splash of brandy until smooth and creamy. The rich, buttery sweetness pairs beautifully with the dense, fruity pudding.
Other popular options include whipped cream, vanilla ice cream, or a drizzle of custard. Some people like to serve it with a dollop of crème fraîche or a sprinkle of powdered sugar for an extra touch of elegance. There are no rules here — serve it however you and your family enjoy it most.
How to Store Leftover Pudding
Christmas pudding keeps remarkably well. Once cooled, wrap the pudding tightly in plastic wrap, then in aluminum foil, and store it in a cool, dry place for up to two weeks. For longer storage, wrap it tightly and freeze it for up to three months. When you are ready to enjoy it again, simply thaw it overnight in the refrigerator and reheat gently.
If you have already sliced the pudding, wrap each slice individually before freezing. This way, you can defrost just one portion at a time without having to thaw the entire pudding. It is a wonderful way to enjoy this festive treat well into the New Year.
Making Ahead: Can You Prepare Christmas Pudding in Advance?
Absolutely. In fact, Christmas pudding is one of the best desserts to make ahead of time. The flavors improve with age, and many families prepare their puddings weeks or even months before Christmas Day. The key is to store the pudding properly — wrapped tightly and kept in a cool, dark place or the refrigerator.
If you are short on time, you can prepare the batter on Christmas Eve, bake it on Christmas morning, and still have a delicious, warm pudding ready for the holiday table. The pudding will taste fresh and wonderful even when made just a few hours before serving.
Frequently Asked Questions
Can I cook Christmas pudding in the oven without a pudding basin?
Yes, you can. Any deep, oven-safe dish or ramekin will work in a pinch. Just make sure to grease it well and adjust the cooking time based on the size and depth of your container. A shallower dish will cook faster, so keep an eye on it and test with a skewer to check for doneness.
How long does Christmas pudding last after baking?
A freshly baked Christmas pudding can last for up to two weeks when stored properly in the refrigerator, wrapped tightly. If you freeze it, it will keep for up to three months. Many people believe that Christmas pudding actually improves in flavor after a few days of resting, which is why it is such a popular make-ahead dessert.
Can I make Christmas pudding without alcohol?
Definitely. You can substitute the brandy or rum with orange juice, apple juice, or even strong tea. The pudding will still be delicious and moist. Some people also use a combination of fruit juices and a splash of vanilla extract to add complexity and depth without the alcohol.
What temperature should I bake Christmas pudding at?
The ideal temperature for baking Christmas pudding in the oven is 140°C (285°F) for a conventional oven or 120°C (250°F) for a fan-forced oven. This low temperature ensures the pudding cooks through evenly without drying out or burning the top. Patience and a steady, gentle heat are the keys to success.
Can I reheat a store-bought Christmas pudding in the oven?
Yes, you can. Wrap the store-bought pudding in foil and place it in a preheated oven at 150°C (300°F) for about 20-30 minutes. If the pudding comes in a microwave-safe container, you can also reheat it in the microwave, though the oven method gives a better texture. Adding a splash of brandy or juice before reheating helps refresh the moisture and flavor.
Why is my Christmas pudding dry and dense?
A dry Christmas pudding is usually the result of overbaking, using too little fat or liquid, or baking at too high a temperature. To avoid this, stick to the recommended temperature and time, make sure your fruit is well soaked, and do not skip the eggs and suet. If your pudding has already turned out dry, brushing it with a little warm juice or syrup before serving can help add moisture back in.
Conclusion
Cooking Christmas pudding in the oven is one of the most rewarding things you can do in the kitchen during the holiday season. It is simpler than traditional steaming, requires less equipment, and produces a beautifully rich, moist pudding that will be the centerpiece of your Christmas dessert table. With the right ingredients, the correct oven temperature, and a little patience, you can create a pudding that your family will talk about for years to come.
Remember to take your time with the preparation, use quality ingredients, and follow the steps carefully. The magic of Christmas pudding lies not just in the final result but in the process — the mixing, the soaking, the waiting, and the anticipation of that first slice on Christmas Day. Whether you are a beginner baker or a seasoned pro, this oven-baked method will help you create a festive dessert that is truly special.
So pull on your apron, gather your ingredients, and get ready to bake the best Christmas pudding you have ever made. Your family and guests will thank you, and the warm, spicy aroma filling your kitchen will be the perfect start to a memorable holiday celebration. Happy baking, and happy holidays!