How To Change Oven Element With These Easy Steps Today
Learning how to change oven element is easier than most homeowners think. This guide walks you through every step with clear instructions and essential safety tips. You will save money on oven repair costs and gain confidence in handling basic oven maintenance tasks. Whether your bake element or broil element has failed, this article has you covered. Read on to replace your faulty heating element quickly and safely at home.
Learning how to change oven element is one of the most satisfying DIY repairs you can do at home. It might seem intimidating at first, but the process is straightforward and saves you a fortune in oven repair costs. Most homeowners can complete the task in under an hour with basic tools and a little patience. This guide covers everything from identifying a faulty heating element to installing your replacement part correctly. By the end, you will feel confident tackling this common oven maintenance task on your own.
A broken oven element can disrupt your entire cooking routine. Imagine prepping a roast only to find your oven not heating properly. The bake element sits at the bottom of the oven and handles most of your baking and roasting. The broil element lives at the top and delivers high heat for browning and grilling. When either one fails, your oven temperature suffers and your meals pay the price. Understanding how these components work helps you diagnose problems faster and decide whether a DIY fix is right for you.
Replacing an element is not just about saving money. It also teaches you more about your appliance and builds practical skills. Many people avoid oven repair because they fear electrical work. But changing an oven heating element involves simple electrical connections that any careful homeowner can manage. With the right guidance, you will see that this is one of the easiest and most rewarding repairs you can handle. Let us walk through the entire process together.
Key Takeaways
- Safety First: Always disconnect the power supply before starting any oven repair work.
- Right Tools Matter: A screwdriver, multimeter, and compatible replacement part make the job smooth.
- Know Your Element Type: Bake elements and broil elements differ in location and function.
- Test Before You Cook: Always verify the new element works before running a full bake cycle.
- Avoid Common Mistakes: Skipping safety checks and buying the wrong part are the top errors homeowners make.
- Call a Pro When Needed: Complex wiring or warranty issues are best left to a qualified technician.
📑 Table of Contents
- Why Your Oven Element Fails
- How To Change Oven Element: Tools and Safety Precautions
- Step-by-Step Guide to Changing Your Oven Element
- Testing Your New Oven Element
- Common Mistakes to Avoid When Replacing an Oven Element
- When to Call a Professional for Oven Element Replacement
- Maintaining Your New Oven Element for Long-Term Performance
- Conclusion
Why Your Oven Element Fails
Oven elements do not last forever. They endure extreme heat every time you cook, and wear naturally over time. Understanding why elements fail helps you prevent future problems and extends the life of your appliance.
Signs Your Oven Heating Element Is Going Bad
Spotting a failing element early saves you from cooking disasters. Look for these clear warning signs:
- Visible damage: Glowing spots, cracks, or holes on the heating coil are obvious red flags.
- Uneven cooking: If food burns on one side and stays raw on the other, your bake element may be weak.
- No heat at all: A completely dead element means your oven not heating during bake or broil modes.
- Intermittent heat: The element works sometimes but cuts out randomly, signaling internal corrosion.
- Bright orange glow issues: A healthy element glows evenly. Patchy or dim glow means it is failing.
These baking problems often point directly to a worn-out heating element. Do not ignore them. The longer you wait, the more strain you put on your oven thermostat and other internal components.
Common Causes of Element Damage
Several factors cause oven elements to wear out prematurely. Spills and food debris that bake onto the element create hot spots that weaken the coil over time. Using the self-clean cycle too frequently exposes the element to extreme temperatures that accelerate degradation. Age is another major factor. Most heating coils last between five and ten years with normal household use. Power surges can also damage electrical connections and blow out the element suddenly. Moisture from steam or aggressive cleaning can corrode the contact points, leading to intermittent failures that worsen over time.
How To Change Oven Element: Tools and Safety Precautions
Before you start any oven repair, gather your tools and review safety steps. Working with electrical appliances demands respect and caution. A little preparation goes a long way toward a smooth, safe element replacement.
What You Will Need
Here is your checklist for a successful repair job:
- Replacement element: Make sure it matches your oven model exactly. Check the model number on the back of your appliance or inside the door frame.
- Screwdriver set: Phillips and flathead screws are commonly used to mount elements securely in place.
- Multimeter: This tool tests electrical connections and confirms the new element works properly before you cook.
- Needle-nose pliers: Helpful for reaching tight spaces and handling small wire clips and connectors.
- Wire nuts or connectors: Sometimes the old connectors need replacing along with the element.
- Flashlight: You will be working inside a dark oven cavity, so good lighting is essential.
- Insulated gloves: Protect your hands from sharp edges and any residual heat inside the oven.
Safety First: Protecting Yourself and Your Home
Oven safety must be your top priority. Never work on a live appliance. Follow these non-negotiable steps every single time:
- Turn off the power: Switch off the circuit breaker that controls your oven at the electrical panel. Do not rely only on turning the oven knob off.
- Verify power is off: Use your multimeter to confirm no voltage reaches the element terminals. This step is non-negotiable.
- Wait for cooling: Let the oven cool completely if you have been cooking. Hot heating coils can cause severe burns even after the oven is turned off.
- Work on a dry surface: Moisture and electricity are a dangerous combination. Keep your work area dry at all times.
- Keep water away: Do not clean around electrical connections with wet cloths or sponges during the repair process.
Step-by-Step Guide to Changing Your Oven Element
Now comes the hands-on part. Follow these steps carefully to change oven element safely and correctly. Each step builds on the previous one, so do not skip ahead or rush through the process.
Step 1: Disconnect the Power Supply
Go to your home’s electrical panel and switch off the breaker that controls the oven. If your oven plugs into a wall outlet, unplug it as well. This double protection ensures zero risk of electrical shock while you work. Tape the breaker in the off position so no one in your household accidentally turns it back on while you are inside the oven cavity.
Step 2: Remove the Old Element
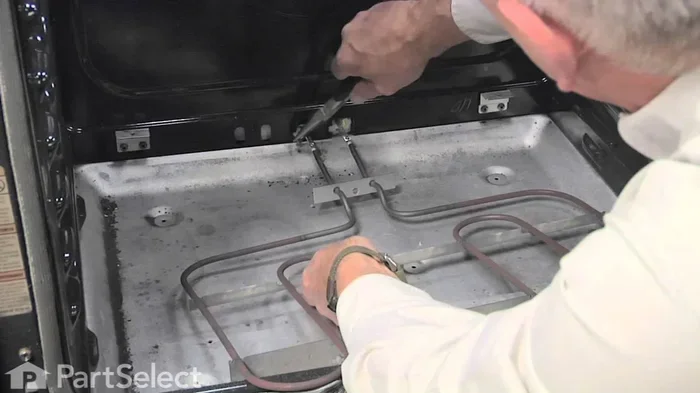
Open the oven door and locate the mounting screws that hold the heating element in place. These screws are usually at the back of the oven cavity, hidden behind the metal panel. Use your screwdriver to loosen and remove them carefully. Once the screws are out, gently pull the element forward toward you. You will see electrical connections at the back of the oven wall where the wires attach. Use needle-nose pliers to disconnect the wires one at a time. Take a clear photo before disconnecting so you remember the exact wiring layout for reassembly. Some elements slide out from the front of the oven; others require you to reach in from the back panel carefully.
Inspect the oven wiring while you have clear access. Look for burn marks, frayed wires, or corroded terminals. If the wiring looks damaged or worn, this is a sign that you may need more than just a new replacement part. Note any issues so you can address them during the repair.
Step 3: Install the New Element
Take your new replacement part and compare it side by side with the old one. They should match in size, shape, and terminal placement. If anything looks different, double-check your oven model number before proceeding. Connect the wires to the new element terminals carefully. Match each wire to the correct terminal based on the photo you took earlier. Use wire nuts or connectors if needed to secure the electrical connections firmly. Push the new element into position and align the mounting holes with the screw points. Insert the screws and tighten them gently. Do not overtighten, as this can crack the element housing or damage the oven cavity.
Step 4: Reconnect and Test the Element
Once the new heating coil is securely mounted, restore power at the circuit breaker. Close the oven door and set the oven to bake mode at 350 degrees Fahrenheit. Wait for about ten minutes and listen for the element to begin glowing. A healthy bake element glows a bright, even orange-red across its entire length. If you see bright spots, dark patches, or no glow at all, turn off the power immediately and recheck your connections. A loose wire is the most common cause of a non-functioning new element.
Testing Your New Oven Element
Do not skip this critical verification step. Testing confirms your oven repair was successful before you rely on the oven for actual meal preparation. A few simple tests give you peace of mind and ensure everything works as it should.
Using a Multimeter to Verify Continuity
A multimeter is your best friend for oven element testing. Set it to the continuity or resistance setting on the dial. Disconnect the element wires from the terminals and touch the multimeter probes to the element terminals directly. A healthy heating element should read between 20 and 60 ohms, depending on the specific model and wattage. If the reading shows infinite resistance (displayed as OL on the screen), the element is broken and you likely have a defective replacement part. If the reading shows zero or very close to zero ohms, the element has shorted out internally. In either case, double-check your wiring connections before assuming the new element itself is faulty.
Running a Test Bake
After the multimeter test passes, run a short test bake to verify real-world performance. Place a single piece of bread on the middle rack and set the oven to 350 degrees Fahrenheit. Monitor the bread for even browning on both sides. A properly functioning bake element produces consistent, even heat from the bottom of the oven. If the bread browns evenly on all sides, congratulations, your oven element replacement was a success. If one side remains pale or undercooked, the element may not be seated correctly or there could be an underlying issue with the oven thermostat that needs further investigation.
| Test Method | What It Checks | Expected Result | Action if Failed |
|---|---|---|---|
| Visual Inspection | Physical damage, cracks, holes | Smooth, intact coil with no spots | Replace the element immediately |
| Multimeter Test | Electrical continuity and resistance | 20 to 60 ohms resistance reading | Recheck wiring or replace part |
| Test Bake | Even heat distribution during cooking | Uniform browning of bread slices | Reseat element or check thermostat |
| Glow Test | Element heating capability and brightness | Even orange glow across full length | Check connections or replace part |
Common Mistakes to Avoid When Replacing an Oven Element
Even simple repairs come with pitfalls that can cause frustration or damage. Knowing the common mistakes helps you avoid them and complete your element replacement successfully the first time.
Skipping Safety Checks
The most dangerous mistake is working on a live appliance. Never assume the oven is disconnected just because the knob is in the off position. Always switch off the breaker at the panel and verify with a multimeter that no voltage reaches the element terminals. Skipping this step risks electrical shock, burns, or damage to your home’s wiring system. Another common safety oversight is forgetting to let the oven cool completely before starting work. Hot heating coils and metal components can cause severe burns even after the oven has been turned off for several minutes.
Buying the Wrong Replacement Part
Not all oven elements are created equal. Buying the wrong replacement part wastes both time and money. Always check your oven’s exact model number before ordering any component. The model number is usually found on a sticker inside the oven door frame, on the back panel, or in the user manual. Match the wattage, length, and terminal configuration exactly to your original element. When in doubt, contact the manufacturer directly or consult your oven’s user manual for the correct heating element specifications and compatibility details.
Over-tightening Mounting Screws
It is tempting to crank the mounting screws tight to ensure a rock-solid fit. But over-tightening can crack the element bracket, warp the oven cavity, or strip the screw holes. Tighten screws firmly but gently. The element should sit flush and secure without any bending or warping of the metal. A snug fit is all you need for a stable, long-lasting connection.
Ignoring Underlying Electrical Issues
Sometimes a failed heating element is actually a symptom of a bigger electrical problem lurking in the oven. A faulty oven thermostat, a damaged thermal fuse, or issues with the power supply can all cause repeated element failures. If you replace the element and it fails again within just a few weeks, do not simply replace it again. Investigate the root cause thoroughly before ordering another replacement part. Persistent failures are never normal and always signal that something else in the oven needs professional attention.
When to Call a Professional for Oven Element Replacement
DIY oven repair is rewarding and cost-effective, but some situations genuinely call for a qualified professional. Knowing when to call for help saves you time, money, and potential injury.
Complex Electrical Issues
If you discover damaged oven wiring, a tripped thermal fuse, or problems with the oven thermostat during your inspection, it is best to consult a licensed technician. These components involve more complex electrical connections and safety risks that go well beyond a simple element replacement. A qualified professional has the specialized training, diagnostic tools, and experience to handle these issues safely and correctly without risking further damage to your appliance or your home.
Warranty Considerations
Is your oven still under warranty? Attempting a DIY element replacement might void your coverage entirely. Check your warranty terms and conditions carefully before opening up the oven or disconnecting any components. Many manufacturers require certified technicians to perform all repairs in order to keep the warranty valid. If your oven is relatively new and still covered, contact the manufacturer directly or visit an authorized service center. The cost of professional service may be fully covered by your warranty, saving you both money and the hassle of doing it yourself.
Repeated Element Failures
If you have replaced the heating element more than once and it keeps failing prematurely, there is definitely an underlying electrical problem you need to address. A professional technician can run a comprehensive diagnostic on your oven’s power supply, wiring harness, control board, and thermostat. Repeated failures are not normal and always signal that something else in the oven’s electrical system needs proper diagnosis and repair. Do not keep replacing parts without understanding why they keep failing.
Maintaining Your New Oven Element for Long-Term Performance
You have successfully changed oven element and restored your oven to full working condition. Now let us talk about keeping it that way with proper oven maintenance habits. A little care goes a long way toward extending the life of your new heating element and preventing premature failures down the road.
Clean up spills immediately after the oven cools down completely. Food debris that bakes onto the heating coil creates stubborn hot spots that gradually weaken the element over many cooking cycles. Avoid using the self-clean cycle too frequently, as the extreme heat puts significant stress on all oven components, including both the bake element and broil element. Once a month, inspect your oven wiring and terminal connections for any signs of wear, discoloration, or corrosion. Keep the oven interior clean and dry at all times to prevent moisture damage to sensitive electrical connections. Regular oven maintenance like this ensures your replacement part lasts for many years of reliable, consistent cooking performance.
Also, be mindful of how you use your oven on a daily basis. Avoid slamming the oven door, as the vibration can gradually loosen electrical connections over time and cause intermittent heating issues. Never place aluminum foil directly on top of or touching the heating element, as the foil can reflect too much heat back toward the coil and cause uneven heating or damage. These small, mindful habits make a meaningful difference in the long-term performance and lifespan of your oven.
Conclusion
Learning how to change oven element empowers you to take control of your kitchen appliance repairs with confidence. You save significant money on oven repair costs, gain practical hands-on skills, and keep your oven running at peak performance for years to come. The process involves simple, clear steps: disconnect the power supply, remove the old heating element, install the replacement part, and test thoroughly before cooking. With the right tools, proper safety precautions, and this comprehensive guide, you can handle the job confidently and successfully.
Remember that not every situation calls for DIY work. If you encounter complex wiring issues, warranty concerns, or repeated element failures, do not hesitate to call a qualified professional. But for the average faulty heating element, this repair is well within the capabilities of most homeowners. Your oven temperature will be back to normal, your baking problems will be completely solved, and you will have the deep satisfaction of a repair job done right. Roll up your sleeves, gather your tools, and replace oven element like a confident pro today.
Frequently Asked Questions
How long does it take to change an oven element?
Most homeowners complete the entire process in 30 to 60 minutes. The actual element replacement takes about 15 to 20 minutes once you have your tools ready. The rest of the time goes toward safety checks, removing the old part carefully, and testing the new one thoroughly. Having everything prepared before you start helps keep the process smooth and efficient from beginning to end.
Can I replace the oven element myself without any prior experience?
Absolutely. Changing an oven heating element is one of the most beginner-friendly appliance repairs you can attempt. The task involves basic electrical connections that are straightforward to disconnect and reconnect safely. As long as you follow the safety steps like disconnecting the power supply at the breaker, you can handle this repair with confidence. This guide walks you through every single detail to ensure a safe and successful DIY oven repair experience.
How much does it cost to replace an oven element professionally?
The replacement part itself typically costs between $20 and $60 depending on your oven model and brand. If you hire a professional for the oven repair, expect to pay $150 to $300 including labor charges and service fees. Doing it yourself saves you the entire labor cost. The only investment is the price of the new heating element and a few basic tools you likely already own at home.
Why does my new oven element keep burning out repeatedly?
A faulty heating element that fails repeatedly usually points to an underlying electrical issue that has not been addressed. Common culprits include a damaged thermal fuse, a malfunctioning oven thermostat, or problems within the oven wiring. Power surges can also damage new elements before they have a chance to settle in. Before replacing the replacement part again, investigate these potential root causes to prevent the same frustrating problem from recurring.
What is the difference between a bake element and a broil element?
The bake element is located at the bottom of the oven and provides steady, even heat for baking, roasting, and general cooking. The broil element sits at the top and delivers high, direct radiant heat for browning, grilling, and finishing dishes. Both are essential for different cooking functions and modes. When one fails, it affects only that specific cooking mode. Knowing which element is faulty helps you order the correct replacement part for your specific oven repair needs.
Do I need any special or expensive tools to change an oven element?
You need very few tools for this straightforward repair. A basic screwdriver set, a multimeter for testing electrical continuity, and needle-nose pliers for handling wires and clips are all you need. Most homeowners already have these essential tools in their home toolbox. The replacement part itself typically comes with mounting hardware included in most cases. No specialized or expensive equipment is required for a standard heating element swap.