How Long To Cook Milanesa In Air Fryer The Easy Way
Cooking milanesa in an air fryer is the easiest way to get a perfectly crispy, golden crust without deep frying. This guide covers exact cook times, temperatures, and pro tips for both chicken and beef milanesa. Whether you are a beginner or a home cook looking to upgrade your milanesa recipe, you will find everything you need right here.
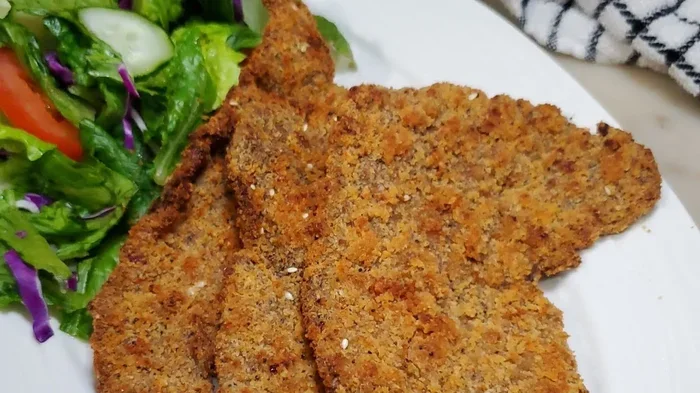
There is nothing quite like a perfectly crispy milanesa straight out of the kitchen. Golden, crunchy on the outside, tender and juicy on the inside. For years, people have relied on deep frying or oven baking to get that signature coating just right. But now, the air fryer has changed the game completely.
Cooking milanesa in an air fryer gives you all the crunch of deep frying with a fraction of the oil. It is faster, cleaner, and honestly easier than most people expect. Whether you are making milanesa de pollo (chicken milanesa) or a classic beef cutlet, the air fryer delivers consistent results every single time. In this guide, you will learn exactly how long to cook milanesa in air fryer, the best temperatures, preparation tricks, and common mistakes to avoid.
By the end, you will feel confident enough to whip up a restaurant-quality milanesa recipe in your own kitchen. No deep fryer required. Let us get into it.
Key Takeaways
- Ideal Temperature: Cook milanesa at 375°F to 400°F for the best crispy coating and even cooking.
- Cook Time: Most milanesa cuts need 10 to 15 minutes in the air fryer, flipping halfway through.
- Thickness Matters: Thicker cuts may need up to 20 minutes, while thin slices cook in as little as 8 minutes.
- Preparation Tips: Patting meat dry and lightly oiling the breading leads to a crunchier finish.
- Avoid Overcrowding: Cook in batches for proper air circulation and maximum crispiness.
- Resting Is Key: Let milanesa rest for 2 to 3 minutes after cooking to lock in juices.
- Versatile Dish: Milanesa works with chicken, beef, pork, and even cheese, making it a flexible air fryer staple.
📑 Table of Contents
What Is Milanesa And Why Air Fry It?
Understanding The Classic Milanesa
Milanesa is a breaded cutlet that originated in Argentina and has become a staple across Latin America. It is typically made from thin slices of beef, chicken, or pork that are coated in seasoned flour, beaten egg, and breadcrumbs. The result is a crispy exterior with a tender, flavorful center. Some popular variations include milanesa napolitana topped with tomato sauce and cheese, or a simple plain black milanesa served with lemon.
The traditional method involves shallow frying in a skillet or deep frying in a pan full of oil. Both methods work well, but they can be messy, use a lot of oil, and require close attention. The air fryer simplifies everything. It uses hot circulating air to crisp up the breading evenly, giving you that satisfying crunch without the excess grease. If you love crispy milanesa but want a cleaner cooking process, the air fryer is your best bet.
Why The Air Fryer Works So Well
The air fryer is essentially a small convection oven. It blows hot air rapidly around the food, creating a crispy surface through the Maillard reaction. This is the same chemical process that makes fried food golden and delicious. Here is why it works so well for milanesa:
- Even cooking: The circulating heat coats every part of the breading equally.
- Minimal oil: You only need a light spray of oil, unlike deep frying.
- Faster prep: No heating a large pot of oil or waiting for it to stabilize.
- Easy cleanup: Most air fryer baskets are dishwasher safe.
- Healthier results: Up to 70 to 80 percent less fat compared to deep frying.
Think of it like this. If you have ever tried to use a kitchen appliance for something unexpected, like brewing tea in a coffee maker, you know that once you figure out the technique, it opens up new possibilities. The same idea applies here. The air fryer was originally popularized for snacks, but it handles full meals like milanesa beautifully.
How Long To Cook Milanesa In Air Fryer
Standard Cook Times For Different Milanesa Types
The exact cooking time depends on a few factors: the type of meat, the thickness of the cutlet, and your specific air fryer model. Here is a breakdown of the most common types and their recommended air fryer cooking times:
| Milanesa Type | Thickness | Temperature | Total Cook Time |
|---|---|---|---|
| Chicken Milanesa | Thin (1/4 inch) | 375°F | 10-12 minutes |
| Beef Milanesa | Thin (1/4 inch) | 400°F | 8-10 minutes |
| Pork Milanesa | Medium (1/2 inch) | 375°F | 14-16 minutes |
| Cheese Milanesa | Thin | 375°F | 6-8 minutes |
| Thick Cut Milanesa | 3/4 inch | 375°F | 18-20 minutes |
These are general guidelines. Always check the internal temperature. Chicken milanesa should reach 165°F inside. Beef and pork can be cooked to your preference, but pork should hit at least 145°F. The air fryer temperature and time listed above will give you a golden crust while keeping the meat perfectly cooked.
The Flip Rule: Why Turning Matters
No matter what type of milanesa you are making, you should flip it halfway through cooking. This ensures both sides get equally crispy. If you skip the flip, the bottom may turn pale while the top browns unevenly. Set a timer for half the total cook time, open the basket, and gently turn each piece. Then cook for the remaining minutes. It is a small step that makes a huge difference in the final result.
Preparing Your Milanesa For The Air Fryer
Choosing The Right Meat
The foundation of a great milanesa preparation starts with the meat. For chicken, use boneless, skinless breast cut into thin cutlets. Pound them evenly so they are roughly 1/4 inch thick. For beef, sirloin or round steaks work great. Slice them thin and pound gently to even out the thickness. The more uniform your cutlets, the more consistent your cooking will be.
If you are using pre-sliced milanesa from the store, check the thickness. Some pre-sliced versions are too thick for quick air fryer cooking and may need a few extra minutes. Adjust your timing accordingly.
The Breading Process
A proper crispy coating is what separates good milanesa from great milanesa. Here is a simple three-step breading method:
- Flour: Season flour with salt, pepper, and a pinch of garlic powder. Dredge each cutlet in the flour, shaking off the excess.
- Egg: Beat eggs with a splash of milk or water. Dip the floured cutlet into the egg mixture, making sure it is fully coated.
- Breadcrumbs: Use fine or Italian-style breadcrumbs. Press them gently onto the cutlet to create an even layer. Do not press too hard or you will flatten the coating.
For extra crunch, you can mix parmesan cheese into the breadcrumbs. This adds flavor and helps the coating brown faster in the air fryer. Some cooks also add a pinch of paprika or dried oregano to the breadcrumb mix for a more aromatic milanesa seasoning.
Prepping For The Basket
Before placing milanesa in the air fryer, lightly spray or brush each piece with oil. This helps the breading crisp up faster. Do not drench the milanesa in oil. A light mist is all you need. Also, preheat your air fryer for about 3 minutes at the target temperature. Preheating ensures the breading starts crisping immediately, similar to how you would preheat an oven for pour over coffee to get the best extraction from the start.
Tips For Perfectly Crispy Milanesa Every Time
Do Not Overcrowd The Basket
This is the number one mistake people make. Overcrowding blocks airflow and leads to soggy, unevenly cooked milanesa. Leave space between each piece so the hot air can circulate freely. If you have a large batch, cook in multiple rounds. Yes, it takes a bit longer, but the results are worth it. Think of it this way. Proper spacing is like the difference between a single-serve brew and trying to force a full pot through a small filter. Space matters for quality.
Pat The Meat Dry
Moisture is the enemy of crispiness. Before breading, pat each cutlet thoroughly with paper towels. This removes surface moisture and helps the flour and egg mixture stick better. If the meat is wet, the breading will slide off during cooking, leaving you with bare, bland patches.
Use Panko For Extra Crunch
If you want an even crunchier crust, swap regular breadcrumbs for panko. Panko breadcrumbs are lighter and flakier, which creates more surface area for crisping. The result is an ultra-crispy golden milanesa that stays crunchy even after resting. Japanese-style panko works especially well in the air fryer.
Add A Light Rest After Cooking
Once the milanesa is done, let it rest on a wire rack or paper towel for 2 to 3 minutes. This allows the juices to redistribute and the crust to set. Cutting into it immediately releases steam, which can soften the coating. A brief rest keeps your milanesa crispy from the first bite to the last.
Season Generously
Do not be shy with seasoning. Milanesa benefits from salt, pepper, garlic powder, onion powder, and a touch of cayenne for heat. Season both the flour and the breadcrumbs. Layered seasoning creates a deeply flavorful crust that elevates the entire dish. If you are watching calories, you can still enjoy this. Check out this guide on reducing calories for inspiration on how small swaps make a big difference in any recipe. The same mindset works here. You can season boldly without adding significant calories.
Common Mistakes When Cooking Milanesa In An Air Fryer
Using Too High A Temperature
It might be tempting to crank up the heat for faster results. But too much heat burns the breading before the meat cooks through. Stick to 375°F for most milanesa. If your air fryer runs hot, drop it to 360°F. The goal is a slow, even brown, not a quick char. You want that beautiful golden color, not a dark, bitter crust.
Skipping The Oil Spray
The air fryer does not need as much oil as deep frying, but it still needs some. Without any oil, the breading can dry out and turn pale. A light spray of cooking spray or a brush of olive oil on each side does wonders. It promotes browning and adds a subtle richness to the crust.
Ignoring The Air Fryer Manual
Every air fryer model has slightly different performance characteristics. Some run hotter, some have weaker fans. If you are new to your machine, take notes on your first batch. Adjust time and temperature based on what you see. This is similar to learning how to use a Cv1 coffee maker or any new appliance. The manufacturer guidelines are a great starting point, but personal experience fine-tunes the process. Also, regular maintenance matters. Keeping your machine in top shape, like descaling a Breville coffee machine with vinegar, ensures consistent performance. The same applies to your air fryer. Clean the basket regularly for best results.
Not Flipping The Milanesa
We mentioned this earlier, but it is worth repeating. Flipping is essential. Without it, you will get one perfectly crispy side and one pale, undercooked side. Set a reminder on your phone if you need to. It takes literally five seconds to flip each piece.
Using Wet Or Frozen Milanesa Without Adjusting Time
If you are cooking from frozen, add 3 to 5 extra minutes to the total cook time. Frozen milanesa releases moisture as it thaws, which can soften the breading. Pat any excess moisture off before placing it in the basket. If you are using a wet batter, let it drip off before breading to avoid a soggy result.
Serving Suggestions And Pairings
Classic Accompaniments
Milanesa is incredibly versatile when it comes to sides. Here are some popular pairings that pair perfectly with a hot, crispy air fryer dinner:
- Mashed potatoes: A classic comfort pairing. Creamy potatoes balance the crunch of the milanesa.
- French fries: You can even cook fries in the air fryer alongside the milanesa for a full meal.
- Fresh salad: A simple green salad with lemon dressing lightens up the dish.
- Rice and beans: A hearty Latin American combination that works perfectly with milanesa.
- Lemon wedges: A squeeze of fresh lemon brightens the flavor and cuts through the richness.
- Tomato sauce: For milanesa napolitana, top with tomato sauce and melted cheese before serving.
Creative Twists
If you want to get creative, try these fun variations:
- Milanesa sandwich: Place a crispy milanesa cutlet between toasted bread with lettuce, tomato, and mayo. It is a beloved street food in Argentina.
- Cheese-stuffed milanesa: Place a slice of mozzarella between two thin cutlets, bread the whole thing, and air fry until golden. The melted cheese center is absolutely irresistible.
- Milanesa stir fry: Slice cooked milanesa into strips and toss with vegetables and sauce for a quick weeknight meal.
- Mini milanesa bites: Cut milanesa into smaller pieces for a party snack. Kids love these just as much as adults.
The beauty of milanesa is its adaptability. You can go classic or experimental, and the air fryer makes every version easier and healthier. Whether you are meal prepping for the week or hosting a casual dinner, this dish delivers every time.
Quick Tips For Air Fryer Milanesa
- Always preheat the air fryer for 2 to 3 minutes before adding milanesa.
- Lightly oil the breading for maximum crispiness.
- Flip halfway through cooking for even browning.
- Use a wire rack instead of the basket for thicker cuts to allow airflow underneath.
- Cook in small batches to avoid overcrowding.
- Let milanesa rest for 2 to 3 minutes before serving.
- Store leftovers in an airtight container and reheat at 350°F for 3 to 4 minutes to restore crunch.
Conclusion
Learning how long to cook milanesa in air fryer opens up a world of quick, healthy, and delicious meals. With the right temperature, proper timing, and a few simple preparation tricks, you can achieve a perfectly crispy crust every single time. Whether you are making thin chicken cutlets or thick beef milanesa, the air fryer handles it all with ease. Remember to preheat, oil lightly, flip halfway, and avoid overcrowding. These small steps separate a good milanesa from a truly great one.
Now that you have this complete guide, it is time to fire up your air fryer and make your first batch. Trust the process, follow the times listed here, and adjust based on your machine. Soon enough, you will have a go-to milanesa recipe that the whole family will love. Enjoy your cooking!
Frequently Asked Questions
How long to cook milanesa in air fryer at 400°F?
At 400°F, thin chicken or beef milanesa typically takes 8 to 10 minutes, flipping halfway through. Thicker cuts may need up to 15 minutes. Always check that the internal temperature reaches 165°F for chicken or your desired doneness for beef.
Do I need to flip milanesa in the air fryer?
Yes, you should always flip milanesa halfway through cooking. This ensures both sides develop an even, crispy crust. Flipping takes just a few seconds and makes a noticeable difference in the final result.
Can I cook frozen milanesa in the air fryer?
Yes, you can cook frozen milanesa. Add 3 to 5 extra minutes to the recommended cook time and pat off any excess moisture before placing them in the basket. Lightly spray with oil to help the breading crisp up properly.
How do I keep milanesa crispy after cooking?
Let milanesa rest on a wire rack for 2 to 3 minutes after cooking. Avoid stacking pieces directly on top of each other. To reheat leftovers, place them in the air fryer at 350°F for 3 to 4 minutes to restore the crunch.
What is the best temperature to cook milanesa in the air fryer?
The best temperature is between 375°F and 400°F. 375°F is ideal for thicker cuts that need more even cooking, while 400°F works well for thinner cutlets that require a faster cook time. Adjust based on your specific air fryer model.
Can I put cheese on my milanesa before air frying?
Absolutely. Cheese-stuffed milanesa is a delicious variation. Place a slice of mozzarella or provolone between two thin cutlets, bread the entire stack, and air fry at 375°F for 12 to 15 minutes until the cheese melts and the crust turns golden. Let it rest for a minute before cutting to keep the cheese from oozing out too quickly.