How To Put An Oven Rack Back In Without The Hassle
Learn how to put an oven rack back in quickly and easily. This guide covers simple steps for all oven types, from standard ranges to convection models. You’ll discover why racks get stuck, how to avoid common mistakes, and expert tips for smooth reinsertion every time.
Ever yanked out your oven rack for a deep clean, only to realize you have no idea how to put an oven rack back in? You’re not alone. Many home cooks face this frustrating moment every time. The good news is that putting it back is simpler than you think. With the right technique, you can slide that rack in smoothly every single time. This guide walks you through the exact steps, from alignment to avoiding common pitfalls. You’ll learn how to handle standard racks, convection models, and even stubborn stuck situations. By the end, you’ll feel confident tackling any oven rack reinsertion.
Key Takeaways
- Align the rack correctly: Slide it in at a slight angle to avoid jamming.
- Clean the rails first: Grease and debris are the top causes of sticking.
- Use gentle pressure: Forcing the rack can bend the guides or damage the oven.
- Check for warping: A bent rack won’t fit properly and may need replacement.
- Prevent future issues: Regular cleaning and proper removal keep racks gliding smoothly.
- Know when to replace: Worn springs or damaged rails signal it’s time for a new rack.
📑 Table of Contents
Why Oven Racks Get Stuck
The first step to a smooth reinsertion is understanding why racks get stuck in the first place. Several factors can turn a simple task into a battle. Once you know the cause, the fix becomes obvious.
The Role of Gravity and Alignment
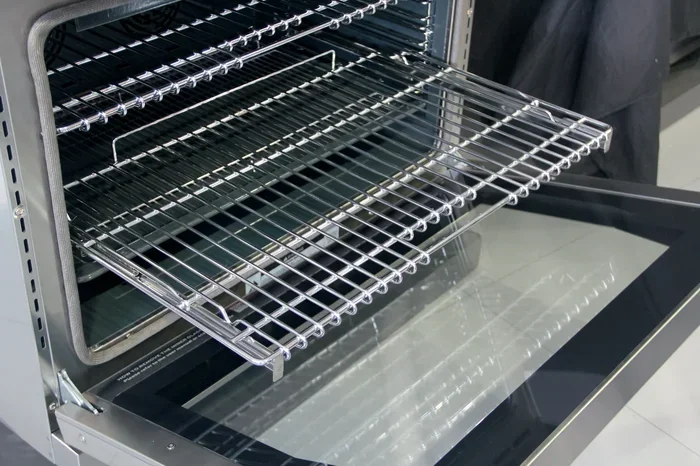
Oven racks have metal guides or rails on the sides. When you pull them out, the rack hangs on those guides. If you don’t align it correctly, gravity works against you. The rack can tilt and jam against the oven walls. Even a slight angle can cause it to catch. This is the most common reason people struggle. Proper oven rack alignment is everything.
Grease and Food Buildup
Over time, grease, crumbs, and food spills build up on the rack and the rails. This sticky residue acts like glue. It makes the rack feel heavy and sticky. A clean oven rack slides easily, but a dirty one fights you. Regular oven maintenance prevents this buildup. A quick wipe after each use saves you from a deep scrub later.
Warped or Damaged Racks
Racks can warp from high heat or impacts. A bent rack won’t sit flat in the guides. You might notice it rocks or wobbles. This is a sign of oven rack warping. If the rack is damaged, no amount of技巧 will fix it. You may need a replacement. Always check for bends before trying to reinsert.
Different Oven Types
Not all ovens are the same. A range oven rack in a standard electric oven behaves differently than a convection oven rack. Some have spring-loaded clips. Others slide on smooth rails. Knowing your oven type helps you choose the right method. Below is a quick comparison of common oven types.
| Oven Type | Rack Movement | Common Sticking Cause | Best Reinsertion Method |
|---|---|---|---|
| Standard Electric | Slides on side rails | Grease buildup on rails | Tilt and slide |
| Convection | May have clips or fans | Misaligned fan guard | Release clips first |
| Gas Range | Rests on burner brackets | Debris in burner area | Clear brackets first |
| Self-Cleaning | Heavy gauge racks | Warping from high heat | Check for bends |
How To Put An Oven Rack Back In: A No-Fuss Guide
Follow these steps to put your oven rack back in without any hassle. Each step builds on the last for a smooth result.
Step 1: Pull the Rack Out Fully
Before you can put it back, you need to remove it completely. Pull the rack straight out until it clears the oven cavity. Check for any large debris stuck to the bottom. If the rack is full of food bits, shake it over the sink. A clean oven rack goes back in much easier. This also gives you a chance to inspect the guides.
Step 2: Tilt and Align
This is the key move. Hold the rack at a slight angle—about 15 to 20 degrees. Slide the front end of the rack into the oven first. Let the back end hang outside. This angle lets the guides catch the rails. Once the front is in, you can lower the back end down gently. The rack will settle onto the guides smoothly. Think of it like sliding a tray under a couch.
Step 3: Slide It Back In Gently
Now that the rack is angled in, push it straight back. Use both hands. Apply even pressure. Do not force it. If you feel resistance, stop. Check the alignment again. A stuck oven rack usually means the guides are not catching. Adjust the angle slightly and try again. Patience is your best tool here.
Quick Release Technique for Stubborn Racks
If the rack still won’t budge, try the “rock and roll” method. Gently rock the rack side to side while pushing forward. This helps the guides find the rails. You can also lift the rack slightly and re-angle it. Sometimes just a small wiggle does the trick. Never use a hammer or tool to shove it in. That can damage the oven cavity or bend the rack permanently.
How To Put An Oven Rack Back In When It’s Stuck
Even with the right method, some racks resist. When you’re trying to put oven rack back in and it won’t move, don’t panic. First, check the rails for hidden debris. A piece of burnt food can act like a wedge. Next, look at the rack ends. Are the guide clips or springs intact? Sometimes a small spring pops out and blocks the path. If you see a broken spring, that’s likely the culprit. You can often replace just the spring without buying a whole new rack. If the rack itself is bent, no amount of wiggling will work. It’s time for a stuck oven rack rescue plan.
Common Mistakes That Make It Worse
Avoid these common errors to keep your oven rack in good shape and your reinsertion process smooth.
Forcing the Rack Straight Down
The biggest mistake is pushing the rack straight down into the oven. This jams it against the back wall. The metal guides can bend or snap. You might damage the oven cavity. Always use the tilt method. Patience saves you from costly repairs. Remember, how to put an oven rack back in correctly means working with gravity, not against it.
Ignoring the Rails and Tracks
The rails on the oven walls need attention too. If there’s grease or food on the rails, the rack will stick. Wipe the rails with a damp cloth before reinserting. This simple oven maintenance step makes a huge difference. A clean oven rack and clean rails work together. A quick scrub with a toothbrush can remove stubborn grime from the tracks.
Not Cleaning Before Reinserting
Putting a dirty rack back in just creates more mess. Food residue will bake onto the oven floor. It can smoke or smell. Take the extra minute to clean the rack first. A quick wash with warm soapy water keeps everything fresh. This also prevents pests from being attracted to leftover food particles.
Overloading the Rack
Heavy pots and pans can bend a rack over time. A bent rack won’t fit properly. Avoid placing oversized items that exceed the rack’s weight limit. Distribute weight evenly when cooking. This extends the life of your range oven rack. If you’re baking a large roast, consider using a lower rack position to spread the load.
Quick Tips to Prevent Future Hassles
A little prevention goes a long way. These simple habits keep your oven rack gliding smoothly every time.
- Clean racks after every use: A quick wipe prevents buildup. You don’t need a deep clean every time. Just remove loose crumbs and grease. This habit keeps the slide oven rack action smooth.
- Check the rails monthly: Look at the oven rails with a flashlight. Use a toothbrush for hard-to-reach spots. Clean rails mean the rack glides without catching.
- Lubricate with food-safe grease: For stubborn racks, a tiny bit of food-safe silicone grease on the rails helps. Apply a thin layer with a cloth. Wipe off any excess. This creates a slick surface. The rack slides in like butter.
- Store racks properly when removed: If you remove the rack for cleaning, store it flat. Don’t lean it against a wall where it can warp. A closet shelf or drawer works well. Proper storage prevents oven rack warping and damage.
- Check rack ends regularly: The metal clips or springs at the ends of the rack can wear out. Inspect them every few months. A missing spring makes the rack wobble and stick. Replace small parts before they cause bigger problems.
Expert Insights: When to Replace Your Oven Rack
Sometimes a rack is beyond saving. Knowing the signs saves you time and frustration. Here’s what the experts say.
Signs Your Rack Is Beyond Repair
Look for cracks, severe warping, or rust that won’t scrub off. If the rack doesn’t sit level anymore, it’s time for a new one. A damaged rack can affect your cooking results. Uneven heat distribution is a red flag. You might notice food browning more on one side. That’s a clear sign the rack is no longer doing its job.
Repair vs. Replace: Cost Comparison
Sometimes a oven rack repair is possible. You can bend a slightly warped rack back into shape. But if the metal is fatigued, replacement is safer. A new oven rack replacement costs between $20 and $60 for most models. It’s a small price for peace of mind. Below is a quick cost comparison.
| Option | Cost | Time | Best For |
|---|---|---|---|
| Repair (Bend Back) | Free | 10 minutes | Slightly warped rack |
| Replacement | $20-$60 | 1-2 days (shipping) | Cracked, rusted, or severely bent rack |
How to Find the Right Replacement
Check your oven manual for the model number. You can also measure the rack dimensions. Match the length, width, and wire gauge. Many manufacturers sell oven rack replacement parts online. Universal racks also work if they fit your oven’s rail system. Always double-check the size before ordering. A perfect fit ensures smooth operation and even cooking.
Key Takeaways
- Always tilt the rack at an angle when reinserting to prevent jamming.
- Clean the rails and rack before putting it back for smooth operation.
- Never force a stuck oven rack—stop and adjust your approach.
- Regular maintenance like wiping down racks after use prevents buildup.
- Replace damaged racks to ensure even cooking and safety.
- Know your oven type to choose the best reinsertion method.
Conclusion
Putting an oven rack back in doesn’t have to be a hassle. With the right how to put an oven rack back in technique, you can do it in seconds. Remember to tilt, align, and slide gently. Keep your rails clean and check for damage regularly. A little oven maintenance goes a long way. Now you know exactly what to do the next time that rack comes out. Enjoy your cooking with a perfectly placed oven rack.
Frequently Asked Questions
Can I put an oven rack back in while the oven is still warm?
It’s best to let the oven cool completely first. Hot racks can burn your hands, and the metal expands when warm, which can make reinsertion harder. Wait until it’s cool to the touch for safety and ease.
What if my oven rack has springs that pop out?
Small springs hold the rack ends in place. If one pops out, you can often reattach it with needle-nose pliers. Make sure the rack is fully seated in the guides before pushing it back into the oven. A missing spring causes wobbling and sticking.
Is it normal for an oven rack to stick after cleaning?
Yes, especially if you used a lot of water or cleaner. Residue can make the rails sticky. Wipe the rails dry and apply a thin layer of food-safe silicone grease. This restores smooth sliding action.
How often should I replace my oven rack?
Most racks last 10 to 15 years with proper care. Inspect them annually for warping, rust, or broken springs. If the rack doesn’t sit level or you see cracks, replace it immediately for even cooking and safety.
Can I use a universal oven rack replacement?
Yes, universal racks work if they match your oven’s rail system. Measure the rack length and width carefully. Check the wire gauge and ensure the end clips fit the oven cavity. Universal racks are a cost-effective solution for most standard models.
Why does my oven rack feel rough when I slide it in?
Roughness usually comes from baked-on grease or debris on the rails. Clean the rails with a damp cloth and a little baking soda. A smooth surface allows the rack to glide without catching. This simple step fixes most friction issues.