How To Make A Coffee Mug From Clay In 5 Easy Steps
Making a coffee mug from clay is easier than you think. This step-by-step guide walks you through shaping, drying, firing, and finishing your own handmade mug. Whether you use air-dry clay or a kiln, you will create a beautiful coffee mug from clay that is ready for your morning brew.
There is something deeply satisfying about sipping your morning coffee from a mug you made with your own hands. A coffee mug from clay carries a personal touch that no store-bought cup can match. Whether you are a complete beginner or a seasoned crafter, this project is fun, affordable, and incredibly rewarding.
In this guide, we walk you through every step of the process. You will learn how to choose the right clay, shape your mug, add a handle, dry it properly, and finish it with a beautiful glaze. By the end, you will have a handmade mug that you can proudly use every single day. Let us dive in.
Key Takeaways
- Simple Process: You only need 5 straightforward steps to create a functional coffee mug from clay at home.
- Beginner Friendly: No prior pottery experience is required. This project is perfect for first-time crafters.
- Multiple Clay Options: You can use air-dry clay, polymer clay, or kiln-fire clay depending on your needs.
- Customizable Design: Add handles, patterns, and glazes to make your mug truly unique.
- Affordable Craft: Basic supplies are inexpensive and widely available at craft stores or online.
- Food Safety Matters: Choose clay and glazes that are rated food safe for drinking vessels.
- Patience Is Key: Proper drying and curing time ensures your mug lasts for years.
📑 Table of Contents
- Why Make A Coffee Mug From Clay?
- What You Will Need To Make A Coffee Mug From Clay
- Step 1: Prepare Your Clay
- Step 2: Shape The Mug Body
- Step 3: Create The Handle
- Step 4: Dry And Cure Your Mug
- Step 5: Finish And Glaze Your Mug
- Common Mistakes To Avoid
- Expert Tips For Better Results
- Caring For Your Handmade Mug
- Where To Find Quality Clay And Supplies
- Final Thoughts
Why Make A Coffee Mug From Clay?
Before we get into the steps, let us talk about why this project is worth your time. Crafting your own mug offers benefits that go far beyond just having a cute cup on your shelf.
First, it is a creative outlet. Working with clay is therapeutic and meditative. Many people find that shaping clay reduces stress and boosts focus. Second, it saves money. A handmade mug costs a fraction of what a similar artisan piece would cost at a boutique. Third, it makes an amazing gift. Friends and family will love receiving a personalized mug made just for them.
If you have ever wanted to try pottery but felt intimidated, this is your perfect starting point. The process is simple, and the results are impressive. You do not need a fancy studio or expensive equipment. A few basic tools and some clay are all you need to get started.
What You Will Need To Make A Coffee Mug From Clay
Before you begin, gather your supplies. Having everything ready will make the process smooth and enjoyable. Here is a simple list of what you need.
Clay Selection
Your choice of clay is the most important decision you will make. There are three main types to consider:
- Air-Dry Clay: This is the easiest option for beginners. It dries naturally at room temperature. No kiln or oven is needed. Air-dry clay is widely available and affordable.
- Polymer Clay: This clay cures in a home oven. It comes in many colors and stays flexible until baked. Polymer clay is great for small, detailed projects.
- Ceramic or Kiln Clay: This is the traditional pottery clay. It requires a kiln to fire at high temperatures. The result is a durable, professional-quality mug.
Basic Tools and Supplies
- Clay sculpting tools or a basic knife
- A rolling pin or flat surface for shaping
- A cup or round object for tracing the base
- Water or a spray bottle for smoothing
- Sandpaper (fine grit) for finishing
- Acrylic paint or food-safe glaze
- A brush for applying finish
You do not need to buy expensive tools. Many household items work perfectly. A butter knife can replace a sculpting tool. A glass jar works as a rolling pin. Get creative with what you already have.
Step 1: Prepare Your Clay
The first step in making a coffee mug from clay is preparing your material. This step sets the foundation for everything that follows. Take your time here to get the best results.
Start by removing your clay from its packaging. Knead it thoroughly for about five minutes. This process, called wedging, removes air bubbles and ensures the clay is soft and uniform. Air bubbles can cause your mug to crack during drying or firing, so this step is critical.
If you are using air-dry clay, keep a spray bottle of water nearby. Clay can dry out quickly as you work. Mist it lightly if it starts feeling stiff. For polymer clay, warm it in your hands for a few minutes until it becomes pliable.
Conditioning Your Clay
Conditioning means working the clay until it is smooth and easy to shape. Push, fold, and press the clay repeatedly. You will feel it become softer and more responsive. Well-conditioned clay is less likely to crack and much easier to work with.
Once your clay is ready, roll it into a ball. The size depends on how large you want your mug to be. A standard coffee mug holds about 10 to 12 ounces, so plan your clay size accordingly. A ball roughly the size of a softball works well for a typical mug.
Step 2: Shape The Mug Body
Now comes the fun part. This is where your mug starts to take shape. There are several methods you can use, and we will cover the simplest one.
The Coil Method
The coil method is one of the oldest and easiest pottery techniques. Roll your clay into long, snake-like coils. Each coil should be about the thickness of a pencil. Then, stack the coils on top of each other, blending them together as you go.
Start with a flat base. Roll out a circle of clay about 4 inches wide. This will be the bottom of your mug. Stack your first coil on top of the base and press it firmly. Continue adding coils, blending each one into the last with your fingers or a tool.
As you build up the walls, keep them even in thickness. Aim for about a quarter-inch thickness all around. Too thin and the mug will be fragile. Too thick and it will be heavy and uneven.
The Slab Method
Another approach is the slab method. Roll out a flat sheet of clay and cut it into a rectangle. Wrap the rectangle around a cylindrical object to form the mug shape. Score the edges and slip them together to seal the seam. This method gives you clean, straight walls.
Both methods work well. Choose the one that feels most comfortable to you. Practice makes perfect, so do not worry if your first attempt is not flawless.
Step 3: Create The Handle
A mug without a handle is just a cup. The handle is what makes it a true coffee mug. Making a handle is simple but requires a little attention to detail.
Roll a piece of clay into a long rope about 6 to 8 inches long. The thickness should be comfortable to grip, roughly the width of your thumb. Curve the rope into a handle shape, making a C or D curve depending on your preference.
Attach the handle to the mug body by scoring both contact points. Scoring means scratching small lines into the clay surfaces you are joining. Apply a small amount of water or slip (clay mixed with water) to the scored areas. Press the handle firmly onto the mug and blend the edges with your finger.
Make sure the handle is attached securely. Give it a gentle tug to test the bond. If it feels loose, add a small coil of clay to reinforce the joint. Let the handle dry slightly before moving on to the next step. This helps it hold its shape.
Handle Design Tips
- Make the handle wide enough for your fingers to fit comfortably
- Keep the handle symmetrical for a balanced look
- Consider a loop handle for a modern aesthetic
- Add texture or patterns to the handle for visual interest
Your handle design says a lot about the overall style of the mug. Experiment with different shapes until you find one you love. Remember, there are no rules here. This is your creation.
Step 4: Dry And Cure Your Mug
Drying is one of the most important steps in the process. Rushing this stage is the number one mistake beginners make. Proper drying prevents cracking and ensures your mug holds up over time.
Place your mug in a cool, dry area away from direct sunlight. Direct heat can cause uneven drying, which leads to cracks. Let it dry slowly over several days. Air-dry clay typically takes 24 to 48 hours to dry completely, depending on the thickness of the walls.
If you are using polymer clay, you can skip the air-drying step and move directly to baking. Follow the manufacturer’s instructions for temperature and time. Usually, polymer clay is baked at around 275 degrees Fahrenheit for 15 to 30 minutes per quarter inch of thickness.
Oven Drying For Polymer Clay
When curing polymer clay, a standard home oven works perfectly. You do not need a kiln. Place your mug on a baking sheet lined with parchment paper. Bake at the recommended temperature and monitor it closely. Overbaking can cause discoloration or burning.
Some crafters also use a homemade clay oven for more controlled heat distribution. This approach works well if you want consistent results without investing in a full kiln setup.
For those using traditional ceramic clay, kiln firing is necessary. If you do not own a kiln, many local pottery studios and community centers offer kiln services for a small fee. This is a great option for beginners who want professional-quality results without the equipment investment.
Step 5: Finish And Glaze Your Mug
The final step is where your mug truly comes to life. Finishing and glazing add color, protection, and that professional polished look. This step transforms a simple clay shape into a beautiful, functional piece of art.
Sanding
Before applying any finish, lightly sand your dried mug with fine-grit sandpaper. This smooths out any rough edges or imperfections. Sand in gentle circular motions. Wipe away any dust with a damp cloth before moving on.
Applying Glaze Or Paint
If you want a glossy, ceramic-like finish, use a food-safe ceramic glaze. Apply the glaze with a brush in thin, even coats. Two to three coats usually give the best results. Let each coat dry before applying the next.
For a more colorful and creative approach, acrylic paints work wonderfully on air-dry and polymer clay. You can paint patterns, designs, or solid colors. Get as creative as you like. There is no wrong way to decorate your mug.
After painting, apply a clear sealant to protect the design. A food-safe sealant is essential if you plan to use the mug for drinking. Look for sealants labeled as food safe or non-toxic.
Baking The Glaze
If you are using ceramic glaze, it needs to be fired in a kiln to set properly. The kiln heats the glaze to a high temperature, fusing it to the clay surface. This creates a durable, waterproof finish that can withstand daily use.
For air-dry clay mugs, a food-safe acrylic sealer sprayed on after painting works as an alternative. It provides a protective layer without the need for kiln firing.
Adding Personal Touches
- Press your initials into the bottom of the mug
- Add small decorative elements like leaves or stars
- Create a marbled effect by blending two clay colors
- Use stamps or textured tools to imprint patterns
- Paint a favorite quote or inside joke on the side
These personal touches make your mug one of a kind. They tell a story and make each sip feel more special. Your coffee mug from clay is not just a container for your drink. It is an expression of who you are.
Common Mistakes To Avoid
Even with the best intentions, mistakes can happen. Knowing what to avoid saves you time, clay, and frustration. Here are the most common pitfalls and how to steer clear of them.
- Skipping the wedging step: Unconditioned clay has air bubbles that cause cracks. Always wedge your clay thoroughly before shaping.
- Rushing the drying process: Speeding up drying with direct heat or a hair dryer causes uneven cracks. Let nature take its course.
- Making the walls too thin: Thin walls are fragile and prone to breaking. Keep a consistent quarter-inch thickness throughout.
- Attaching the handle while the body is too wet: The handle needs a slightly firmer base for a strong bond. Let the body firm up a bit first.
- Using non-food-safe materials: If the mug will hold beverages, always use food-safe clay and sealants. This is especially important for items that touch your lips.
Avoiding these mistakes does not mean you need to be perfect. Every potter makes errors along the way. What matters is learning from them and enjoying the process.
Expert Tips For Better Results
Want to take your mug-making skills to the next level? Here are some expert tips that make a real difference.
- Keep a spray bottle nearby: Mist your clay frequently to prevent it from drying out too fast while you work.
- Use a rib tool for smoothing: A simple rib tool gives you cleaner, smoother surfaces than your fingers alone.
- Work on a damp canvas: A wet canvas prevents your clay from sticking to your work surface and keeps it moist.
- Store leftover clay properly: Wrap unused clay tightly in plastic wrap and store it in a sealed bag. It stays workable for weeks.
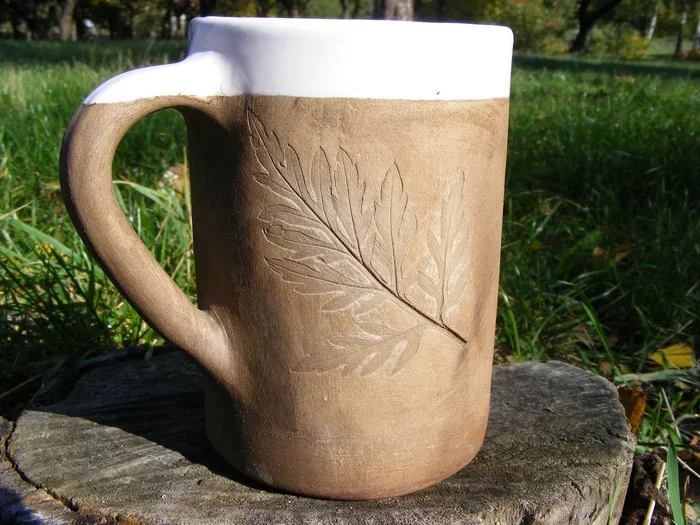
- Experiment with textures: Try pressing fabric, leaves, or lace into the clay before it dries for unique surface patterns.
These small adjustments elevate your craft significantly. You will notice the difference in your finished pieces right away. The more you practice, the more natural the process becomes.
Caring For Your Handmade Mug
Your finished mug deserves proper care to last a long time. Handmade clay mugs are durable but do require some special attention.
If your mug is made from air-dry clay or polymer clay, hand washing is recommended. Avoid placing it in a dishwasher, as the heat and water pressure can damage the finish over time. Use mild soap and warm water to clean it gently.
For kiln-fired ceramic mugs, dishwasher use is generally safe. The high firing temperature makes the clay vitrified and non-porous. However, hand washing still extends the life of any mug, handmade or not.
Store your mug in a safe place where it will not get knocked over. A mug stand or a dedicated shelf works well. If you are giving the mug as a gift, wrap it in tissue paper or bubble wrap for protection during transport.
Where To Find Quality Clay And Supplies
Getting the right materials is the first step to a successful project. Fortunately, quality clay and tools are easy to find. Most craft stores carry a good selection of air-dry and polymer clays. Online retailers offer even more variety and often better prices.
For ceramic clay and kiln services, check with local pottery studios or community art centers. Many offer beginner classes where you can learn the basics and use professional equipment. This is a fantastic way to build your skills and meet other craft enthusiasts.
When shopping for clay, look for brands that are specifically rated for the type of project you are doing. For drinking vessels, always choose materials labeled as food safe. Your health and safety should always come first.
Final Thoughts
Making a coffee mug from clay is one of the most rewarding beginner craft projects you can try. It combines creativity, functionality, and a sense of accomplishment. In just five simple steps, you can go from a lump of clay to a beautiful, handmade mug that you will cherish.
The process teaches patience, builds confidence, and sparks creativity. Each mug you make will be better than the last. You will develop your own techniques and style that set your work apart. So grab some clay, set aside an afternoon, and start crafting. Your perfect morning coffee mug is waiting to be born.
Remember, perfection is not the goal. Enjoyment is. Every imperfect mug carries a story and a piece of your heart. That is what makes handmade things truly special. Now go make something amazing.
Frequently Asked Questions
Can I use any type of clay to make a coffee mug?
Not all clays are suitable for mugs. Air-dry clay, polymer clay, and ceramic kiln clay all work, but each requires different drying and finishing methods. Choose a clay that is rated food safe if the mug will hold beverages.
Do I need a kiln to make a clay mug?
No, you do not need a kiln if you use air-dry clay or polymer clay. Both of these options cure without a kiln. Air-dry clay dries at room temperature, while polymer clay cures in a standard home oven. Kiln firing is only necessary for traditional ceramic clay.
How long does it take to make a clay mug?
The active crafting time is about 1 to 2 hours. However, drying and curing add extra time. Air-dry clay takes 24 to 48 hours to dry, polymer clay bakes in 30 to 60 minutes, and kiln-fired clay requires firing time which varies by studio.
Is it safe to drink from a homemade clay mug?
Yes, as long as you use food-safe clay and food-safe sealants or glazes. Always check product labels to confirm they are rated for food contact. Avoid using glazes that contain lead or cadmium, especially for drinking vessels.
Can I put my handmade clay mug in the dishwasher?
It depends on the type of clay and finish. Kiln-fired ceramic mugs are generally dishwasher safe. Air-dry and polymer clay mugs should be hand washed to preserve the finish and prevent damage from heat and water pressure.
What if my clay mug cracks during drying?
Cracks usually happen from uneven drying or air bubbles. You can repair small cracks by wetting the cracked area and pressing a small piece of clay into it. Smooth it out and let it dry slowly. Prevention through proper wedging and slow drying is the best approach.