How Long To Cook A Duck In The Oven For Juicy Results
How long to cook a duck in the oven depends on the cut and temperature, but the goal is always crispy skin and tender meat. This guide covers exact times, temperatures, and simple steps for a juicy roast duck. You’ll learn to avoid common mistakes and carve like a pro.
Roasting a whole duck in the oven feels intimidating, but it doesn’t have to be. The secret is simple: know your time and temperature. How long to cook a duck in the oven varies by the cut you choose, but the reward is a meal with crispy golden skin and juicy, tender meat. This guide walks you through every step, from picking the bird to slicing it for the table.
Many home cooks worry that duck will turn out greasy or dry. In reality, a few easy tricks solve both problems. You’ll learn the best oven settings, how to prep the skin, and the exact internal temperatures to aim for. By the end, you’ll feel confident enough to make oven-baked duck a regular dinner party star.
The key is patience. Duck needs gentle heat to melt the fat under the skin without drying out the flesh. Whether you’re cooking a whole duck, breast halves, or just the legs, the right approach makes all the difference. Let’s dive into the details and get your roast started on the right foot.
Key Takeaways
- Low and slow wins: Roasting duck at 325°F (165°C) renders fat and keeps meat juicy.
- Always use a meat thermometer: Duck breast is done at 135°F (57°C) and legs at 165°F (74°C).
- Rest the duck for 15–20 minutes: This lets juices redistribute for moist slices.
- Score the skin: Cutting shallow lines helps fat render and creates crispy crackling.
- Whole duck takes 2–3 hours: Breast halves cook in 45–60 minutes, while legs need 1–1.5 hours.
- Pat the skin dry: Dry skin crisps better than wet skin, so blot before seasoning.
📑 Table of Contents
- Why Oven-Roasted Duck Is Worth the Effort
- Choosing the Right Duck for Your Oven
- Preparing Your Duck for the Oven
- How Long To Cook A Duck In The Oven: Time and Temperature Guide
- Resting and Carving Your Duck for Juicy Results
- Common Mistakes That Ruin Duck
- Expert Tips for Perfectly Juicy Duck Every Time
- Conclusion
Why Oven-Roasted Duck Is Worth the Effort
The Magic of Crispy Skin and Tender Meat
Duck skin has a thick layer of fat that melts during cooking. When you roast it slowly, that fat renders out and leaves behind crackling that shatters at the bite. The meat stays moist because the fat bastes it from the inside. No other cooking method gives you that perfect contrast of crispy skin and juicy breast.
Oven-roasting also lets you control the heat precisely. You can start high to crisp the skin, then lower the temperature to cook the meat gently. This two-phase approach works wonders for a whole duck recipe. The result is a showstopper dish that looks impressive and tastes even better.
Why the Oven Works Best for Duck
A stovetop can’t render fat evenly, and a grill adds smoke that may overpower the delicate flavor of duck. The oven surrounds the bird with consistent, dry heat. This environment is ideal for duck cooking time management. You can baste the bird with its own juices without lifting a heavy pan over a hot burner.
Also, an oven fits a whole duck easily. You don’t need special equipment beyond a roasting pan and a rack. The oven’s enclosed space traps moisture, which helps keep the meat succulent while the skin crisps. For these reasons, the oven is the go-to method for roast duck at home.
Choosing the Right Duck for Your Oven
Whole Duck vs. Duck Breast
A whole duck feeds four to six people and makes a dramatic centerpiece. It takes longer to cook, usually around 2 to 3 hours, but the presentation is unbeatable. If you’re short on time or cooking for two, duck breast halves are a great alternative. They cook in under an hour and still deliver that signature crispy skin.
Duck legs and thighs are another option. They’re tougher cuts that benefit from longer, slower cooking. These pieces are perfect for low and slow duck recipes. They fall off the bone and have a rich, concentrated flavor. Choose based on how many people you’re serving and how much time you have.
Fresh vs. Frozen Duck
Fresh duck offers the best texture and flavor, but frozen duck works perfectly fine if you plan ahead. Thaw a frozen duck in the refrigerator for 24 to 48 hours. Never thaw it at room temperature, as the outer layers can enter the danger zone for bacteria growth.
When you buy a frozen duck, look for one without added solutions. Plain frozen duck keeps its natural juices better. Once thawed, pat the skin completely dry with paper towels. This simple step is crucial for achieving crispy skin in the oven.
Preparing Your Duck for the Oven
Seasoning and Flavoring
Duck has a rich, natural flavor that pairs well with simple seasonings. A generous sprinkle of salt and black pepper is all you need for a classic roast. For extra depth, add crushed garlic, fresh thyme, and a few bay leaves inside the cavity.
Some cooks like to rub the skin with a little five-spice powder or smoked paprika. These add a subtle warmth that complements the duck fat. Avoid heavy sauces before roasting, as they can prevent the skin from crisping. Keep the seasoning light on the outside and let the bird’s natural flavor shine.
Scoring the Skin for Crispy Results
Scoring means making shallow cuts through the skin and fat, without cutting into the meat. Use a sharp knife and cut lines about half an inch apart. This creates channels for the fat to escape and renders more evenly.
Scoring also increases the surface area, which helps the skin puff up and become crispy. It’s one of the most important steps for crispy duck skin. Don’t skip it, even if you’re in a hurry. The difference in texture is well worth the extra two minutes of prep.
Bringing the Duck to Room Temperature
Take the duck out of the refrigerator 30 to 45 minutes before it goes into the oven. This lets the meat cook more evenly. A cold bird placed in a hot oven will have a raw center and overcooked edges.
While the duck rests at room temperature, preheat your oven. This way, the bird goes straight into the heat as soon as it’s seasoned. The brief rest also helps the skin dry out slightly, which further enhances crispiness.
Quick Tips for Prep
- Always pat the skin dry with paper towels before seasoning.
- Prick any large pockets of fat with a fork to help it render.
- Place the duck breast-side up on a rack set inside a roasting pan.
- Use a rack to allow air to circulate underneath, preventing soggy skin.
How Long To Cook A Duck In The Oven: Time and Temperature Guide
Low and Slow vs. High Heat
The best approach for a whole duck is to start at a moderate temperature and then finish with a brief blast of high heat. Begin roasting at 325°F (165°C) for most of the cook time. This gentle heat melts the fat slowly without drying out the meat.
In the last 15 to 20 minutes, increase the temperature to 425°F (220°C). This high-heat finish crisps the skin beautifully. The two-stage method gives you tender, juicy meat and a perfectly golden, crackling exterior. It’s the same principle used by restaurants for oven-baked duck.
Cooking Times by Cut
The how long to cook a duck in the oven question depends heavily on the cut you’re using. Whole ducks take the longest, while smaller pieces cook much faster. Here’s a general breakdown to guide your planning.
| Cut | Oven Temperature | Approximate Cooking Time | Internal Temperature |
|---|---|---|---|
| Whole duck (4–6 lbs) | 325°F (165°C), then 425°F (220°C) | 2 hours 15 minutes to 3 hours | 135°F (57°C) for breast, 165°F (74°C) for thighs |
| Duck breast halves (skin-on) | 375°F (190°C) | 45 minutes to 1 hour | 135°F (57°C) medium-rare |
| Duck legs and thighs | 350°F (175°C) | 1 hour to 1 hour 30 minutes | 165°F (74°C) |
| Duck breast (boneless, skin-on) | 400°F (200°C) | 25 minutes to 35 minutes | 135°F (57°C) for medium-rare |
These times are starting points. Always use a meat thermometer to check the internal temperature. The exact duck cooking time can vary based on the thickness of the meat, the oven’s accuracy, and whether the bird was frozen beforehand.
Internal Temperature: The Only Sure Way to Know
A visual cue like juice color can help, but a thermometer removes all guesswork. Insert the probe into the thickest part of the breast, avoiding the bone. For a juicy, slightly pink center, pull the duck at 135°F (57°C). The meat will carry over cook by 5 to 10 degrees while resting.
For dark meat like legs and thighs, aim for 165°F (74°C). This temperature ensures the collagen has broken down, making the meat tender and fall-off-the-bone easy. If you prefer very well-done dark meat, you can go up to 180°F (82°C), but be careful not to dry out the breast in the process.
Resting and Carving Your Duck for Juicy Results
Why Resting Matters
Resting is not a waste of time—it’s a crucial step. When you remove the duck from the oven, the juices inside are under high pressure. Cutting too soon releases those juices onto the cutting board instead of keeping them in the meat.
Let the duck rest for 15 to 20 minutes before carving. Tent it loosely with aluminum foil to keep it warm. During this time, the temperature equalizes, and the meat becomes juicier when sliced. This simple pause makes a noticeable difference in every bite of your roast duck.
Carving Tips for Beautiful Slices
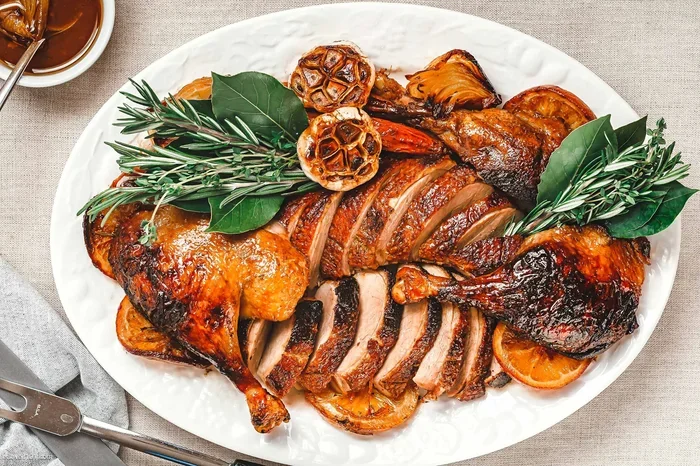
Start by removing the legs and thighs with a sharp knife. Cut through the joint where the leg meets the body. For the breast, slice horizontally against the grain into thin, even pieces. This gives you tender slices that are easy to eat.
Save the carcass for making stock. Duck bones are rich in collagen and fat, perfect for a flavorful soup base. Carving doesn’t have to be fancy; a clean, confident cut is all you need to serve a beautiful meal.
Common Mistakes That Ruin Duck
Skipping the Rest
Cutting into the duck immediately after it comes out of the oven is the most common mistake. The juices run out, leaving the meat dry and less flavorful. Always wait the full 15 to 20 minutes. Use this time to make a quick pan sauce with the drippings.
Overcooking the Breast
Duck breast dries out quickly if you cook it past 145°F (63°C). Many people treat duck like chicken and cook it to 165°F (74°C), but that turns the breast into a tough, stringy texture. Trust the thermometer and pull the breast at 135°F (57°C) for the juiciest result.
Not Scoring the Skin
Unscored duck skin traps fat underneath, leading to a flabby, greasy texture instead of crispy crackling. The shallow cuts allow the fat to render and escape, creating that satisfying crunch. Score the skin in a crosshatch pattern or parallel lines, whichever you prefer.
Using Too Much Salt Too Early
Salt draws moisture out of the skin, which can prevent crisping. Apply salt right before the duck goes into the oven, or even just 15 minutes prior. This gives the salt time to season the meat without drawing too much moisture from the skin.
Expert Tips for Perfectly Juicy Duck Every Time
Use a Meat Thermometer
A good instant-read thermometer is the single best tool for cooking duck. It removes all guesswork and ensures your duck breast temperature is spot-on. Invest in a reliable probe and check it against boiling water (212°F or 100°C at sea level) to verify accuracy.
Baste with Duck Fat
As the duck roasts, it produces its own liquid gold. Spoon the melted fat over the breast and legs every 20 to 30 minutes. This self-basting technique keeps the meat moist and adds incredible flavor. The fat also helps the skin crisp up evenly.
Pairing with the Right Sides
Duck pairs beautifully with sweet and tangy flavors. A classic orange sauce or a cherry complement cuts through the richness of the fat. For a simpler approach, serve with roasted root vegetables and a fresh green salad dressed with a light vinaigrette.
The sides should balance the richness of the bird. Avoid heavy, creamy sauces that compete with the duck’s natural flavor. Let the oven-baked duck be the star, and choose sides that cleanse the palate between bites.
Conclusion
Cooking duck in the oven is easier than most people think. The key is to give it gentle, steady heat and to let it rest before slicing. How long to cook a duck in the oven depends on the cut, but with the right temperature and a meat thermometer, you’ll nail it every time. Start with a whole duck for a dramatic centerpiece, or go for breast halves when you’re short on time.
Remember to score the skin, dry it thoroughly, and season simply. These small steps make a big difference in the final texture and flavor. Your duck roast will have crispy, crackling skin and juicy, tender meat that everyone will love. Try it once, and you’ll understand why duck has been a celebratory dish for centuries. Enjoy the process, and don’t be afraid to experiment with spices and sides. The oven does most of the work for you.
Frequently Asked Questions
How long does it take to cook a whole duck in the oven?
A whole duck typically takes 2 hours and 15 minutes to 3 hours at 325°F (165°C), with a final 15-minute blast at 425°F (220°C) for crispy skin. The exact time depends on the duck’s size and whether it’s fresh or frozen.
What internal temperature should duck breast reach?
Duck breast is best at 135°F (57°C) for a juicy, medium-rare center. If you prefer it more done, you can take it to 145°F (63°C), but be careful not to let it exceed 155°F (68°C) or the meat will dry out.
Should I cover my duck with foil while roasting?
No, you don’t need to cover the duck. Leaving it uncovered allows the skin to dry out and crisp up. If the skin is browning too quickly, you can loosely tent the breast with foil for the last 30 minutes, but this is rarely necessary.
Can I cook a frozen duck directly in the oven?
It’s not recommended. Cooking a frozen duck leads to uneven cooking, with the outside overcooking before the inside thaws. Always thaw the duck in the refrigerator for 24 to 48 hours first, then pat the skin dry before roasting.
What’s the best way to reheat leftover duck?
Reheat leftover duck in a 325°F (165°C) oven for 10 to 15 minutes, or until warmed through. Avoid the microwave, which can make the skin rubbery. Reheat the breast slices gently to keep them juicy.
How do I know when the duck is done without a thermometer?
You can pierce the thickest part of the thigh. If the juices run clear and not pink, the duck is done. However, a thermometer is much more reliable and takes the guesswork out of cooking duck in the oven.