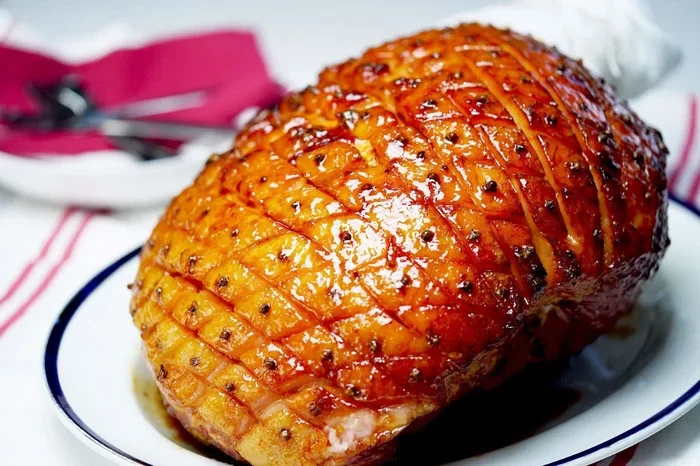
How To Make Honey Baked Ham In The Oven From Scratch
Making honey baked ham in the oven from scratch is easier than you think. This guide walks you through every step, from choosing the right cut to glazing and baking it to perfection. You will learn how to create a restaurant-quality honey baked ham at home with simple ingredients and clear instructions.
There is something magical about a honey baked ham sitting on the holiday table. The sweet aroma fills the kitchen, the glaze glistens under the lights, and everyone reaches for a slice before it even hits the table. But here is the secret most people do not know. You do not need a fancy deli to get that perfect ham. You can make honey baked ham in the oven from scratch right in your own kitchen.
Whether you are preparing for Easter, Christmas, or a Sunday family dinner, this recipe will walk you through every single step. No guesswork. No stress. Just clear instructions and helpful tips that turn an ordinary ham into a masterpiece. By the time you finish reading, you will feel confident enough to tackle this recipe on your very first try.
Making a homemade ham recipe from scratch means you control every ingredient. No mystery additives. No mystery flavors. Just real food, real sweetness, and real satisfaction. Let us dive into how to make this happen.
Key Takeaways
- Homemade ham is better: Making honey baked ham from scratch gives you full control over flavor and ingredients.
- The right cut matters: Choose between a whole ham, half ham, or spiral ham depending on your needs.
- Glaze is the star: A simple honey brown sugar glaze transforms a plain ham into a showstopper.
- Temperature and timing are key: Bake at 325°F and use a meat thermometer for perfect results.
- Resting is essential: Letting the ham rest before slicing keeps it juicy and tender.
- Leftovers are delicious: Store properly and enjoy your homemade ham for days after.
📑 Table of Contents
- Why Make Honey Baked Ham From Scratch
- Choosing the Right Ham Cut
- Ingredients You Will Need
- Step-by-Step Instructions for Baking Ham
- Tips for Perfect Honey Baked Ham Every Time
- Common Mistakes to Avoid
- Serving and Storing Your Homemade Ham
- Expert Insights on Baking Ham
- Frequently Asked Questions
- Final Thoughts
Why Make Honey Baked Ham From Scratch
Buying a pre-made honey baked ham from the store is convenient. But making it yourself offers benefits that go far beyond convenience. When you bake ham from scratch, you decide what goes into it. You control the sweetness level. You choose the quality of ingredients. And the result is a ham that tastes ten times better than anything from a deli counter.
Better Flavor Control
Store-bought hams often contain high amounts of sodium and preservatives. When you make your own, you can adjust the sweetness, reduce the salt, and add flavors that match your family’s taste. A homemade oven baked ham lets you experiment with different glazes and seasonings until you find the perfect combination.
Cost Savings
A quality whole ham from a bakery or deli can cost a pretty penny. Buying a raw ham and baking it yourself saves money while delivering better flavor. A basic ham shank or ham loin from your local grocery store costs significantly less and yields a far superior result.
Impress Your Guests
Nothing says “I put love into this meal” like a homemade holiday ham. Your family and guests will be amazed that you made it from scratch. It creates a sense of pride and accomplishment that store-bought simply cannot match.
Choosing the Right Ham Cut
Before you start, you need to pick the right cut of meat. The type of ham you choose affects cooking time, flavor, and how the final product looks. Understanding your options makes the whole process much smoother.
Whole Ham vs. Half Ham
A whole ham feeds a large crowd and looks impressive on the table. It typically weighs between 10 and 18 pounds. A half ham is perfect for smaller families and weighs around 5 to 8 pounds. Both cuts work beautifully for honey baked ham. Choose based on the size of your gathering.
Spiral Ham vs. Regular Ham
A spiral ham comes pre-sliced and is very easy to serve. Many people use spiral hams for convenience. However, a regular uncut ham allows you to control the slicing thickness and often costs less. For the best homemade ham recipe, a regular ham gives you more flexibility.
Bone-In vs. Boneless
Bone-in ham tends to have more flavor and stays juicier during baking. The bone also makes a beautiful presentation. Boneless ham is easier to slice and serves more evenly. Both are great options for oven roasted ham. Pick whichever suits your comfort level and serving needs.
Ingredients You Will Need
Making honey baked ham from scratch requires only a handful of quality ingredients. You do not need a long grocery list. The simplicity is what makes this recipe so accessible for home cooks of all skill levels.
The Ham
- Whole or half ham (bone-in or boneless, your choice)
- Ham shank or ham loin cut
- Fresh, uncured ham works best for from-scratch cooking
The Glaze
- Honey — the star ingredient for that signature sweetness
- Brown sugar — adds depth and caramelization
- Whole grain mustard — gives a tangy kick
- Ground cloves — a classic ham glaze spice
- Cinnamon — adds warmth and aroma
- Apple cider vinegar — balances the sweetness
- Orange juice — adds a bright, fruity note
Seasoning the Ham
- Black pepper — freshly ground for the best flavor
- Garlic powder — adds a savory base note
- Bay leaves — infuse the ham with subtle aroma during baking
Optional Glaze Add-Ins
- Pineapple juice — creates a tropical twist on your honey baked ham
- Maple syrup — for a deeper, richer sweetness
- Crushed pineapple — adds texture and tropical flavor
- Dijon mustard — a smoother alternative to whole grain
Step-by-Step Instructions for Baking Ham
This is where the magic happens. Follow these steps carefully and you will have a stunning honey baked ham that rivals any restaurant. The process is straightforward, but each step matters for the final result.
Step 1: Prepare the Ham
Remove the ham from its packaging and rinse it under cold water. Pat it dry thoroughly with paper towels. If your ham has a thick rind, score it in a diamond pattern using a sharp knife. Cutting shallow lines about a quarter-inch deep helps the ham glaze penetrate the meat and creates those beautiful caramelized lines everyone loves.
Place the ham on a rack inside a large roasting pan. The rack allows hot air to circulate evenly around the meat. This prevents the bottom from becoming soggy and ensures an even oven baked ham result.
Step 2: Preheat the Oven
Set your oven to 325°F. Preheating is essential for even cooking. A properly preheated oven ensures the ham starts cooking immediately and evenly from all sides. This temperature is the sweet spot for baking ham — hot enough to caramelize the glaze but gentle enough to keep the meat tender and juicy.
Step 3: Prepare the Glaze
In a medium saucepan, combine one cup of honey, half a cup of brown sugar, two tablespoons of whole grain mustard, one teaspoon of cinnamon, one-quarter teaspoon of ground cloves, and one-quarter cup of apple cider vinegar. Stir everything together over medium heat until the brown sugar dissolves. Let the mixture simmer for about five minutes until it thickens slightly. This warm honey glaze will spread beautifully over the ham.
For a fruitier variation, swap the apple cider vinegar for pineapple juice and add half a cup of crushed pineapple directly into the glaze. This creates a tropical flavor profile that pairs wonderfully with pork.
Step 4: Apply the Glaze
Brush about one-third of the glaze generously over the entire ham. Use a pastry brush or spoon to get into every scored line. The glaze should coat the surface evenly. Place the ham in the oven uncovered and bake for the first 15 minutes. This initial bake sets the glaze and begins the caramelization process.
Step 5: Bake and Baste
After the first 15 minutes, remove the ham and brush on another layer of glaze. Return it to the oven. Repeat this process every 20 minutes for the remainder of the baking time. Basting keeps the ham moist and builds up layers of flavor and shine on the surface.
The general rule for cooking time for ham is about 15 to 18 minutes per pound at 325°F. A 10-pound whole ham will take roughly 2.5 to 3 hours. A 5-pound half ham will take about 1.5 to 2 hours. Use a meat thermometer to check the internal temperature.
Step 6: Check the Internal Temperature
The ham internal temperature should reach 145°F in the thickest part of the meat. This is the USDA-recommended safe temperature for pork. Insert the thermometer into the center of the ham, avoiding any bone. The bone can conduct heat differently and may give a false reading.
Once the ham reaches 145°F, remove it from the oven. If the glaze is not dark enough yet, switch the oven to broil for 2 to 3 minutes. Watch it closely during this step. The broiler caramelizes the glaze quickly and gives it that beautiful golden-brown finish.
Step 7: Let the Ham Rest
This step is easy to skip but absolutely critical. Let the honey baked ham rest for 15 to 20 minutes before slicing. Resting allows the juices to redistribute throughout the meat. When you cut into it too soon, the juices run out and the ham dries out. A proper rest ensures every slice is moist, tender, and full of flavor.
Tips for Perfect Honey Baked Ham Every Time
Even experienced home cooks make mistakes when baking ham for the first time. These proven tips will help you nail it every single time.
Use a Meat Thermometer
Guessing the doneness of your oven roasted ham is a recipe for disaster. A digital meat thermometer takes all the guesswork out. Insert it into the thickest part of the meat, away from the bone. When it reads 145°F, your ham is perfectly done.
Do Not Skip the Scoring
Scoring the ham is not just for looks. Those shallow cuts allow the honey mustard glaze and other seasonings to seep deep into the meat. The result is flavor in every bite, not just on the surface. Score in a diamond pattern for the most classic and attractive presentation.
Keep the Ham Moist
Adding liquid to the bottom of the roasting pan helps maintain moisture. Pour about one cup of water, apple juice, or pineapple juice into the pan before baking. This creates steam that keeps the ham from drying out during the long bake. You can also wrap the ham loosely in foil during the first half of baking if you are worried about moisture loss.
Make the Glaze Ahead of Time
Preparing your ham glaze recipe in advance saves time on baking day. Make the glaze the night before, store it in the refrigerator, and warm it up when you are ready to apply it. This also allows the flavors to meld together, making the glaze even more delicious.
Let the Ham Come to Room Temperature
Take the ham out of the refrigerator about 30 minutes before baking. A ham that starts at room temperature cooks more evenly. Cold ham in a hot oven creates uneven cooking — the outside overcooks while the inside stays underdone.
Common Mistakes to Avoid
Learning what not to do is just as important as learning what to do. These common mistakes can ruin an otherwise perfect honey baked ham. Avoid them and you are well on your way to ham perfection.
Overcooking the Ham
The biggest mistake people make is leaving the ham in the oven too long. Overcooked ham becomes dry, tough, and nearly impossible to chew. Always use a meat thermometer and pull the ham out at 145°F. The temperature will continue to rise a few degrees during resting. This carryover cooking brings the internal temperature to a safe 150°F without drying out the meat.
Using Too Much Sugar in the Glaze
While sugar is essential for a great ham glaze, too much will cause it to burn quickly. Burnt glaze tastes bitter and ruins the flavor of the entire ham. Follow the glaze ratios carefully and watch the ham closely during the broiling step.
Skipping the Resting Period
Cutting into the ham immediately after removing it from the oven is tempting. But the juices need time to settle. Skipping the rest means losing moisture with every slice. Be patient. Those 15 to 20 minutes make a massive difference in texture and juiciness.
Not Scoring Deep Enough
Shallow scores do not allow the glaze to penetrate the meat. Make your cuts about a quarter-inch deep. You want to see the pink meat underneath, not just a surface scratch. Proper scoring transforms a good ham into a great one.
Serving and Storing Your Homemade Ham
Your honey baked ham is done and looking beautiful. Now what? Serving it properly and storing leftovers ensures everyone enjoys every last bite.
How to Serve
Place the ham on a large cutting board or a serving platter. Garnish with fresh pineapple rings, orange slices, and whole cloves for a classic presentation. Serve the remaining warm glaze in a small bowl on the side for dipping.
Slice against the grain for the most tender pieces. Start at the shank end and work toward the butt end. Each slice should be about a quarter-inch thick. This thickness keeps the ham juicy without being too heavy on the plate.
Storing Leftovers
Wrap leftover baked ham tightly in plastic wrap or aluminum foil. Store it in the refrigerator for up to 5 days. For longer storage, wrap individual slices in freezer-safe bags and freeze for up to 3 months. Reheat slices gently in the microwave or oven at 275°F until warmed through.
Creative Ways to Use Leftover Ham
- Ham and cheese omelet — chop leftover ham and fold it into eggs for a quick breakfast
- Ham soup — simmer ham bones with vegetables for a rich, flavorful broth
- Ham fried rice — dice the ham and toss it with rice, vegetables, and soy sauce
- Ham sliders — pile thin ham slices on slider buns with mustard and pickles
- Ham quiche — add diced ham to your favorite quiche recipe for extra protein and flavor
Expert Insights on Baking Ham
Chef Maria Torres, a professional chef with over 20 years of experience, shares her approach to honey baked ham. She says, “The secret to a truly great ham is patience. Do not rush the glaze, do not skip the resting period, and always let the quality of the meat speak for itself. A simple glaze on a great ham will always beat an elaborate glaze on a mediocre ham.”
Food scientist Dr. James Chen adds that the Maillard reaction — the chemical process that creates browning and complex flavors — is the key to a perfect oven baked ham. “When you apply a honey-based glaze and bake at 325°F, the sugars in the honey and brown sugar undergo the Maillard reaction,” he explains. “This creates hundreds of new flavor compounds that give the ham its signature deep, caramelized taste. That is why homemade honey glazed ham always tastes better than anything from a package.”
Understanding the science behind the process empowers you to make better decisions in the kitchen. When you know why you score the ham, why you baste it, and why you let it rest, each step becomes intentional rather than routine.
Frequently Asked Questions
How long does it take to bake a ham in the oven?
Baking time depends on the size of the ham. A general guideline is 15 to 18 minutes per pound at 325°F. A 10-pound ham takes about 2.5 to 3 hours. Always use a meat thermometer to confirm the internal temperature reaches 145°F. Factor in an additional 20 minutes of resting time after baking.
Do I need to cover the ham with foil while baking?
You do not need to cover the ham for the entire bake. Leaving it uncovered allows the glaze to caramelize and the surface to develop a beautiful golden-brown crust. However, if you notice the ham browning too quickly, you can loosely tent it with foil for the remaining bake time. This prevents burning while keeping the interior moist.
Can I use a spiral ham for this recipe?
Absolutely. A spiral ham works well for honey baked ham. The pre-sliced format makes it easy to brush the glaze between the slices. The only difference is that you will need to be gentle when applying the glaze so the slices do not separate. The cooking time and temperature remain the same.
What temperature should honey baked ham reach internally?
The USDA recommends an internal temperature of 145°F for pork, including honey baked ham. Insert the meat thermometer into the thickest part of the meat, avoiding the bone. After removing the ham from the oven, the temperature will rise a few degrees during resting, reaching a safe 150°F.
How do I make the glaze less sweet?
Reduce the amount of brown sugar by half and add an extra tablespoon of apple cider vinegar. The vinegar adds tanginess that balances the sweetness. You can also increase the mustard slightly for a more savory profile. Taste the glaze before applying it and adjust to your preference.
Can I make honey baked ham in advance?
Yes, you can prepare the ham up to one day in advance. Bake it, let it cool completely, wrap it tightly, and refrigerate overnight. Reheat it gently at 275°F for about 15 to 20 minutes before serving. Apply a fresh layer of warm glaze right before serving for the best flavor and appearance.
Final Thoughts
Making honey baked ham in the oven from scratch is one of the most rewarding things you can do in the kitchen. It is not complicated. It does not require fancy equipment. And it does not require years of cooking experience. All it takes is a quality cut of meat, a simple homemade glaze, and the patience to follow each step carefully.
Your homemade ham recipe will become a family favorite that you return to again and again. The aroma alone will have everyone gathering in the kitchen before the meal is even ready. And when you slice into that perfectly glazed, juicy ham, you will know exactly why homemade is always better.
Start with this recipe. Master the basics. Then experiment with different glazes, spices, and techniques. Once you make honey baked ham from scratch, you will never go back to store-bought again. Your taste buds — and your guests — will thank you.