How To Bake Corn On Cob In Oven For Perfectly Tender Corn
Baking corn on cob in oven is the easiest way to get perfectly tender, juicy corn without standing over a hot grill. This method works year-round, requires minimal prep, and delivers consistent results that everyone will love. Whether you are feeding a crowd or just want a simple side dish, oven-baked corn on the cob is a total game changer that saves time and energy while keeping all the natural sweetness intact.
There is something magical about corn on the cob. Whether it is summer or the middle of winter, a perfectly baked ear of corn can turn any meal into a celebration. For years, people have boiled, grilled, and air-fried corn, but baking corn on cob in oven is quietly becoming the go-to method for home cooks everywhere.
The beauty of this approach lies in its simplicity. You do not need to watch a grill or stand over a boiling pot. You just prep the corn, pop it in the oven, and let the heat do all the work. The result is tender, juicy kernels with a subtle caramelized sweetness that beats almost any other cooking method. If you have been looking for the easiest way to make corn on the cob that always comes out right, you are in the right place.
This guide walks you through everything you need to know about baking corn on cob in oven. From choosing the best ears at the store to pro tips that take your corn from good to unforgettable, we have got you covered. Let us get started.
Key Takeaways
- Oven-baked corn on cob is simple and forgiving: You just shuck, season, wrap, and bake. There is almost no way to mess it up.
- The ideal temperature is 400°F: This high heat caramelizes the natural sugars in the corn for a slightly smoky, sweet flavor.
- Baking time is only 25 to 35 minutes: Much faster than boiling and far less messy than grilling indoors.
- Foil wrapping locks in moisture: This keeps every kernel tender and juicy without drying out.
- Seasoning before baking makes all the difference: Butter, herbs, garlic, and spices infuse the corn while it cooks.
- Oven-baked corn works year-round: You do not need a grill or good weather to enjoy this classic side dish.
- Leftover baked corn stores well: It reheats beautifully and works great in salads, soups, and casseroles.
📑 Table of Contents
- Why Baking Corn On The Cob In The Oven Is A Game Changer
- What You Will Need To Bake Corn On Cob In Oven
- Step-By-Step Guide To Bake Corn On Cob In Oven
- Pro Tips For Perfectly Tender Oven-Baked Corn
- Common Mistakes To Avoid When Baking Corn On Cob
- Delicious Variations Of Oven-Baked Corn
- How To Serve And Store Your Baked Corn On Cob
- Frequently Asked Questions About Baking Corn On Cob In Oven
- Final Thoughts On Baking Corn On Cob In Oven
Why Baking Corn On The Cob In The Oven Is A Game Changer
You might be wondering why anyone would choose to bake corn in an oven instead of grilling it outside or boiling it on the stove. The truth is, oven-baked corn on cob offers advantages that other methods simply cannot match.
First, it is incredibly consistent. When you grill corn, the heat can be uneven. Some kernels get charred while others stay undercooked. When you bake corn in the oven, the heat surrounds every ear evenly. Every single kernel cooks at the same rate, giving you perfectly tender corn from end to end.
Second, baking corn in the oven is hands-off. You do not need to flip ears or rotate them. You set the timer, walk away, and come back when it is done. This makes oven-baked corn ideal for dinner parties, holidays, and busy weeknights when you do not want to fuss over the stove.
Third, baking works all year round. You do not need to wait for summer or fire up the grill in January. Baking corn on cob in oven means you can enjoy this beloved side dish whenever the craving strikes, regardless of the weather outside.
The Science Behind Perfectly Baked Corn
When you bake corn on cob in oven, something wonderful happens at the molecular level. The high heat breaks down the cell walls in each kernel, releasing natural sugars and starches. This process, called caramelization, creates that slightly sweet, golden flavor that everyone loves.
The husk and foil act as a natural steamer. They trap moisture inside, which keeps the corn from drying out. This is why oven-baked corn stays so tender and juicy compared to boiling, where nutrients and flavor can leach into the water.
The butter and seasonings you add before baking also play a role. As the corn heats up, the fats carry flavor deep into each kernel. This means every bite is seasoned perfectly, not just on the surface.
What You Will Need To Bake Corn On Cob In Oven
Before you start, let us talk about what you need. The good news is that baking corn on cob in oven requires very little equipment and even fewer ingredients. You probably already have everything in your kitchen right now.
Choosing The Right Corn
The quality of your corn matters more than you might think. Look for ears with bright green, snug husks. The silk at the top should be moist and light golden, not dry or brown. Fresh corn on cob is the best choice, but frozen corn on the cob works well too if fresh is not available.
When you squeeze the ear gently, the kernels should feel plump and firm. Avoid corn with dented or shriveled kernels. Sweet corn varieties like Silver Queen, Peaches and Cream, and Jubilee all bake beautifully in the oven and produce outstanding results.
Essential Tools And Ingredients
Here is your shopping and prep list for oven-baked corn on cob:
- Fresh corn on the cob: As many ears as you need, ideally with husks still on.
- Butter: Unsalted butter works best. You will need about one tablespoon per ear.
- Heavy-duty aluminum foil: This wraps around the corn to trap steam and moisture.
- Salt and pepper: Basic seasonings that enhance the natural sweetness of the corn.
- Fresh herbs: Thyme, rosemary, or parsley add a wonderful aromatic touch.
- Garlic powder or minced garlic: Optional but highly recommended for extra flavor.
- A baking sheet or roasting pan: Something large enough to hold all your ears comfortably.
That is it. No fancy equipment needed. Baking corn on cob in oven is one of the simplest cooking techniques you will ever use.
Step-By-Step Guide To Bake Corn On Cob In Oven
Now for the part you have been waiting for. Here is the complete process for baking corn on cob in oven, broken down into easy steps anyone can follow.
Step One: Prepare The Corn
Start by peeling back the husks. Do not remove them completely. Instead, peel them back until they form a natural handle at the top. Remove the silk threads and discard them. Leaving the husk attached at the top acts as a natural wrapper that helps steam the corn while it bakes.
If you prefer fully husked corn, you can remove all the husk and silk. Just know that leaving some husk on helps retain moisture and adds a subtle smoky flavor. Both methods work great for oven-baked corn on cob, so choose whichever you prefer.
Step Two: Season The Corn
Now comes the fun part. Spread a thin layer of butter over each ear of corn. Sprinkle with salt, pepper, and any other seasonings you like. Corn on cob seasoning can be as simple or as creative as you want.
Some popular options include:
- Chili powder and lime juice for a Mexican-inspired twist
- Parmesan cheese and black pepper for a savory upgrade
- Honey and cinnamon for a sweet dessert-style corn
- Old Bay seasoning for a classic coastal flavor
- Smoked paprika and cumin for a smoky, earthy taste
The key is to keep the seasoning light. You want to enhance the corn, not overpower it. Let the natural sweetness of the corn shine through.
Step Three: Wrap The Corn In Foil
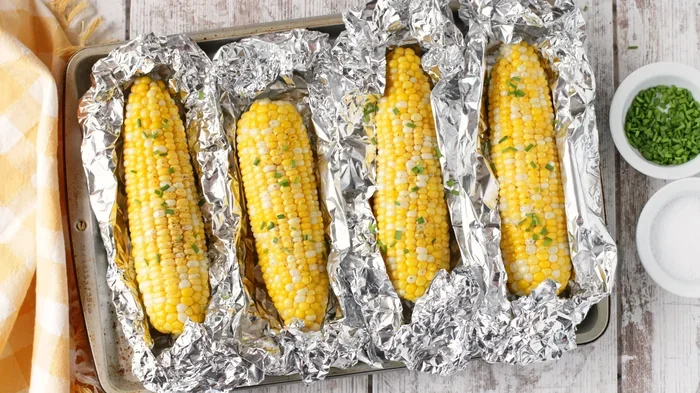
Take a sheet of heavy-duty aluminum foil and wrap each ear of corn completely. Fold the edges tightly to seal in the moisture. Wrapping corn in foil before baking creates a mini steaming environment that keeps every kernel perfectly hydrated.
If you are baking multiple ears, you can wrap them individually or place them on a sheet of foil and fold the edges over the whole batch. Just make sure there are no gaps where steam can escape.
Step Four: Bake At 400°F For 25 To 35 Minutes
Preheat your oven to 400°F. Place the wrapped corn directly on a baking sheet or in a roasting pan. The ideal corn on cob temperature is 400°F because this high heat caramelizes the sugars without overcooking the kernels.
Bake for 25 to 35 minutes. Corn on cob cooking time depends on how many ears you are baking and how tender you like them. For crisp-tender corn, go with 25 minutes. For fully soft and buttery corn, bake for 35 minutes.
You can check doneness by carefully unwrapping one ear and pressing a kernel with your fingernail. It should release easily and feel plump. Oven-baked corn is ready when it is hot throughout and tender to the bite.
Step Five: Serve Immediately
Remove the corn from the oven and let it cool for just a minute or two. Unwrap the foil carefully because steam will be hot. Brush on any extra melted butter that has collected in the foil, and serve right away.
Baked corn on cob is best enjoyed fresh while the kernels are still warm and juicy. Serve it alongside burgers, ribs, grilled chicken, or any summer meal. It also makes a fantastic standalone snack.
Pro Tips For Perfectly Tender Oven-Baked Corn
Want to take your baked corn on cob in oven to the next level? These pro tips will help you achieve restaurant-quality results every single time.
Soak the corn before baking. If you are leaving the husks on, soak the ears in cold water for 15 to 20 minutes before wrapping them in foil. This extra moisture creates even more steam during baking and results in incredibly tender kernels.
Use a combination of butter and olive oil. Olive oil helps the butter spread more evenly and prevents the corn from tasting too heavy. Mix equal parts melted butter and olive oil for the perfect coating.
Add cheese in the last five minutes. If you love cheesy corn, sprinkle shredded cheddar or Monterey Jack over the corn during the last five minutes of baking. The cheese will melt perfectly without overcooking the corn.
Do not skip the resting time. Let the corn rest for three to five minutes after removing it from the oven. This allows the juices to redistribute, making every bite more flavorful.
Rotate the pan halfway through. Even though ovens are designed for even heat, rotating your baking sheet ensures all ears get the same amount of direct heat. This small step makes a big difference in consistency.
Try brining the corn for extra flavor. Soak shucked corn in a saltwater solution for 30 minutes before baking. This technique, borrowed from BBQ traditions, seasons the corn from the inside out and enhances its natural sweetness.
Common Mistakes To Avoid When Baking Corn On Cob
Even though baking corn on cob in oven is simple, there are a few mistakes that can ruin your results. Here is what to watch out for.
Overcooking the corn. This is the number one mistake people make. Baking corn for too long turns the kernels mushy and loses their natural sweetness. Stick to the 25 to 35 minute range and check early. It is always better to slightly undercook than overcook.
Using too much seasoning. Heavy spice blends can mask the delicate flavor of the corn. Keep it simple with salt, pepper, and butter. You can always add more, but you cannot take it away.
Skipping the foil wrap. Some people bake corn without foil, and while this works for grilling, it dries out the corn in an oven. The foil traps steam and keeps the kernels moist. Do not skip this step for oven-baked corn.
Using old or dried-out corn. Freshness matters. Corn that has been sitting in the fridge for too long loses its sweetness and becomes tough. Buy corn as fresh as possible and bake it the same day if you can.
Not preheating the oven. Putting corn in a cold oven throws off the cooking time and can result in unevenly baked corn. Always preheat to 400°F before placing the corn inside.
Delicious Variations Of Oven-Baked Corn
Once you master the basic method for baking corn on cob in oven, you can experiment with these fun variations. Each one adds a unique twist that will keep your corn game exciting.
Mexican Street Corn Style
After baking, brush the corn with a mix of mayo, cotija cheese, chili powder, and a squeeze of fresh lime. This style, known as elote, is incredibly popular and adds a creamy, tangy, and spicy kick to your oven-baked corn on cob.
Honey Garlic Butter Corn
Mix melted butter with honey and minced garlic. Brush this sweet and savory glaze over the corn before baking. The honey caramelizes in the oven and creates a sticky, delicious coating that pairs beautifully with grilled meats.
Herb-Infused Baked Corn
Chop fresh rosemary, thyme, and basil and mix them into softened butter. Spread this herbed butter over the corn before wrapping and baking. The herbs infuse the corn with a fragrant, earthy flavor that elevates the simplest side dish.
Spicy Chipotle Corn
Add a teaspoon of chipotle powder and a squeeze of lime juice to your butter before spreading it on the corn. For those who love heat, this variation brings smoky-spicy flavor that pairs perfectly with barbecue.
How To Serve And Store Your Baked Corn On Cob
Baked corn on cob is incredibly versatile when it comes to serving and storing. Here are some ideas to make the most of your harvest.
For serving: Place baked ears on a platter and garnish with fresh herbs, a sprinkle of flaky salt, or a drizzle of hot honey. Corn on the cob pairs wonderfully with summer salads, pasta dishes, and grilled proteins. It is a crowd-pleaser at any gathering and rarely leaves leftovers.
For storing: Let leftover corn cool completely, then store it in an airtight container in the refrigerator for up to four days. Reheat baked corn in the oven at 350°F for about 10 minutes to maintain its texture. Microwaving works in a pinch but can make the kernels a bit soggy.
For freezing: You can freeze baked corn on the cob by wrapping cooled ears tightly in plastic wrap and placing them in freezer bags. They will keep for up to three months. Thaw overnight in the refrigerator and reheat in the oven.
Corn on cob leftovers also work wonderfully in soups, stews, and casseroles. Cut the kernels off the cob and toss them into a corn chowder or a creamy corn bisque for a quick and delicious meal.
Frequently Asked Questions About Baking Corn On Cob In Oven
Can I bake corn on cob without husks?
Yes, you absolutely can. Shucked bake corn on cob in oven works just as well as husked corn. The only difference is that shucked corn may dry out slightly faster, so make sure you wrap it tightly in foil. Adding a bit of extra butter helps keep shucked corn moist during baking.
How long does it take to bake corn on cob at 350°F?
At a lower temperature of 350°F, corn on cob cooking time increases to about 40 to 50 minutes. The corn will still come out tender and juicy, but it takes longer. Baking at 400°F is recommended for faster results and better caramelization of the natural sugars.
Can I bake corn on cob in foil without butter?
Definitely. While butter adds flavor and moisture, you can bake corn in foil with just a drizzle of olive oil and seasoning. The foil traps enough steam to keep the corn tender even without butter. This is a great option for dairy-free or lighter versions of oven-baked corn on cob.
Is it better to bake corn with or without the husk?
Both methods produce excellent results. Baking with the husk on adds a subtle smoky flavor and extra protection against drying out. Baking without the husk allows seasonings to coat the kernels more directly. Try both methods and see which one you prefer for your next batch of baked sweet corn.
Can I bake frozen corn on cob in the oven?
Yes, frozen corn on cob can be baked in the oven. Simply increase the baking time by about 10 minutes and wrap the corn tightly in foil. Thawed frozen corn works even better and produces results very close to fresh corn. Oven-baked corn from frozen is a convenient option when fresh corn is not in season.
What temperature is best for baking corn on cob?
400°F is the sweet spot for baking corn on cob in oven. This temperature is hot enough to caramelize the sugars and create a slightly golden exterior while keeping the inside tender and juicy. Lower temperatures work but take longer, while higher temperatures risk burning the outside before the inside is cooked through.
Final Thoughts On Baking Corn On Cob In Oven
Baking corn on cob in oven is one of the easiest, most reliable ways to cook this beloved summer staple. Whether it is July or January, this method delivers tender, juicy, flavorful corn with almost no effort. The simplicity of the process, combined with the consistently delicious results, is why so many home cooks are making the switch from grilling and boiling to oven-baking.
With the right temperature, proper wrapping, and a few simple seasonings, you can serve up perfectly tender corn on the cob that rivals anything from a backyard barbecue. The variations we shared give you endless ways to keep this classic side dish exciting and new.
So the next time you find yourself craving corn on the cob, skip the grill and the boiling pot. Turn on your oven, wrap up some ears of corn, and let the magic happen. You will be amazed at how easy and delicious oven-baked corn on cob can be. Give it a try, and you might never go back to any other method again.