How To Make Pastrami In The Oven With This Easy Recipe
Discover how to make pastrami in the oven with this simple, foolproof recipe. You will learn how to cure, spice, and slow-roast beef brisket at home for deli-quality results. This guide covers every step from brining to slicing, so you can enjoy restaurant-style pastrami without a smoker.
Making pastrami at home might sound intimidating. But here is the truth. You do not need a fancy smoker or years of experience. You can make incredible oven pastrami right in your own kitchen. This recipe walks you through every single step with clear instructions.
If you love the smoky, peppery flavor of deli pastrami but do not want to spend a fortune, this guide is for you. I will show you how to make pastrami in the oven using a simple beef brisket, a homemade cure, and a bold spice rub. By the end, you will have juicy, tender meat with a stunning bark that rivals any New York deli.
Whether you are a beginner cook or a seasoned home chef, this method works beautifully. The oven does most of the work for you. All you need is patience and a little bit of planning. Let us get started.
Key Takeaways
- Oven-baked pastrami is easier than you think: You do not need a smoker or special equipment to make authentic-tasting pastrami at home.
- The curing process is the foundation: A proper brine with salt, sugar, and spices transforms a simple brisket into flavor-packed pastrami.
- The spice rub creates the signature bark: A thick coat of cracked peppercorns, coriander, and garlic gives oven pastrami its iconic crust.
- Low and slow cooking is essential: Cooking at a low temperature for several hours ensures tender, juicy meat every time.
- Resting and slicing matter: Letting the pastrami rest and slicing against the grain makes each bite melt-in-your-mouth tender.
- Homemade pastrami saves money: Making your own is far cheaper than buying deli pastrami and tastes even better.
- You can customize the flavor: Adjust the spice blend and cure time to suit your personal taste preferences.
📑 Table of Contents
- What Is Pastrami and Why Make It in the Oven?
- Ingredients You Will Need for Homemade Pastrami
- How To Cure the Brisket for Pastrami
- The Perfect Pastrami Spice Rub Recipe
- How To Cook Pastrami in the Oven Step by Step
- Slicing and Serving Your Homemade Pastrami
- Common Mistakes to Avoid When Making Oven Pastrami
- Expert Tips for Perfect Oven Pastrami Every Time
- Frequently Asked Questions
- Final Thoughts on Making Pastrami in the Oven
What Is Pastrami and Why Make It in the Oven?
Pastrami is a cured and smoked meat product traditionally made from beef brisket. It has a rich, peppery flavor and a tender, juicy texture. Delis around the world love it on rye bread with mustard. But did you know you can make it without a smoker?
Making pastrami in the oven is a game changer. It gives you the same deep flavor and beautiful crust without needing special equipment. The oven provides steady, even heat that slowly breaks down the tough fibers in the meat. This results in pastrami that is incredibly tender and full of flavor.
The process involves three main stages. First, you cure the meat in a brine. Second, you apply a thick spice rub. Third, you slow cook it in the oven until it is perfectly tender. Each step builds layers of flavor that make homemade pastrami so special.
Why Choose Oven-Baked Pastrami Over Smoking?
Smoking pastrami is traditional, but it requires a smoker, wood chips, and hours of monitoring. Oven baking simplifies the process dramatically. Your oven maintains a consistent temperature, which means more predictable results. You also avoid the hassle of managing charcoal or wood pellets.
Another advantage is convenience. Most people already have an oven at home. You do not need to buy extra equipment or spend hours outside tending to a fire. The oven method also works year round, regardless of the weather. Rain or shine, you can make delicious pastrami anytime.
Ingredients You Will Need for Homemade Pastrami
Great pastrami starts with great ingredients. You do not need a long grocery list, but each ingredient plays an important role. Here is everything you need to make oven pastrami that tastes amazing.
The Meat: Beef Brisket
The star of the show is a beef brisket. Look for a whole packer brisket, which includes both the flat and the point. A 4 to 5 pound brisket works perfectly for most ovens. Choose a well-marbled piece because the fat keeps the meat moist during the long cooking process.
If you can only find a smaller piece, that works too. Just adjust the cooking time accordingly. Avoid lean cuts because they tend to dry out during the curing and cooking stages. The fat cap is your friend here. It bastes the meat from within as it cooks.
The Brine: Salt, Sugar, and Seasonings
The brine is what turns a plain piece of beef into pastrami. It infuses the meat with flavor and helps preserve it. You will need kosher salt, brown sugar, and a mix of aromatics. Garlic cloves, bay leaves, and black peppercorns are essential. Some recipes also add pink curing salt, which gives the meat its classic pink color.
Make sure to use non-iodized salt. Iodized salt can leave a metallic taste in the meat. Kosher salt is the best choice because it dissolves evenly and does not contain additives. The sugar balances the salt and adds a subtle sweetness to the final product.
The Spice Rub: The Heart of Pastrami Flavor
The spice rub is what gives pastrami its signature taste. Cracked black pepper is the foundation. Coriander seeds add a warm, citrusy note. Garlic powder and paprika bring depth and color. Some people like to add a touch of mustard powder for a subtle kick.
Toast your whole spices before grinding them. This releases their essential oils and makes the flavor much more vibrant. Freshly ground spices make a huge difference compared to pre-ground ones. The rub goes on thick, almost like a paste, before the meat enters the oven.
How To Cure the Brisket for Pastrami
Curing is the first and most important step. It transforms raw beef into pastrami by infusing it with flavor and changing its texture. Do not skip or rush this step. The cure needs time to penetrate deep into the meat.
Preparing the Brine
Start by dissolving the kosher salt and brown sugar in water. Heat about four cups of water on the stove until the salt and sugar are fully dissolved. Add your garlic cloves, bay leaves, and peppercorns to the liquid. Let it cool completely before using it.
You can also add pink curing salt at this stage. Use it carefully and follow the recommended amount. Pink curing salt contains sodium nitrite, which prevents harmful bacteria growth and gives the meat its characteristic rosy color. It is safe when used in the correct quantity.
Brining the Brisket
Place your brisket in a large container or a heavy-duty zip lock bag. Pour the cooled brine over the meat. Make sure the brisket is fully submerged. If it floats, use a plate or a zip lock bag filled with water to weigh it down.
Refrigerate the brisket in the brine for five to seven days. Turn the meat once a day to ensure even curing. During this time, the salt draws out moisture from the meat and then reabsorbs it along with the brine flavors. The result is deeply seasoned, firm-textured meat that is ready for the next step.
Rinsing and Drying the Cured Meat
After the curing period, remove the brisket from the brine. Rinse it thoroughly under cold running water. This washes off excess salt from the surface. Pat the meat completely dry with paper towels.
Now is a good time to apply a thin layer of mustard. Yellow mustard works great because it acts as a glue for the spice rub. It does not add much flavor on its own but helps the rub stick to the meat. Let the mustard coat dry for about 30 minutes before applying the spice rub.
The Perfect Pastrami Spice Rub Recipe
The spice rub is where the magic happens. A generous coat of this mixture creates the dark, crunchy bark that defines great pastrami. Getting the rub right makes all the difference between good pastrami and outstanding pastrami.
Ingredients for the Spice Rub
You will need cracked black pepper, ground coriander, garlic powder, paprika, and a pinch of cayenne pepper if you like a little heat. Some recipes call for ground ginger or allspice for extra warmth. Keep it simple to start, and then experiment once you are comfortable with the basic version.
Use about a quarter cup of each ground spice for a full brisket. Mix them together in a small bowl. The total amount of rub should be enough to cover the entire surface of the meat generously.
Applying the Rub
Spread the mustard-coated brisket on a wire rack set over a baking sheet. Sprinkle the spice mix evenly over all sides. Press it gently into the meat so it adheres well. The layer should be thick, almost like a crust. Do not be shy with the rub. This is what forms that beautiful peppery shell during cooking.
Let the rubbed brisket sit uncovered in the refrigerator overnight. This allows the rub to bond with the surface of the meat. The cold, dry air in the fridge also helps form a tacky layer called pellicle, which absorbs smoke flavor and helps the bark develop during cooking.
How To Cook Pastrami in the Oven Step by Step
Now comes the exciting part. Cooking the pastrami in the oven. This is where your kitchen will start smelling incredible. Follow these steps carefully for the best results.
Setting Up the Oven
Preheat your oven to 225 degrees Fahrenheit. This low temperature is the key to tender, juicy pastrami. A slow cook at low heat breaks down the collagen in the brisket without drying it out. If your oven runs hot, use an oven thermometer to verify the actual temperature inside.
Place a rack inside a large roasting pan or a deep baking dish. Set the rubbed brisket on the rack with the fat cap facing up. The rack elevates the meat and allows hot air to circulate around it evenly. Add about one cup of water to the bottom of the pan. This creates steam and prevents drippings from burning.
Wrapping and Cooking
Cover the roasting pan tightly with aluminum foil. The foil traps moisture and creates a gentle steaming environment. This is crucial for keeping the pastrami juicy during the long cook. Place the pan in the oven on the middle rack.
Cook the pastrami for about four to five hours. The exact time depends on the size of your brisket. A general rule is to cook it until the internal temperature reaches 200 to 205 degrees Fahrenheit. Use a meat thermometer inserted into the thickest part of the flat. The meat should be fork tender and pull apart easily.
Unwrapping and Developing the Bark
After the initial cook, remove the foil carefully. The meat will be very tender and juicy at this point. Increase the oven temperature to 300 degrees Fahrenheit. This higher heat helps develop the dark, crunchy bark on the surface of the pastrami.
Return the uncovered pastrami to the oven and cook for an additional one to two hours. Brush the surface with a thin layer of beef broth or water every 30 minutes to keep it from drying out. The bark will darken and become beautifully crusty. It should feel firm to the touch but the meat inside should still be moist and tender.
Resting the Pastrami Before Slicing
This step is easy to skip but it is very important. Once the pastrami reaches the right temperature and color, remove it from the oven. Wrap it tightly in butcher paper or heavy aluminum foil. Let it rest for at least 30 minutes before slicing.
Resting allows the juices to redistribute throughout the meat. If you cut too soon, the juices will run out and the pastrami will be drier. The carryover heat continues to cook the meat slightly during this resting period, which helps finish the cooking process gently.
Slicing and Serving Your Homemade Pastrami
Slicing pastrami correctly makes a huge difference in the eating experience. The way you cut affects both the texture and the appearance of each slice. Take your time with this step for the best results.
Which Way to Slice
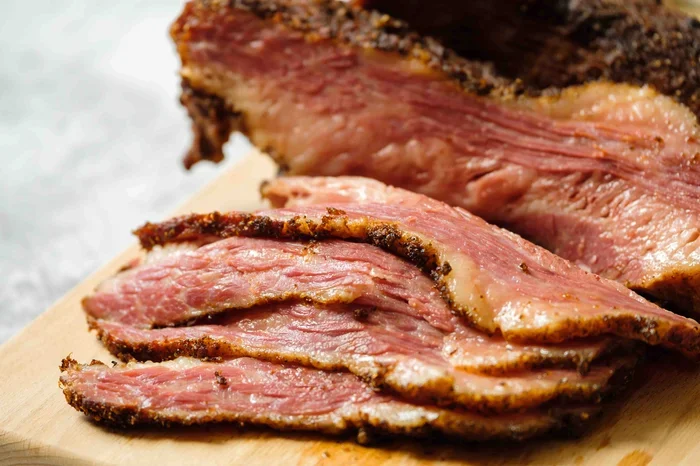
Always slice against the grain of the meat. The grain is the direction of the muscle fibers. Cutting against it shortens those fibers, making each bite much easier to chew. If you slice with the grain, the pastrami will be tough and chewy no matter how well you cooked it.
Use a sharp slicing knife or a carving knife. A dull knife will shred the meat instead of giving you clean slices. Aim for slices about a quarter inch thick. This thickness is perfect for sandwiches and allows the bark and the tender interior to shine in each bite.
Serving Suggestions
Classic pastrami is served on rye bread with yellow mustard and a pickle on the side. But you can get creative. Try pastrami on a bun with Swiss cheese for a pastrami burger. Use it in a Reuben sandwich with sauerkraut and Russian dressing. You can also chop it up and add it to scrambled eggs or a breakfast hash.
Leftover pastrami keeps well in the refrigerator for up to five days. Store it in an airtight container. You can also freeze it for up to three months. Reheat gently in a skillet with a little water or broth to keep it moist.
Common Mistakes to Avoid When Making Oven Pastrami
Even with a great recipe, mistakes can happen. Here are the most common ones and how to avoid them.
Skipping the cure time. Some people want to rush the process. But the cure needs at least five days to properly penetrate the meat. Shortchanging this step results in bland pastrami that lacks depth of flavor.
Using too much heat. It is tempting to crank up the oven to save time. But high heat dries out the meat and prevents the collagen from breaking down properly. Patience is the secret ingredient in pastrami making.
Not resting the meat. Cutting into the pastrami right out of the oven wastes all the juiciness. Always let it rest for at least 30 minutes. This small wait makes a big difference.
Using the wrong cut of meat. A lean brisket or a thin slice will not work well. You need a well-marbled packer brisket with a good fat cap. The fat is what keeps the meat succulent throughout the entire cooking process.
Expert Tips for Perfect Oven Pastrami Every Time
A few pro tips can elevate your pastrami from good to great. These are the small details that experienced cooks swear by.
Dry brine as an alternative. If you do not have time for a wet brine, try a dry cure. Coat the brisket heavily with kosher salt and sugar, then refrigerate it for three to four days. Rinse it off and proceed with the spice rub. This method produces excellent results with less effort.
Add a smoke tube for extra flavor. If you want a smoky taste but do not have a smoker, use a smoke tube filled with wood pellets. Place it in the oven during the last hour of cooking. It adds a subtle smokiness without any extra equipment.
Double wrap for extra moisture. If your brisket looks dry during cooking, double wrap it in foil. This traps even more steam and helps rehydrate the meat. It is a simple trick that can save a slightly overcooked piece of meat.
Slice paper thin for sandwiches. For the best pastrami sandwich, slice the meat as thin as possible. Thin slices are more flexible and fold easily into bread. They also absorb the mustard and other condiments better, creating a more flavorful bite.
Frequently Asked Questions
Can I use corned beef instead of a raw brisket for this recipe?
Yes, you can use store-bought corned beef as a shortcut. Simply soak it in water overnight to remove excess salt, then apply the spice rub and cook it in the oven. The results will be good, but they will not be as deeply flavored as meat you cure yourself from scratch.
How long does homemade pastrami last in the fridge?
Properly stored homemade pastrami keeps for four to five days in the refrigerator. Wrap it tightly in plastic wrap or foil and place it in an airtight container. For longer storage, freeze it for up to three months. Thaw it overnight in the refrigerator before reheating.
Do I need pink curing salt to make pastrami?
Pink curing salt is not strictly required, but it is recommended. It prevents botulism, ensures food safety, and gives the meat its classic pink color. If you choose to skip it, make sure to cure the meat for a shorter period and keep everything refrigerated at all times.
Can I make pastrami in a convection oven?
Yes, a convection oven works well for pastrami. The fan circulates hot air evenly, which promotes consistent cooking. Reduce the temperature by about 25 degrees Fahrenheit when using convection mode. Check the meat periodically to make sure it does not dry out.
Why is my oven pastrami tough even after cooking for hours?
Tough pastrami usually means the meat was not cooked long enough or at too high a temperature. The collagen in brisket needs time and low heat to break down into gelatin. Make sure your oven stays at 225 degrees Fahrenheit and cook until the internal temperature reaches at least 200 degrees.
Can I reuse the leftover brine to make another batch of pastrami?
It is not recommended to reuse brine. The brine has been in contact with raw meat and may contain harmful bacteria. Always prepare a fresh brine for each batch. This ensures food safety and consistent flavor in every batch of pastrami you make.
Final Thoughts on Making Pastrami in the Oven
Making pastrami in the oven is one of the most rewarding things you can do in the kitchen. It takes a few days of planning, but the result is absolutely worth the effort. The aroma that fills your home as the pastrami cooks is something you will never forget.
Once you master this method, you will never go back to store-bought pastrami again. The flavor, the texture, and the satisfaction of creating something so delicious from scratch are unmatched. Plus, you control every ingredient, which means no preservatives or additives.
Start with this recipe and make it your own. Try different spice combinations. Adjust the cure time to suit your taste. Share your creations with family and friends. Before long, you will be known as the pastrami expert in your circle.
The beauty of oven-baked pastrami is that it is accessible to everyone. You do not need special skills or expensive equipment. You just need a good brisket, some quality spices, and the patience to let the flavors develop. Follow the steps in this guide, and you will produce pastrami that is tender, flavorful, and absolutely delicious.
So what are you waiting for? Gather your ingredients, fire up your oven, and start your pastrami journey today. Your taste buds will thank you.