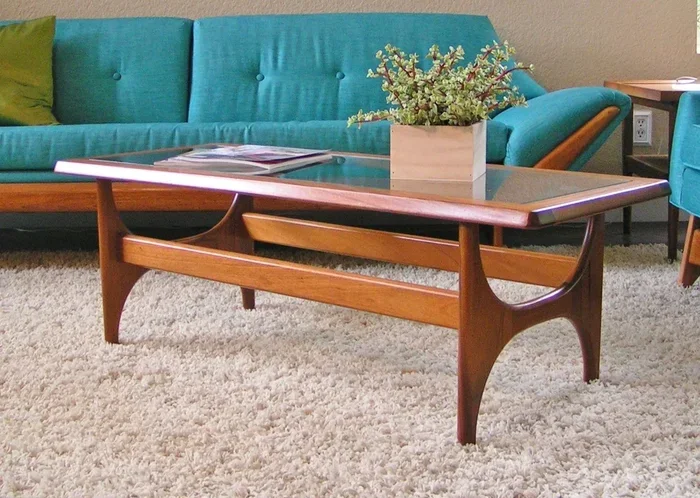
How To Make A Mid Century Coffee Table From Scratch
Building a mid century coffee table from scratch is easier than you think. This guide walks you through every step, from choosing the right wood to applying a beautiful finish. You will learn how to create a stylish mid century coffee table that looks expensive but costs very little. Whether you are a beginner or a seasoned DIYer, this project will level up your home decor game.
A mid century coffee table can transform any living room. The clean lines, simple shapes, and warm wood tones give a space that classic, cozy feel. Many people think they need to spend hundreds of dollars to get this look. But the truth is, you can build one yourself with basic tools and a weekend of free time.
This guide covers everything you need to know. We will walk you through picking materials, cutting wood, assembling the piece, and applying a beautiful finish. By the end, you will have the confidence to start your own coffee table DIY project. Let us get into it.
A mid century coffee table gets its name from the mid 1900s design movement. This era brought us some of the most loved furniture styles ever made. Danish designers, in particular, led the way with simple, functional pieces that looked amazing. The style focuses on clean lines, gentle curves, and natural materials.
What makes this design so popular today is its versatility. A mid century modern table fits in a rustic farmhouse just as well as a sleek urban apartment. The warm wood tones and minimal ornamentation create a sense of calm. It is retro furniture that never feels dated.
There are a few things that define this style. First, the legs. Most mid century coffee table designs use tapered legs. These legs slope inward slightly, giving the table a light, airy feel. Hairpin legs are another popular choice. They are simple, elegant, and very easy to attach.
Second, the tabletop. Solid wood is the go-to material. You want to see the natural wood grain and enjoy the warmth it brings. Some designs use a live edge, which means keeping the natural bark edge on one side. This adds organic character and makes each piece one of a kind.
Third, the finish. A natural stain or light walnut tone works best. You want the wood to be the star. A coat of polyurethane protects the surface while keeping the classic look intact. Less is more when it comes to mid century design.
Before you start cutting wood, gather everything you need. Having all your materials ready makes the process smooth and enjoyable. Here is what you will need for this woodworking project.
Choosing the Right Wood
Wood selection is the most important decision you make. For an authentic mid century coffee table, go with hardwoods like oak, walnut, or maple. These woods have beautiful grain patterns and are durable enough for daily use. Pine works too if you are on a tight budget, but it dents more easily.
You will need enough wood planks to cover your desired tabletop size. A standard coffee table is about 48 inches long and 24 inches wide. Plan for wood that is at least 3/4 inch thick for a sturdy feel. Visit your local lumber yard and pick boards that look straight with minimal warping.
Essential Hardware and Finish
You do not need a lot of hardware. Wood glue is essential for a strong bond. Pocket hole screws make assembly quick and clean. You will also need sandpaper in several grits, from 80 to 220. A tack cloth helps remove dust before you apply finish.
For the finish, choose a stain that matches your vision. Natural, golden oak, or dark walnut are all classic mid century modern choices. A water based polyurethane protects the surface without adding too much shine. You will also need brushes or foam applicators for a smooth coat.
Now comes the fun part. Building your coffee table DIY piece step by step. Follow this guide and you will have a beautiful table in no time.
Cutting Your Wood Pieces
Start by measuring and marking your wood. Use a tape measure and a pencil to mark your cut lines. A table saw makes clean, straight cuts easy. If you do not have one, most lumber yards will cut your wood for you when you buy it. Just ask!
Cut your tabletop planks to length first. Then rip them to the correct width. You want all planks to be the same width for a uniform look. Next, cut your leg pieces. Tapered legs need a slight angle, so measure carefully. Take your time with this step because accurate cuts make everything else easier.
Remember, measuring right is the foundation of any great build. Just like learning how to measure a toaster oven for the perfect fit, precise measurements here save you headaches later. Double check every measurement before you cut.
Assembling the Tabletop
Lay your planks side by side on a flat surface. Apply wood glue along the edges where the planks meet. Press them together firmly and clamp them overnight. This gives the glue time to set and creates a strong bond.
Once the glue is dry, flip the tabletop over. Use a router or sandpaper to smooth the edges. You want the top to feel perfectly flat and the edges to be soft and rounded. This is a key part of the mid century coffee table aesthetic. Smooth, gentle edges everywhere.
Attaching the Legs
Now it is time to attach the legs. Position each leg about two inches from the corner of the tabletop. Mark the spots with a pencil. Drill pilot holes to prevent the wood from splitting.
Apply wood glue to the leg ends. Then use pocket hole screws or lag bolts to secure each leg. Go slow and make sure each leg is perfectly vertical. Use a level to check your work. Uneven legs will make the table wobble, and nobody wants that.
Let the glue dry fully before you move the table. This usually takes at least 24 hours. Patience here pays off with a sturdy, lasting piece of DIY furniture.
Sanding and Finishing
Sanding is where the magic happens. Start with 80 grit sandpaper to smooth out any rough spots. Work your way up to 220 grit for a silky finish. Sand with the grain of the wood, not against it. This prevents scratches and gives you the best result.
After sanding, wipe the entire table with a tack cloth. Remove every bit of dust. Then apply your stain with a brush or cloth. Work in thin, even coats. Let the stain penetrate the wood for a few minutes before wiping off the excess.
Once the stain dries, apply your first coat of polyurethane. Use a soft brush or foam applicator. Let it dry completely, then lightly sand with 220 grit before applying the next coat. Two to three coats of polyurethane gives you a durable, beautiful finish. This process is a lot like how you would carefully cure a cast iron Dutch oven, where patience and proper technique give you the best results.
The beauty of building a mid century coffee table is that you can customize it to match your space. Here are some popular variations to consider.
Live Edge Style
A live edge tabletop keeps the natural bark edge on one or both sides. This creates a rustic, organic look that pairs perfectly with the clean lines of mid century design. You will need a slab of wood that already has a natural edge. Many lumber yards sell live edge slabs specifically for this purpose.
Live edge tables are conversation starters. They bring a piece of nature indoors and add warmth to any room. If you love the idea of a one of a kind piece, this is the way to go.
Hairpin Leg Options
Hairpin legs are a signature of mid century modern design. They are simple, elegant, and incredibly easy to attach. You can buy them pre made in various lengths and finishes. Black hairpin legs look sleek and modern. Brass or gold legs add a touch of warmth.
You can also make your own hairpin legs from steel rod if you have basic metalworking skills. Either way, they give your coffee table DIY project that classic mid century silhouette. They are lightweight too, which makes the table easy to move around.
Storage Additions
Want more function in your table? Add a lower shelf or a small drawer. A lower shelf gives you extra storage for magazines or blankets. You can build it from the same wood or use a contrasting material for visual interest.
A small drawer under the tabletop is a great hidden storage spot. Remote controls, coasters, and playing cards all fit nicely. Just make sure your design can support the extra weight. Keep the lines simple and clean to stay true to the mid century coffee table aesthetic.
Common Mistakes to Avoid
The biggest mistake is rushing the sanding process. Skipping grits or sanding against the grain leaves visible scratches. Take your time and work through each grit level. Your finished table will look so much better for the effort.
Another common error is choosing the wrong wood. Softwoods like pine dent easily and do not have the rich grain that defines mid century style. Invest in quality hardwood for a table that lasts for years. Also, do not skip the polyurethane coats. An unfinished table will stain and scratch quickly.
Finally, do not rush the glue drying time. If you assemble the table too soon, the joints will be weak. Give the glue a full 24 hours to set before you use the table. This patience is what separates a good build from a great one.
Expert Insights
Professional woodworkers will tell you that the finish makes or breaks a piece. Take the time to apply multiple thin coats of stain and polyurethane. Each coat builds depth and richness. The result is a table that looks like it came from a high end furniture store.
Also, pay attention to the wood grain when choosing your planks. Boards with straight, consistent grain are easier to work with and look more polished. If you are new to woodworking, practice your cuts on scrap wood first. This simple step saves material and builds your confidence. After all, cleaning up sawdust and wood shavings is much easier when you can tackle it efficiently, similar to how you would quickly clean up after a project, much like learning how to clean an oven with a dishwasher tablet without scrubbing.
Building a mid century coffee table is a rewarding project that adds real value to your home. You have learned how to choose the right wood, cut and assemble the pieces, and apply a professional finish. The process is straightforward, and the results are stunning.
This coffee table DIY project proves that you do not need expensive tools or years of experience. With basic materials and a weekend of effort, you can create a piece of retro furniture that friends and family will admire. The mid century modern style is timeless, and your handmade table will be a conversation piece for years to come.
Start your build this weekend. Gather your materials, follow the steps in this guide, and enjoy the satisfaction of creating something beautiful with your own hands. A mid century coffee table is more than just a piece of furniture. It is a statement of style, craftsmanship, and creativity.
Key Takeaways
- Mid century design is timeless: Clean lines and simple shapes make this style work in any room.
- You need basic tools only: A table saw, drill, and sander are all you require to start.
- Wood choice matters: Solid wood or quality planks give the best results for a coffee table DIY project.
- Finishing is everything: The right stain and polyurethane bring out the beauty of the wood grain.
- Customization is easy: Try hairpin legs, live edges, or storage drawers to make your piece unique.
- Patience pays off: Take your time with sanding and finishing for a professional look.
Frequently Asked Questions
What wood is best for a mid century coffee table?
Oak, walnut, and maple are the best choices. They have beautiful grain patterns and are hard enough to withstand daily use. If you are on a budget, pine works well too, but it will dent more easily over time.
Do I need advanced woodworking skills for this project?
Not at all. This project is designed for beginners. You only need basic tools like a table saw, drill, and sander. Follow the steps carefully and take your time with measuring and cutting.
How long does it take to build a mid century coffee table?
Most people finish the build in one to two weekends. The cutting and assembly take about a day. The finishing process, including sanding and applying coats of polyurethane, needs extra drying time between coats.
Can I use hairpin legs instead of tapered legs?
Absolutely. Hairpin legs are a classic mid century design element. They are easy to buy online or at hardware stores. Just make sure to choose the right length for your desired table height.
How do I maintain the finish on my coffee table?
Wipe the table with a damp cloth regularly. Avoid harsh chemical cleaners. If the finish gets scratched, lightly sand the spot and apply a thin coat of polyurethane to refresh it.
Can I build this table without a table saw?
Yes. Many lumber yards offer cutting services when you purchase your wood. You can also use a circular saw with a straight edge guide for clean cuts. The key is to measure carefully and cut slowly.
=== CONCLUSION ===
Creating a mid century coffee table from scratch is one of the most satisfying DIY projects you can tackle. It combines practical woodworking skills with artistic design to produce a functional piece of art. The clean lines, warm wood tones, and simple elegance of this style make it a favorite for good reason.
You now have everything you need to start. From choosing the right solid wood to applying the perfect polyurethane finish, this guide covers the full process. The coffee table DIY journey is rewarding, and the end result is a stunning piece of home decor that reflects your personal style.
Grab your tools, pick out your wood, and start building today. Your dream mid century coffee table is closer than you think.