How To Operate A Keurig Coffee Machine The Easy Way
Operating a Keurig coffee machine is simple once you know the basics. This guide walks you through every step, from plugging in your machine and adding water to selecting brew sizes and troubleshooting common issues. You will learn how to make great coffee at home with minimal effort.
There is nothing quite like walking into your kitchen and having a fresh cup of coffee ready in under a minute. A Keurig coffee machine makes that possible every single morning. Whether you are a complete beginner or have had your machine sitting in a box for weeks, this guide will show you exactly how to operate a Keurig coffee machine with confidence.
The process is simpler than most people think. You do not need any special skills or expensive accessories. Just a few basic steps and you will be brewing like a pro. In this article, we cover everything from initial setup to daily use and long-term maintenance. By the end, you will never second-guess your Keurig again.
Keurig machines have become one of the most popular single-serve coffee makers in homes across the country. They are fast, convenient, and incredibly easy to use. But knowing how to get the best results from your machine makes all the difference. Let us dive in and walk through it together.
Key Takeaways
- Setup is fast: Unbox, fill the reservoir, and power on to get started in minutes.
- Brewing is customizable: Choose from multiple cup sizes and strength settings to match your preference.
- Maintenance keeps it running: Regular descaling and cleaning prevent buildup and extend your machine’s life.
- Troubleshooting is easy: Most common issues like slow brewing or error lights have simple fixes.
- Accessories enhance the experience: Reusable pods, a water filter, and a drip tray mat add convenience.
📑 Table of Contents
Getting to Know Your Keurig Machine
Before you start brewing, it helps to understand the basic parts of your Keurig machine. Each component plays an important role in delivering a great cup of coffee. Familiarizing yourself with these parts will make every step easier.
Main Components
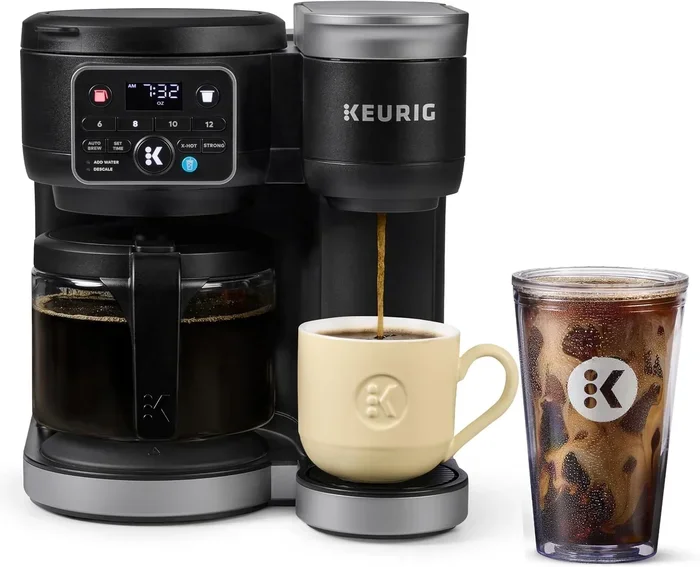
- Water Reservoir: This is where you pour the water for brewing. Most Keurig models have a removable reservoir on the back or side of the machine.
- Drip Tray: Located at the bottom, this catches any drips or overflow. It is removable for easy cleaning.
- K-Cup Holder: This is the compartment where you place your coffee pod. It punctures the pod during brewing.
- Brew Button: The button or buttons you press to start the brewing process.
- Power Cord and Outlet: Always plug into a grounded outlet away from water sources.
Take a moment to look over your machine before you begin. Make sure all parts are clean and properly assembled. If your machine came with a water filter, install it now. This small step improves the taste of your coffee significantly.
Step-by-Step Setup Process
Setting up your Keurig is the first important step. A proper setup ensures your machine works correctly from day one. Follow these steps carefully for the best results.
Step 1: Unbox and Place Your Machine
Remove all packaging materials from your Keurig. Place it on a flat, stable surface near a power outlet. Make sure there is enough space around the machine for air circulation. Just like when you set the clock on your Krups toaster oven, placement matters for safe and efficient operation.
Step 2: Remove and Clean Internal Parts
Take out the water reservoir, drip tray, and K-Cup holder. Wash each piece with warm soapy water. Rinse thoroughly and dry them before reassembling. This removes any dust or manufacturing residue from shipping.
Step 3: Fill the Water Reservoir
Reattach the water reservoir and fill it with fresh, cold water. Do not overfill past the maximum line. Using filtered water can help reduce mineral buildup over time, which keeps your machine running smoothly.
Step 4: Run a Test Brew
Plug in the machine and press the power button. Place a mug on the drip tray. Insert a K-Cup of your choice and close the holder. Press the brew button and let the machine run through a full cycle without a pod first. This flushes out any remaining particles. Some people compare this initial rinse to how you would work an air fryer oven for the first time — a test run before actual use.
How to Brew Your First Cup of Coffee
Now that your machine is set up, it is time to make your first cup. The brewing process on a Keurig is straightforward, but a few tips can elevate your results.
Choosing Your K-Cup
Open the K-Cup holder by lifting the handle. Place your favorite coffee pod inside with the foil side facing up. Close the handle firmly until you hear a click. Make sure the pod is seated properly to avoid leaks.
Selecting Your Cup Size
Most Keurig machines offer multiple brew sizes. Common options include:
- 4 oz (Small Cup): Best for strong, concentrated coffee.
- 6 oz (Medium Cup): A standard serving size for most drinkers.
- 8 oz (Large Cup): Ideal for a regular mug of coffee.
- 10 oz or 12 oz (Extra Large): Perfect for travel mugs or those who like a full mug.
Select your preferred size using the brew size buttons on your machine. The machine will adjust the amount of water accordingly.
Starting the Brew
Place your mug under the dispenser. Press the brew button for your selected size. The machine will heat the water and push it through the K-Cup. Within 60 to 90 seconds, your coffee is ready. Sit back, relax, and enjoy.
Adjusting Brew Strength
Many newer Keurig models include a strength setting. If your machine has this feature, you can choose between regular and strong brew. A stronger setting uses a slower water flow, which extracts more flavor from the coffee grounds. This is a great option if you prefer a bolder cup.
Daily Maintenance and Cleaning Tips
Keeping your Keurig clean is essential for great-tasting coffee and a long machine life. Regular maintenance takes only a few minutes each week.
Daily Cleaning Routine
- Empty and rinse the drip tray after each use.
- Wipe down the exterior with a damp cloth.
- Remove and rinse the K-Cup holder.
- Empty and refill the water reservoir with fresh water.
Weekly Deep Cleaning
Once a week, give your machine a more thorough cleaning. Remove the water reservoir and wash it with warm soapy water. Use a damp cloth to clean the inside of the K-Cup holder. Check the needle area for any coffee grounds or residue. A straight paperclip works well for gently clearing the needle.
Just as you would clean your oven with a dishwasher tablet without scrubbing, keeping your Keurig clean does not have to be a chore. Simple habits make a big difference over time.
Descaling Your Machine
Descaling removes mineral deposits that build up inside the machine. Most Keurig models need descaling every 3 to 6 months depending on your water hardness. Use a Keurig descaling solution or a mix of white vinegar and water. Run the solution through a full brew cycle, then rinse the reservoir and run 2 to 3 cycles with fresh water only.
Troubleshooting Common Issues
Even the best machines occasionally have issues. Most problems are easy to fix without calling customer service. Here are the most common issues and their solutions.
Machine Will Not Turn On
Check that the machine is properly plugged into a working outlet. Verify the power button is fully pressed. If the outlet is controlled by a switch, make sure it is turned on. Sometimes simply resetting the machine by unplugging it for 30 seconds solves the problem.
Water Is Not Flowing Properly
This is often caused by air bubbles in the water line. Remove the reservoir, reattach it firmly, and run a few brew cycles without a K-Cup. If the issue persists, check that the water reservoir is not empty or clogged. Also make sure the needle under the K-Cup holder is not blocked by coffee grounds.
Coffee Tastes Weak or Off
Weak coffee usually means the K-Cup is past its prime or the brew size is too large for the pod. Try using a smaller cup size or a fresh K-Cup. If the taste is off, run a cleaning cycle with vinegar water to remove any built-up residue inside the machine.
Error Messages or Blinking Lights
Most Keurig models display error codes when something is wrong. Refer to your user manual for the specific meaning. Common fixes include refilling the water reservoir, removing a stuck K-Cup, or descaling the machine. If the error persists, unplug the machine for a few minutes and try again.
Tips and Accessories to Enhance Your Keurig Experience
A few simple upgrades can make your Keurig experience even better. These accessories are affordable and highly practical.
Reusable K-Cup Filters
If you prefer using your own ground coffee, a reusable K-Cup filter is a game changer. Simply fill it with your favorite coffee grounds, place it in the holder, and brew. This saves money and reduces waste over time.
Water Filter Cartridges
Keurig sells water filter cartridges that fit inside the water reservoir. These filters remove chlorine and impurities that can affect the taste of your coffee. Replace the filter every 2 months for the best results.
Drip Tray Mat
A drip tray mat catches drips and keeps your countertop clean. It is especially helpful if you use larger travel mugs that may not sit perfectly on the drip tray.
Mug Warmer
A mug warmer keeps your coffee at the perfect drinking temperature for hours. This is a nice addition if you tend to get distracted and let your coffee cool down.
These small additions may seem minor, but they add up to a much more enjoyable daily coffee routine. Think of them like the way you would convert oven directions to air fryer — small adjustments that lead to better results.
Frequently Asked Questions
How long does it take to brew a cup of coffee on a Keurig?
A standard Keurig brew cycle takes about 60 to 90 seconds from the moment you press the brew button. The first brew after setup may take slightly longer as the machine heats the internal water lines. After that, each cup is ready in just over a minute.
Can I use regular ground coffee in a Keurig machine?
Yes, you can use regular ground coffee by purchasing a reusable K-Cup filter. Simply fill the reusable pod with your ground coffee, place it in the holder, and brew as usual. This is a great way to save money and use your favorite coffee brand.
How often should I descale my Keurig machine?
Most manufacturers recommend descaling every 3 to 6 months. If you live in an area with hard water, you may need to descale more frequently. Signs that your machine needs descaling include slower brewing, smaller cup sizes, or a change in coffee taste.
Why is my Keurig brewing slowly?
Slow brewing is usually caused by mineral buildup or a clogged needle. Try running a descaling cycle first. If that does not help, check the needle under the K-Cup holder for coffee grounds or debris. A paperclip can gently clear any blockages.
Is it safe to leave my Keurig plugged in all the time?
Yes, it is generally safe to leave your Keurig plugged in. Most Keurig machines have an automatic shutoff feature that turns the machine off after a period of inactivity. However, if you prefer extra safety, you can unplug the machine when not in use for extended periods.
Can I brew tea or hot chocolate in a Keurig machine?
Absolutely. Keurig machines work with tea K-Cups, hot chocolate pods, and even cocoa mixes. Simply place your preferred pod in the holder, select your cup size, and brew. Just be sure to clean the machine thoroughly after using flavored pods to prevent flavor mixing.
Final Thoughts
Operating a Keurig coffee machine is one of the easiest kitchen skills you can learn. The entire process, from setup to brewing to cleaning, is designed to be simple and fast. Once you get into a routine, making coffee with your Keurig becomes second nature.
Remember to take care of your machine with regular cleaning and periodic descaling. Use fresh water and quality K-Cups for the best flavor. And do not be afraid to experiment with different brew sizes and strength settings to find your perfect cup.
With this guide, you now have everything you need to confidently operate a Keurig coffee machine every single day. Enjoy your coffee, and happy brewing!