How To Make Banana Chips In Oven With Crispy Results
Learn how to make banana chips in oven with this simple and delicious recipe. You will discover the best tips for getting perfectly crispy banana slices every time. This guide covers everything from prep to storage so you can enjoy healthy homemade banana chips anytime.
There is something truly satisfying about making banana chips in oven at home. You get to control every ingredient, avoid added oils, and enjoy a snack that tastes far better than anything from a store bag. Baked banana chips are crunchy, naturally sweet, and perfect for munching on during a busy day. Whether you are looking for a healthy banana chips option or a fun project to try with your family, this guide has you covered. Keep reading to learn the full banana chips recipe and all the tips you need for the best results.
Homemade banana chips are one of the easiest snacks to prepare. You do not need any special equipment or fancy ingredients. All you need is a few ripe bananas, a simple oven, and about an hour of your time. The process is straightforward, and the results are worth every minute you spend. By the end of this article, you will know exactly how to create crispy banana slices that rival any store-bought version.
Oven dried bananas have become increasingly popular among health-conscious snackers. They offer a satisfying crunch without the guilt that comes with fried snacks. Plus, making your own dehydrated banana chips means you can customize the sweetness and seasoning to match your personal taste. This guide walks you through every step so you can confidently start baking your own batch today.
Key Takeaways
- Easy Oven Method: Making banana chips in oven is simple and requires just a few basic ingredients and common kitchen tools.
- Crispy Results Every Time: The right oven temperature and banana slicing thickness are the keys to perfectly crispy banana slices.
- Healthy Snack Option: Homemade banana chips are a natural, oil-free snack packed with potassium and fiber.
- Quick Prep Work: Properly preparing your bananas with lemon juice prevents browning and enhances flavor.
- Smart Storage Tips: Storing your dried banana chips correctly keeps them crispy for up to two weeks.
- Avoid Common Mistakes: Skipping the lemon soak or using too high heat are the most common errors that ruin your batch.
📑 Table of Contents
- What You Need to Make Banana Chips in Oven
- How to Prepare Bananas for Oven Drying
- Step-by-Step Banana Chips Recipe
- Tips for Perfectly Crispy Banana Chips
- Store-Bought vs Homemade Banana Chips
- Storing and Enjoying Your Banana Chips
- Common Mistakes to Avoid When Baking Banana Chips
- Expert Insights: Getting Professional-Level Results
- Nutritional Benefits of Banana Chips
- Conclusion
What You Need to Make Banana Chips in Oven
Before you start baking, gather your tools and ingredients. Having everything ready makes the process smooth and enjoyable. Here is a complete list of what you need for your oven dried bananas.
Ingredients for Banana Chips
- Ripe bananas: Choose bananas that are ripe but not overly soft. They should have plenty of natural sweetness but still hold their shape when sliced.
- Lemon juice: Fresh lemon juice works best. It prevents browning and adds a subtle tang that balances the sweetness.
- Cinnamon (optional): A light sprinkle of cinnamon adds warmth and flavor to your baked banana chips.
- Honey or maple syrup (optional): A tiny drizzle can enhance sweetness if you prefer a sweeter snack.
- Sea salt: A pinch of salt brings out the natural flavor of the bananas.
Tools You Will Need
- Sharp knife or mandoline slicer: Uniform slices dry evenly, which is essential for crispy banana slices.
- Large mixing bowl: For tossing the banana slices with lemon juice and seasonings.
- Parchment paper or silicone baking mat: These prevent sticking and make cleanup a breeze.
- Baking sheets: You will need at least two for a good batch size.
- Cooling rack (optional): This helps air circulate around the chips for even drying.
When it comes to fruit dehydration, the right tools make a big difference. A mandoline slicer is especially helpful because it creates perfectly even slices. This consistency ensures that all your oven dried fruit pieces dry at the same rate. If you do not have a mandoline, a sharp knife works fine too. Just take your time to keep the slices uniform. A good fruit chips recipe always starts with properly prepared ingredients.
How to Prepare Bananas for Oven Drying
Preparation is the most important step in making great banana chips in oven. Skipping or rushing this step often leads to uneven results or browning. Take a few extra minutes here, and your final snack will be much better.
Choosing the Right Bananas
Not all bananas are created equal for this recipe. Ripe bananas with brown spots on the skin are ideal. They are sweeter and softer, which helps them dry into delicious chips. Avoid using green or underripe bananas because they will taste starchy and not sweet enough. At the same time, bananas that are too mushy will fall apart during slicing. Aim for bananas that are yellow with a few brown spots. This is the sweet spot for the best banana chip recipe.
Slicing Bananas for Chips
Slicing bananas for chips requires a steady hand and patience. Here is how to do it right:
- Peel the bananas and discard the peels.
- Cut off both ends of each banana.
- Slice the bananas into rounds that are about 1/8 inch thick.
- Try to keep all slices the same thickness for even drying.
- Place the slices in a large mixing bowl as you go.
Thin, even slices are the secret to crispy banana slices. If your slices are too thick, they will take much longer to dry and may not become fully crispy. If they are too thin, they can burn easily. A thickness of about 1/8 inch hits the sweet spot for most ovens. For the best baking banana slices results, consistency is everything.
Preventing Browning with Lemon Juice
Once your banana slices are cut, toss them gently with lemon juice. This simple step is crucial for natural banana chips. The acid in lemon juice slows down the oxidation process that causes bananas to turn brown. You do not need a lot of lemon juice. Just enough to lightly coat each slice. About one tablespoon of lemon juice for every two bananas works perfectly.
After tossing, let the slices sit for about five minutes. Then pat them dry with a clean towel or paper towel. You want them damp with lemon juice but not dripping wet. Excess moisture will extend the drying time and may result in chewy rather than crispy chips. This small step makes a huge difference in the final quality of your dehydrated banana chips.
Step-by-Step Banana Chips Recipe
Now comes the fun part. Follow these steps carefully, and you will have a batch of delicious oven dried bananas in no time.
Step 1: Preheat Your Oven
Set your oven to 200 degrees Fahrenheit (about 95 degrees Celsius). This low temperature is essential for dehydrated banana chips. If the heat is too high, the outside will burn before the inside dries out. A low and slow approach is the key to perfectly crispy banana chips.
While the oven is heating up, line your baking sheets with parchment paper or a silicone baking mat. This prevents sticking and makes cleanup much easier.
Step 2: Arrange the Banana Slices
Spread the banana slices in a single layer on the baking sheets. Leave a small gap between each slice so air can circulate freely. Overcrowding the pan is one of the most common mistakes people make. When slices touch or overlap, they steam instead of dry, and you will end up with chewy banana chips instead of crispy ones.
If you have more slices than fits on one sheet, use a second baking sheet or work in batches. It is better to bake two smaller batches than to overcrowd one large one. This is especially important for achieving great oven dried fruit results.
Step 3: Bake the Banana Chips
Place the baking sheets on the middle rack of your oven. Bake banana slices for about 1 to 2 hours. The exact time depends on your oven, the thickness of your slices, and how dry you like your chips.
Check on your oven dried bananas after the first hour. Use tongs or a spatula to flip each slice. This ensures both sides dry evenly. After flipping, continue baking for another 30 minutes to 1 hour.
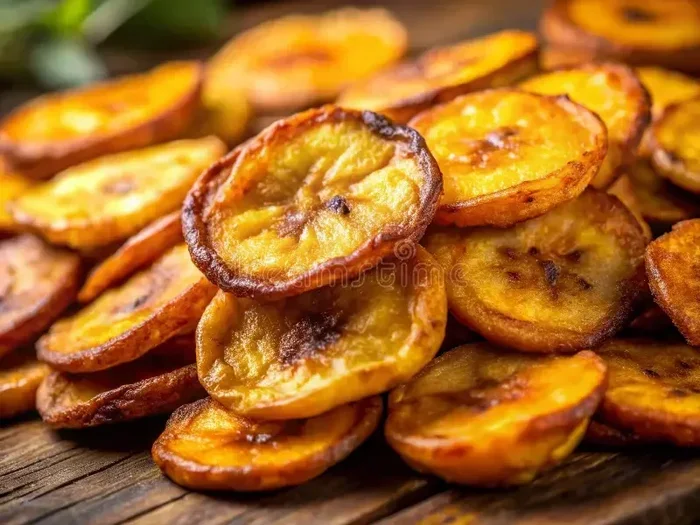
Your baked banana chips are done when they look dry and lightly golden. They should feel firm but not brittle when they first come out. They will crisp up more as they cool. Trust the process and resist opening the oven door too often, as that can change the oven temperature for banana chips and affect your results.
Step 4: Cool and Store
Remove the baking sheets from the oven and let the chips cool completely on a wire rack. This cooling step is important because the chips continue to crisp up as they lose residual heat. Do not skip this step or put them away while they are still warm, as trapped moisture will make them soft.
Once fully cooled, transfer your homemade banana chips to an airtight container. Store them at room temperature, away from direct sunlight and moisture. Now you have a delicious low carb banana snack ready to enjoy whenever you want.
Tips for Perfectly Crispy Banana Chips
Getting the perfect crunch takes a bit of practice, but these tips will help you succeed right from the start.
Use the Right Oven Temperature
The ideal oven temperature for banana chips is between 175 and 200 degrees Fahrenheit. Going higher than 200 degrees risks burning the chips before they fully dry. Going lower than 175 degrees means they will take too long and may develop an odd texture. If your oven runs hot, use an oven thermometer to verify the actual temperature. This small investment pays off big time for your banana chips in oven results.
Choose the Right Banana Variety
Not all banana varieties work equally well. Cavendish bananas are the most common and produce great results. However, red bananas and plantains can also be used for different flavor profiles. Plantain chips tend to be less sweet and more starchy, which some people prefer for a savory snack. Experimenting with different varieties is a great way to build your fruit chips recipe collection.
Pat the Slices Dry
After tossing your banana slices with lemon juice, pat them dry with a paper towel. Removing excess surface moisture speeds up the drying process significantly. This small step can shave 15 to 20 minutes off your total baking time and get you closer to perfectly crispy banana chips.
Flip the Slices Midway
Flipping your banana chip recipe slices halfway through baking ensures even drying on both sides. Use a thin spatula or tongs to gently turn each piece. Be careful not to break the slices, as they become more fragile as they dry. This simple habit separates good chips from great ones.
Do Not Overcrowd the Pan
This tip cannot be stressed enough. Leave space between each slice. Air needs to flow around every piece for proper fruit dehydration. If you find yourself running out of space, use a second baking sheet or bake in multiple rounds. Crowded pans are the number one reason people end up with soft instead of crispy results.
Let Them Cool Completely
Freshly baked banana chips are not fully crispy yet. They continue to firm up as they cool. Resist the urge to taste them right away and let them rest for at least 20 to 30 minutes. You will notice a big difference in texture. This patience is what separates a good snack from a great one.
Quick Tips for Success
- Use a mandoline slicer for perfectly even banana slices every time.
- Line your baking sheets with parchment paper to prevent sticking.
- Rotate your baking sheets halfway through for even browning.
- Add a light dusting of sea salt right after baking for extra flavor.
- Store your oil free banana chips in an airtight container at room temperature.
- Experiment with different seasonings like cocoa powder or chili lime for variety.
Store-Bought vs Homemade Banana Chips
Many people wonder whether making banana chips in oven at home is really worth the effort compared to buying them at the store. Let us take a closer look at the differences.
| Factor | Store-Bought | Homemade |
|---|---|---|
| Added Sugars | Often contains extra sugar or syrup | Only natural fruit sugars |
| Oil Content | Usually fried in oil | Oil free banana chips baked dry |
| Preservatives | Contains artificial preservatives | No preservatives needed |
| Cost per Batch | Higher per serving | Very affordable |
| Freshness | Unknown shelf age | Freshly made and crisp |
| Customization | Limited flavors available | Unlimited seasoning options |
The table above makes a clear case for choosing homemade banana chips over store-bought versions. When you make them yourself, you know exactly what goes into every batch. Your family gets a cleaner, healthier snack without any hidden additives. Plus, the taste is simply unbeatable.
Dehydrated banana chips from the store often contain added oils and sugars that you might not expect. By making your own, you control the entire process. This is especially important for people with dietary restrictions or food sensitivities. A homemade banana chips recipe is the safest and most transparent choice.
Storing and Enjoying Your Banana Chips
Once you have made a batch of delicious homemade banana chips, you will want to keep them fresh. Proper storage is the key to maintaining that satisfying crunch.
Best Storage Methods
The best way to store baked banana chips is in an airtight container at room temperature. Glass jars with tight-fitting lids work wonderfully. You can also use resealable plastic bags or plastic containers with sealed lids.
Keep your container in a cool, dry place away from direct sunlight. Moisture is the enemy of crispy snacks, so make sure your container is truly airtight. If you live in a humid climate, you might want to add a small packet of silica gel to absorb any excess moisture. This keeps your crispy banana slices at their best for longer.
How Long Do Homemade Banana Chips Last?
When stored properly, your low carb banana snack will stay crispy for about one to two weeks. However, they rarely last that long in most households because they are so delicious. If you want to extend their shelf life, you can store them in the refrigerator, which can add a few extra days of freshness. Just make sure they are completely cool before sealing them away.
Creative Ways to Enjoy Banana Chips
Banana snack ideas go far beyond just eating them straight from the jar. Here are some fun ways to enjoy your natural banana chips:
- Crush them over yogurt or oatmeal for added crunch.
- Use them as a topping for smoothie bowls.
- Mix them into trail mix with nuts and dried cranberries.
- Crush them and use as a coating for chicken or fish.
- Pack them in lunch boxes or snack bags for a portable treat.
- Serve them at parties as a healthy and colorful snack.
Dehydrated banana chips also make great gifts. Package them in clear bags with a ribbon, and you have a thoughtful homemade present that health-conscious friends and family will love. This is one of the best banana snack ideas for sharing your homemade creations with others.
Common Mistakes to Avoid When Baking Banana Chips
Even with the best recipe, mistakes can happen. Knowing what to avoid will save you time, ingredients, and frustration.
Using Overripe or Underripe Bananas
Underripe bananas will taste bland and starchy. Overripe bananas that are completely brown and mushy will fall apart during slicing and baking. The sweet spot is bananas that are mostly yellow with a few brown spots. They have the right balance of sweetness and structural integrity for oven dried fruit. This is the foundation of any great banana chips recipe.
Skipping the Lemon Juice
Some people skip the lemon juice step to save time, but this is a big mistake. Without lemon juice, your dried banana slices will turn dark brown within hours. They will still taste fine, but they will not look appetizing. The lemon juice keeps your healthy banana chips looking fresh and golden. It is a small effort that makes a big visual and flavor difference.
Setting the Oven Too High
It is tempting to raise the oven temperature to speed up the process. However, high heat burns the outside of the chips before the inside has a chance to dry. This results in bitter, dark chips with a chewy center. Patience and low heat are the secrets to crispy banana slices. Trust the low-temperature method for the best banana chips in oven outcome.
Overcrowding the Baking Sheet
We mentioned this before, but it deserves repeating. Overcrowding leads to steaming, which produces soft, chewy chips instead of crispy ones. Give each slice enough space to breathe. Your banana chips recipe will thank you for it. Remember, air circulation is the key to successful fruit dehydration.
Not Letting the Chips Cool Properly
Fresh from the oven, banana chips are not yet at their crispiest. They need time to cool and finish drying out. Putting them away while still warm traps moisture and makes them lose their crunch. Always let them cool completely on a rack before storing. This one habit will dramatically improve your results every time.
Ignoring Humidity Levels
Humid weather can affect how your banana chips in oven turn out. On humid days, you may need to bake them for a longer time or at a slightly lower temperature. If you live in a very humid climate, consider running a dehumidifier in your kitchen while baking to get the best results. Weather plays a bigger role in baking banana slices than most people realize.
Expert Insights: Getting Professional-Level Results
Professional bakers and snack makers have a few tricks that take homemade banana chips in oven from good to exceptional. Here are some expert-level tips you can start using right away.
First, try soaking your banana slices in a mixture of lemon juice and a tiny bit of pineapple juice. The natural enzymes in pineapple help break down starches and create an even crispier texture. This is a trick used by many experienced dehydrated banana chips makers.
Second, consider using a convection setting on your oven if you have one. The fan promotes better air circulation, which speeds up drying and creates more uniform results. If your oven does not have a convection feature, cracking the oven door slightly can help moisture escape during the baking process.
Third, experiment with your oven temperature for banana chips to find what works best for your specific oven. Every oven has hot spots and slight temperature variations. Running an oven thermometer for a few bakes will help you understand your oven’s true behavior and adjust accordingly. This is how professionals achieve consistent crispy banana slices every single time.
Finally, do not be afraid to try new flavor combinations. A light sprinkle of sea salt and chili powder creates a savory kick. A dusting of cocoa powder and coconut sugar turns your baked banana chips into a dessert-like treat. The possibilities are endless when you make homemade banana chips in your own kitchen.
Nutritional Benefits of Banana Chips
Healthy banana chips are not just tasty, they also offer real nutritional benefits. Bananas are naturally rich in potassium, which supports heart health and muscle function. They also provide dietary fiber, vitamin B6, and vitamin C. These nutrients make banana chips in oven a smart snack choice for people of all ages.
Because you are drying the bananas rather than frying them, you retain most of these nutrients. Potassium rich snack options are especially valuable for people who exercise regularly or want to support their cardiovascular health. A handful of natural banana chips gives you a satisfying crunch along with essential vitamins and minerals.
Compared to potato chips or other processed snacks, baked banana chips are a much healthier alternative. They are naturally free from artificial flavors, colors, and preservatives. For anyone looking for a guilt-free snack that satisfies cravings, oven dried bananas are an excellent choice. They deliver on taste, nutrition, and convenience all at once.
Conclusion
Making banana chips in oven is one of the simplest and most rewarding things you can do in the kitchen. With just a few ripe bananas, some lemon juice, and about an hour of your time, you can create a batch of crispy banana slices that taste amazing and are good for you too.
Remember the key steps: choose the right bananas, slice them evenly, use lemon juice to prevent browning, bake at a low temperature, and let them cool completely before storing. Follow these guidelines and your homemade banana chips will turn out perfectly every time.
Whether you are looking for a healthy snack, a low carb banana snack, or a fun cooking project, this banana chip recipe delivers on all fronts. Give it a try this week and enjoy the satisfying crunch of natural banana chips made with your own hands. You will wonder why you ever bought them from a store.
Frequently Asked Questions
Can I use a different type of fruit to make chips in the oven?
Absolutely. Many fruits work well for oven drying, including apples, pears, and pineapples. Each fruit has its own ideal drying time and temperature. The process is similar to making banana chips in oven. Just adjust the thickness and baking time based on the fruit you choose. Firmer fruits like apples tend to produce the crispiest results.
Do I need to use oil when making banana chips in the oven?
No. Oil free banana chips are actually better because they are lighter and let the natural banana flavor shine. You do not need any oil on your baking sheets if you use parchment paper or a silicone baking mat. The natural sugars in the bananas help them crisp up without any added fat.
Why are my banana chips turning out chewy instead of crispy?
Chewy chips usually happen for one of three reasons: the slices are too thick, the oven temperature is too low, or the slices were overcrowded on the baking sheet. Try slicing your bananas thinner, increasing the oven temperature slightly, or spreading the slices out more. Also make sure the chips are fully cooled before storing, as trapped moisture causes chewiness.
Can I make banana chips in the oven without lemon juice?
You can, but the results will not be as good. Without lemon juice, your dried banana slices will brown quickly and may develop a less appealing flavor. Lemon juice also adds a subtle brightness that balances the sweetness of the bananas. If you do not have lemon juice, a few drops of vinegar can work as an alternative.
How long do homemade banana chips stay crispy?
When stored properly in an airtight container at room temperature, homemade banana chips stay crispy for about one to two weeks. Keeping them away from moisture and humidity is essential. If you live in a very humid area, storing them in the refrigerator can extend their freshness by a few extra days.
Are banana chips a good snack for weight loss?
Banana chips in oven can be a great snack for weight loss because they are naturally low in fat and free from added oils. They provide natural sweetness and crunch without the empty calories found in many processed snacks. However, portion control is still important because dried fruit is calorie-dense. Enjoy them in moderation as part of a balanced diet.