The Best Beef Gravy Recipe for Perfect Sunday Dinners
This beef gravy recipe delivers rich, savory flavor perfect for Sunday dinners and family gatherings. You will learn how to make homemade gravy from pan drippings, use a simple roux, and avoid common mistakes that ruin a good gravy. Whether you prefer brown gravy or a creamy beef gravy, this guide covers everything you need to create the perfect gravy recipe every single time.
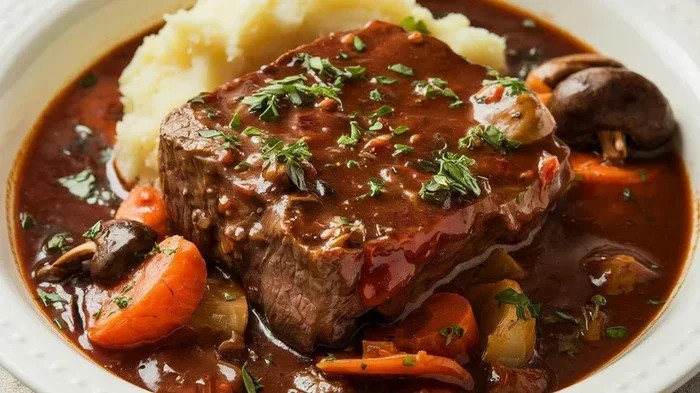
There is something magical about a warm bowl of beef gravy sitting beside a perfectly roasted cut of meat. Sunday dinners feel incomplete without a rich, savory gravy recipe that brings the whole meal together. Whether you are pouring it over mashed potatoes or using it to moisten every bite of roast beef, a good gravy elevates a simple meal into something truly special.
Making homemade beef gravy from scratch might sound intimidating, but it really is not. With just a few basic ingredients and a little patience, you can create a rich, velvety gravy that tastes far better than anything from a jar or packet. This beef gravy recipe is designed to be easy to follow, hard to mess up, and absolutely delicious. By the end of this guide, you will have all the knowledge and confidence you need to make perfect gravy every time.
Let us be honest. Store-bought gravies often taste thin, salty, or artificial. A homemade beef gravy recipe gives you complete control over the flavor, texture, and ingredients. You can adjust the seasoning, make it thicker or thinner, and add extra depth with herbs and spices. Plus, there is something deeply satisfying about making a savory pan gravy from the drippings left behind after cooking a roast. It turns what would otherwise be wasted into something extraordinary.
This guide covers everything you need to know. We will start with the essential ingredients, walk through each step of the process in detail, and share tips that will take your gravy from good to outstanding. You will also learn about common mistakes, how to fix them, and the best ways to store your leftovers. Let us get started.
Key Takeaways
- Simple Ingredients: You only need beef broth, flour, butter, and pan drippings to make restaurant-quality gravy at home.
- Step-by-Step Process: The recipe walks you through every stage from making a roux to achieving the right consistency.
- Pro Tips Included: Expert cooking tips help you avoid lumpy gravy and build deep, savory flavor every time.
- Versatile Side Dish: This beef gravy pairs perfectly with roast beef, mashed potatoes, biscuits, and more.
- Easy to Store: Learn how to store leftover gravy properly so it stays fresh for days.
- Beginner-Friendly: No special skills or equipment needed. Anyone can master this homemade gravy recipe.
📑 Table of Contents
- Why Homemade Beef Gravy Is Worth the Effort
- What You Need to Make the Perfect Beef Gravy
- Step-by-Step Beef Gravy Recipe
- Tips for the Richest, Most Flavorful Gravy
- Common Mistakes to Avoid When Making Gravy
- How to Store and Reheat Your Gravy
- What to Serve with Your Beef Gravy
- Expert Insights on Perfecting Your Gravy
- Key Takeaways
- Conclusion
Why Homemade Beef Gravy Is Worth the Effort
Some people skip making gravy and reach for a packet mix instead. There is nothing wrong with convenience, but once you taste homemade brown gravy made from scratch, you will never go back. The difference in flavor and texture is night and day.
The Flavor Difference
When you make beef gravy at home, you build layers of flavor. A roux-based gravy starts with melted butter and flour cooked together until it turns golden brown. This base gives the gravy a nutty, deep flavor that packet mixes simply cannot replicate. Adding beef stock or the juices from a slow-cooked roast adds even more richness and complexity.
Homemade gravy also lets you control the salt, pepper, and seasoning levels. You know exactly what goes into your food, which matters if you are feeding a family or guests with dietary preferences. It is one of the simplest ways to make your Sunday dinner feel more intentional and heartfelt.
The Texture Difference
Packet gravies tend to be thin, gelatinous, or oddly smooth. Homemade gravy has a natural, silky body that coats the back of a spoon beautifully. You can make it as thick or as thin as you like. Some people prefer a cream gravy that is light and pourable, while others love a thick, hearty meat sauce that almost stands on its own.
The beauty of making your own is that you get to decide. You can adjust the consistency in real time by adding more liquid or letting it simmer longer. This level of control is what separates a good gravy recipe from a great one.
What You Need to Make the Perfect Beef Gravy
Before you start cooking, gather everything you need. Having all your ingredients measured and ready makes the process smooth and stress-free. Here is what goes into a classic beef gravy recipe.
Essential Ingredients
- Beef broth or beef stock: This forms the liquid base of your gravy. Use low-sodium broth so you can control the salt level. Homemade stock is even better if you have it.
- All-purpose flour: Flour acts as the thickening agent. It creates the base of your roux, which gives the gravy its body and smooth texture.
- Butter or cooking fat: Butter adds richness and flavor. You can also use the fat rendered from cooking beef, which adds even more depth.
- Pan drippings: If you are making gravy after roasting beef, save the drippings from the pan. These carry concentrated flavor that store-bought broth simply does not have.
- Salt and black pepper: Season to taste. Start with less salt and add more gradually until the flavor balances perfectly.
Optional Flavor Boosters
Once you master the basic beef gravy recipe, you can experiment with extras that take the flavor to the next level. These are not required, but they make a noticeable difference.
- Garlic: Minced garlic cooked in the butter before adding the flour adds a warm, aromatic depth.
- Worcestershire sauce: A splash of this adds tanginess and umami, making the gravy taste more complex.
- Fresh thyme or rosemary: These herbs complement beef beautifully and give the gravy a subtle herbal note.
- Tomato paste: A small spoonful adds color and a slight sweetness that balances the savory flavors.
- Heavy cream: For a richer, creamier cream gravy, stir in a splash of cream near the end of cooking.
Equipment You Will Need
You do not need any fancy tools for this recipe. A medium saucepan, a whisk, a wooden spoon, and a measuring cup are all you need. A fine-mesh strainer is helpful if you are using pan drippings with bits of food in them, but it is not essential. A spatula will also come in handy for scraping every last bit of flavor from the bottom of the pan.
Step-by-Step Beef Gravy Recipe
Now for the fun part. This step-by-step beef gravy recipe is straightforward and forgiving. Follow along, and you will have a beautiful, flavorful gravy ready in about 20 to 25 minutes.
Step 1: Prepare Your Base
If you have pan drippings from a roast, start by skimming off the excess fat. You only need about two tablespoons of fat for this recipe. If you do not have drippings, simply use two tablespoons of butter as your fat source. Place the fat or butter in a medium saucepan over medium heat and let it melt completely.
Quick Tip: If you are using pan drippings, strain them through a fine sieve first. This removes any small food particles and gives you a cleaner, smoother gravy.
Step 2: Make the Roux
A roux is the foundation of most great gravies. It is simply equal parts fat and flour cooked together. Once your butter or fat is melted, add an equal amount of all-purpose flour. Stir constantly with a whisk for about two minutes. You want the mixture to turn a light golden color, but be careful not to let it burn.
The roux does the heavy lifting when it comes to thickening your gravy. Cooking it for the right amount of time also removes the raw flour taste, which is essential for a smooth, great-tasting homemade gravy.
Step 3: Add the Beef Broth
Now comes the most important step. Slowly pour in about two cups of beef broth while whisking continuously. Adding the liquid slowly and whisking constantly prevents lumps from forming. This is the number one mistake people make when making gravy, so take your time here.
Once all the broth is added, keep whisking until the mixture is smooth and uniform. You should see a liquid that looks like a thin, creamy sauce at this point. Do not worry if it seems too thin. It will thicken as it simmers.
Step 4: Simmer and Thicken
Reduce the heat to low and let the gravy simmer gently for about 10 to 15 minutes. Stir occasionally with a wooden spoon. As it simmers, the flour in the roux will activate and thicken the liquid into a rich, velvety brown gravy.
Keep an eye on the consistency. If the gravy is too thick, add a splash more broth. If it is too thin, let it simmer a few more minutes. The gravy will continue to thicken as it cools, so do not make it too thick while it is still hot.
Step 5: Season and Finish
Taste the gravy and add salt and pepper as needed. This is where you can get creative. Add a splash of Worcestershire sauce for depth, a pinch of garlic powder for warmth, or a few sprigs of fresh thyme for an herbal touch.
Remove any herb stems or bay leaves before serving. Give the gravy a final whisk to make sure everything is evenly combined. Your beef gravy recipe is now ready to serve.
Tips for the Richest, Most Flavorful Gravy
Making a great gravy recipe is about more than just following steps. A few small details can make a big difference in the final result. Here are some expert tips that will help you achieve the best possible flavor and texture.
Use the Best Beef Broth You Can Find
The broth you use directly impacts the flavor of your gravy. If you are using store-bought beef stock, choose a high-quality brand with minimal additives. Better yet, make your own stock from bones and vegetable scraps. The depth of flavor in a well-made stock transforms an ordinary gravy recipe into something truly memorable.
Do Not Rush the Roux
Cooking the roux for the full two minutes is crucial. This step cooks out the raw flour taste and develops a subtle nutty flavor. If you rush this step, your gravy may taste flat or have a chalky texture. Patience here pays off big time.
Whisk Constantly When Adding Liquid
Adding the broth too quickly or without whisking is the fastest way to get a lumpy, unpleasant meat sauce. Pour in small amounts at a time and whisk vigorously after each addition. This creates a smooth emulsion that results in a silky, lump-free gravy.
Adjust Consistency at the End
Remember that gravy thickens as it cools. If you are making the gravy ahead of time for a Sunday dinner, keep it slightly thinner than you want it when hot. You can always reheat it and adjust the consistency right before serving.
Add a Finishing Touch
A small knob of butter stirred in at the very end adds shine and richness to the finished gravy. This technique, called mounting, gives the gravy a glossy appearance and a smoother mouthfeel. It is a restaurant trick that works beautifully at home.
Common Mistakes to Avoid When Making Gravy
Even experienced cooks run into trouble with gravy from time to time. Knowing what goes wrong helps you avoid the same mistakes. Here are the most common issues and how to prevent them.
Lumpy Gravy
Lumps happen when the flour clumps together before the liquid is added. The fix is simple: whisk the flour into the melted fat thoroughly before adding any broth. And when you do add the liquid, do it slowly and keep whisking without stopping. If lumps still form, you can push the gravy through a fine-mesh strainer for a perfectly smooth result.
Thin or Watery Gravy
If your gravy does not thicken enough, the roux may not have cooked long enough, or you may have added too much liquid. Simmer the gravy for a few more minutes to let the flour fully activate. You can also make a slurry by mixing a tablespoon of flour with a tablespoon of cold water, then stirring it into the simmering gravy. This is a quick fix that works every time.
Bland or Flat-Tasting Gravy
A beef gravy recipe without enough seasoning will taste dull. Make sure you are using enough salt and pepper, and consider adding umami-rich ingredients like Worcestershire sauce or a splash of soy sauce. The pan drippings from a well-seasoned roast also add natural flavor that no amount of seasoning can fully replace.
Burned or Bitter Gravy
Burnt gravy happens when the roux is cooked at too high a heat. Keep the heat at medium or medium-low and stir constantly. If the roux turns dark brown too quickly, start over. A burnt roux will give the entire batch a bitter, unpleasant taste that cannot be fixed.
How to Store and Reheat Your Gravy
One of the best things about making a large batch of homemade beef gravy is that it stores beautifully. You can enjoy it for days after your Sunday dinner without losing any flavor.
Storing Gravy in the Fridge
Let the gravy cool to room temperature, then transfer it to an airtight container. It will keep in the refrigerator for up to four days. Gravy tends to thicken as it sits in the fridge, so you may need to add a splash of broth when reheating to bring it back to the right consistency.
Freezing Gravy for Later
Freezing gravy is a great way to have homemade gravy recipe results ready whenever you need them. Pour the cooled gravy into freezer-safe bags or containers, leaving some room for expansion. It will keep in the freezer for up to three months. When you are ready to use it, thaw it in the refrigerator overnight and reheat gently on the stovetop.
Reheating Without Lumps
When reheating, use low heat and stir frequently. High heat can cause the gravy to separate or form lumps. If the gravy seems too thick after reheating, simply whisk in a little more broth or water until you reach the desired consistency. A quick whisk right before serving makes all the difference.
What to Serve with Your Beef Gravy
A great beef gravy recipe opens up a world of serving possibilities. Here are some of the best pairings for your homemade gravy.
- Mashed potatoes: The classic combination. Creamy mashed potatoes and rich beef gravy is comfort food at its finest.
- Roast beef: Pour the gravy over sliced roast beef for a juicy, flavorful main course.
- Biscuits: Smother warm, flaky biscuits in gravy for a breakfast or brunch dish that everyone will love.
- Meatloaf: A generous drizzle of brown gravy over meatloaf adds moisture and depth.
- Steak and fries: Use the gravy as a dipping sauce or pour it over steak and fries for a hearty meal.
- Gravy biscuits or sausage gravy: Transform your beef gravy into a breakfast dish by serving it over biscuits with scrambled eggs on the side.
Expert Insights on Perfecting Your Gravy
Professional chefs and home cooks alike agree that a few small techniques can elevate your gravy recipe from good to exceptional. Here is what the experts have to say.
One of the most important principles is to always taste and adjust. Great gravy is not just about following a recipe. It is about paying attention to how the flavors develop as the gravy cooks. Add a little more salt, a splash more broth, or an extra pinch of herbs if something seems missing.
Another expert tip is to deglaze the roasting pan after cooking beef. The browned bits stuck to the bottom of the pan, called fond, are packed with concentrated flavor. Add a cup of warm broth to the pan, scrape up the fond, and pour that liquid into your gravy. This simple step adds a depth of flavor that takes homemade gravy to a whole new level.
Finally, do not be afraid to make the gravy a day ahead. Gravy often tastes better the next day because the flavors have time to meld and develop. Make your beef gravy recipe the day before your Sunday dinner, store it in the fridge, and reheat it gently before serving. Your guests will never know it was made ahead of time.
Key Takeaways
- Simple Ingredients: You only need beef broth, flour, butter, and pan drippings to make restaurant-quality gravy at home.
- Step-by-Step Process: The recipe walks you through every stage from making a roux to achieving the right consistency.
- Pro Tips Included: Expert cooking tips help you avoid lumpy gravy and build deep, savory flavor every time.
- Versatile Side Dish: This beef gravy pairs perfectly with roast beef, mashed potatoes, biscuits, and more.
- Easy to Store: Learn how to store leftover gravy properly so it stays fresh for days.
- Beginner-Friendly: No special skills or equipment needed. Anyone can master this homemade gravy recipe.
Conclusion
A perfect beef gravy recipe is the secret ingredient that turns an ordinary meal into a memorable Sunday dinner. With just a few simple ingredients and a little attention to detail, you can create homemade gravy that tastes richer, deeper, and more satisfying than anything from a jar. The process is easier than you think, and the results are worth every minute spent at the stove.
Remember to take your time with the roux, whisk constantly when adding the broth, and adjust the seasoning to your taste. Avoid the common mistakes, follow the tips, and soon you will be making rich, savory gravy that your family will ask for again and again. Whether you are pouring it over roast beef, smothering it on mashed potatoes, or using it to elevate a simple weeknight meal, this gravy recipe will become a staple in your kitchen.
So the next time you are planning a Sunday dinner or just craving something warm and comforting, give this beef gravy recipe a try. Your taste buds will thank you, and your family will ask for seconds. Happy cooking.
Frequently Asked Questions
Can I use a different type of flour to make beef gravy?
Yes, you can substitute all-purpose flour with other types of flour. Cornstarch works well as a thickener and creates a clear, glossy gravy. However, keep in mind that the flavor and texture will be slightly different from a traditional flour-based roux. Gluten-free flour blends also work but may require a little more liquid to achieve the same thickness.
How do I fix lumpy beef gravy?
If your gravy has lumps, the easiest fix is to pour it through a fine-mesh strainer into a clean saucepan. Use a spatula to press the gravy through and discard any solids left behind. Another option is to blend the gravy with an immersion blender until smooth. Prevention is easier than fixing, so always whisk constantly when adding the broth to the roux.
Can I make beef gravy without pan drippings?
Absolutely. While pan drippings add incredible flavor, they are not required for a great beef gravy recipe. You can use butter as your fat source and good-quality beef broth as the liquid base. The result will still be delicious and satisfying. Adding a splash of Worcestershire sauce or a small amount of tomato paste can help build extra depth of flavor.
How long does homemade beef gravy last in the fridge?
Homemade beef gravy keeps well in the refrigerator for up to four days when stored in an airtight container. Make sure the gravy has cooled to room temperature before putting it in the fridge. When reheating, warm it gently on the stovetop and stir frequently to maintain a smooth texture.
Can I freeze beef gravy for later use?
Yes, freezing is a great way to store leftover gravy for longer periods. Pour the cooled gravy into freezer-safe containers or heavy-duty freezer bags, leaving some space for expansion. It will keep in the freezer for up to three months. Thaw it overnight in the refrigerator and reheat on the stovetop, adding a splash of broth if needed to restore the consistency.
What is the difference between brown gravy and cream gravy?
Brown gravy is made with a dark roux and beef broth, giving it a rich, deep color and robust flavor. Cream gravy, sometimes called white gravy, uses a lighter roux and often includes milk or cream for a lighter, milder taste. Both start with the same basic technique of cooking flour in fat, but the choice of liquid and cooking time creates two very different styles of gravy that each have their own delicious purpose.