How To Make Oven Baked Chicken Tenders From Scratch
Discover how to make oven baked chicken tenders from scratch using a simple three-step breading method. This recipe delivers crispy, juicy homemade chicken tenders without deep frying. You will learn the best seasoning blend, the ideal oven temperature, and tips for getting that perfect golden crust every single time.
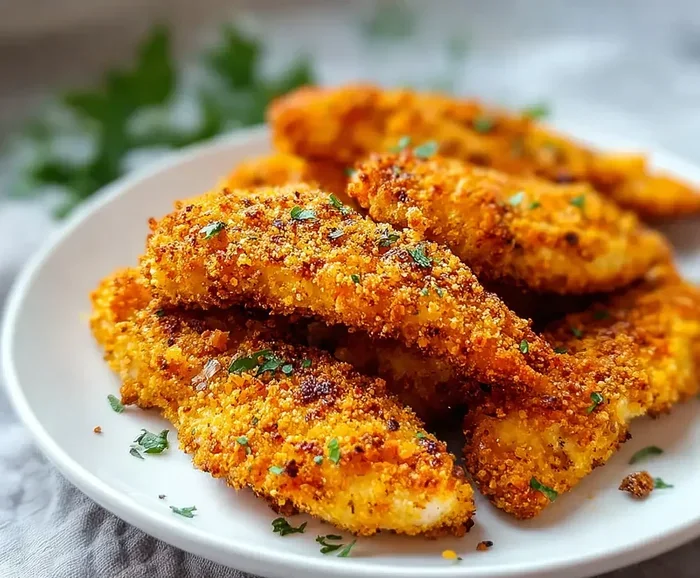
There is nothing quite like biting into a perfectly crispy chicken tender. The golden crust shatters softly, and the inside stays moist and tender. Now imagine making that right in your own kitchen.
Learning how to make oven baked chicken tenders from scratch is easier than you might think. You do not need a deep fryer or fancy equipment. Just a few simple ingredients and a hot oven are all you need. This recipe has become a family favorite because it tastes better than anything out of a box.
Whether you are cooking for picky kids or hosting a game day gathering, these homemade chicken tenders deliver every time. They bake up crispy and golden without all the extra oil. Let us walk through the entire process step by step.
Key Takeaways
- Simple Ingredients: You only need chicken breast, flour, eggs, and breadcrumbs to make delicious homemade chicken tenders.
- Oven Baked Not Fried: Baking gives you crispy chicken tenders with much less fat and fewer calories than deep frying.
- Customizable Flavors: You can easily adjust the seasoning to suit your taste or dietary needs.
- Kid Friendly: Children love these baked chicken fingers, and they are a great way to serve healthier meals at home.
- Meal Prep Friendly: You can bread the tenders ahead of time and store them in the fridge or freezer for quick meals later.
- Perfect Every Time: Following a few key tips ensures your chicken tenders come out crispy on the outside and juicy on the inside.
📑 Table of Contents
- Why Choose Oven Baked Chicken Tenders Over Fried
- Ingredients You Will Need
- How To Make Oven Baked Chicken Tenders From Scratch
- Tips for the Crispiest Baked Chicken Tenders
- How To Store and Reheat Leftovers
- Serving Ideas and Side Dishes
- Common Mistakes to Avoid
- Expert Tips for the Best Results
- Frequently Asked Questions
- Conclusion
Why Choose Oven Baked Chicken Tenders Over Fried
Deep fried chicken tenders taste amazing, but they come with a lot of extra grease and calories. Baking your chicken tenders in the oven gives you that satisfying crunch with a fraction of the fat.
Health Benefits of Baking
When you bake chicken tenders, you use little to no oil. A serving of oven baked chicken tenders has around 200 to 250 calories. The same serving of deep fried tenders can pack 400 calories or more. That is a big difference if you are watching what you eat.
Baking also lets you control exactly what goes into your food. You decide how much salt to use. You choose the type of breading. You avoid the hydrogenated oils found in many restaurant fried foods.
Cost Savings
Making homemade chicken tenders at home saves a lot of money too. A pound of chicken breast costs just a few dollars. When you compare that to buying frozen tenders or ordering takeout, the savings add up fast. A family of four can enjoy a full meal for the price of one takeout order.
Better Texture and Flavor
Many people think baking cannot match the crunch of frying. But with the right technique, baked chicken tenders come out just as crispy. The secret is in the breading and the oven temperature. We will cover both of those in detail below.
Ingredients You Will Need
Keeping the ingredient list simple is the key to great oven baked chicken tenders. You probably already have most of these items in your pantry.
For the Chicken
- Chicken breast tenders — about 1.5 pounds, trimmed and cut into strips
- Salt and black pepper — for basic seasoning
- Garlic powder — adds a savory depth of flavor
- Paprika — gives a subtle smoky sweetness
For the Breading Station
- All-purpose flour — for the first dredge coat
- Eggs — two large eggs, beaten with a splash of milk
- Panko breadcrumbs — these create an extra crispy crust
- Italian seasoning — blends dried herbs for added flavor
Optional Add-Ins
- Grated Parmesan cheese — mix into the breadcrumbs for extra umami
- Hot sauce — add a few dashes to the egg wash for a spicy kick
- Smoked paprika — swap regular paprika for a deeper, smokier taste
- Dried herbs — thyme, oregano, or rosemary all work beautifully
The beauty of this chicken tender recipe is how easy it is to customize. Want a spicy version? Add cayenne pepper to the breadcrumbs. Want a kid-friendly version? Skip the hot sauce and keep the seasoning mild.
How To Make Oven Baked Chicken Tenders From Scratch
Now let us get into the fun part. Making oven baked chicken tenders from scratch follows a simple three-step breading process. Once you set up your station, the assembly goes quickly.
Step 1: Prep the Chicken
Start by patting your chicken tenders dry with paper towels. This step matters more than most people realize. Moisture on the surface prevents the breading from sticking properly. Dry chicken means a crispier crust.
Cut your chicken breasts into even strips, about one inch wide. Uniform sizes mean they cook at the same rate. No more thin pieces turning dry while thick pieces stay undercooked.
Season the chicken lightly with salt, pepper, and garlic powder. This adds flavor right into the meat itself, not just on the surface.
Step 2: Set Up Your Breading Station
Arrange three shallow dishes in a row on your counter. This is the classic dredging method used in restaurants and home kitchens alike.
In the first dish, place your flour. In the second dish, whisk together the beaten eggs and milk. In the third dish, combine the panko breadcrumbs with Italian seasoning and any other spices you like.
Working with one tender at a time, follow this order:
- Dip the chicken into the flour and shake off the excess
- Press it into the egg mixture, coating both sides
- Press it into the breadcrumbs, making sure full coverage
The double coating method works best. After the first pass through all three stations, repeat the process once more. This double layer creates that satisfying thick, crunchy crust.
Step 3: Bake to Perfection
Preheat your oven to 425°F. Line a baking sheet with parchment paper or a wire rack placed over a sheet pan. Using a wire rack is the best trick for getting evenly crispy baked chicken tenders. Air circulates all around each piece so the bottom stays crunchy too.
Place the breaded tenders on the rack or parchment. Lightly spray or brush the tops with olive oil. This small step makes a huge difference in achieving a golden, crispy finish.
Bake for 15 to 18 minutes. Flip each tender halfway through. The chicken is done when the internal temperature reaches 165°F. The crust should be deep golden brown and sound hollow when you tap it.
Tips for the Crispiest Baked Chicken Tenders
Getting crispy chicken tenders from the oven takes a little know-how. These tips will help you nail the texture every single time.
Use Panko Instead of Regular Breadcrumbs
Panko breadcrumbs are lighter and flakier than standard breadcrumbs. They create a crunchier coating that holds up beautifully in the oven. You can find panko in the Asian section of most grocery stores, or you can make your own from stale bread.
Do Not Skip the Wire Rack
Placing tenders directly on a baking sheet traps steam underneath. That steam makes the bottom soggy. A wire rack lets hot air flow freely around the chicken. The result is a uniformly crispy crust on all sides.
Chill Before Baking
This is a game-changing tip. After breading, place your chicken tenders on a plate and refrigerate them for 15 to 30 minutes. The cold helps the coating set and adhere to the chicken. When it hits the hot oven, the crust crisps up instead of sliding off.
Do Not Overcrowd the Pan
Give each tender space. Overcrowding traps steam and leads to uneven cooking. If you need to bake in batches, that is perfectly fine. Your oven baked chicken tenders will thank you for the extra room.
Brush With Oil Before Baking
A light coat of olive oil spray or a quick brush helps the breading brown and crisp. It also prevents the coating from drying out during baking. Use just a thin layer — you are not trying to fry them.
How To Store and Reheat Leftovers
One of the great things about homemade chicken tenders is that they store well. You do not have to eat them all in one sitting.
Storing Leftover Chicken Tenders
Let the tenders cool completely before storing. Place them in an airtight container lined with a paper towel. The paper towel absorbs any excess moisture and keeps the crust from getting soft.
Refrigerated leftover baked chicken tenders stay good for up to 3 to 4 days. They do not freeze well in the breaded state, but you can freeze unbaked breaded tenders for up to 3 months.
Reheating Without Losing Crispiness
The microwave will make your chicken tenders soggy. Avoid it at all costs. Instead, use your oven or an air fryer.
Preheat your oven to 375°F and place the tenders on a wire rack. Heat for 5 to 8 minutes until warmed through. The oven restores the crispy texture far better than any other method.
An air fryer works even faster. Set it to 350°F and reheat for 3 to 4 minutes. The hot circulating air revives the crust beautifully.
Serving Ideas and Side Dishes
Great baked chicken tenders deserve great sides. Here are some easy pairing ideas that make a complete meal.
- Ranch dipping sauce — the classic pairing for a reason
- Honey mustard — sweet and tangy, kids love it
- Barbecue sauce — adds a smoky, savory kick
- Sweet potato fries — baked alongside the tenders for a complete sheet pan meal
- Coleslaw — adds a refreshing crunch
- Caesar salad — a light, fresh contrast to the crispy chicken
For a fun dinner party, set up a chicken tender bar. Lay out the tenders with several dipping sauces and a variety of sides. Everyone gets to build their own perfect plate.
Common Mistakes to Avoid
Even simple recipes can go wrong if you skip important steps. Here are the most common mistakes people make when baking chicken tenders at home.
Using Wet Chicken
If your chicken surface is wet, the breading slides right off. Always pat the tenders dry before seasoning and breading. This single step makes a massive difference in the final result.
Not Letting the Breading Set
Skipping the chilling step before baking leads to a coating that falls off during cooking. Those 15 to 30 minutes in the fridge make a real difference.
Baking at Too Low a Temperature
Low heat dries out the chicken before the crust can crisp. 425°F is the sweet spot. It cooks the chicken through while browning the breading beautifully.
Undercooking the Chicken
Always use a meat thermometer. Chicken must reach an internal temperature of 165°F to be safe to eat. Guessing leads to undercooked or overcooked meat.
Overcrowding the Baking Sheet
Tossing too many tenders onto one pan creates steam and uneven cooking. Give each piece room to breathe for the crispiest result.
Expert Tips for the Best Results
Professional cooks use a few tricks that elevate homemade chicken tenders from good to restaurant quality. Here is what they know that you can apply at home.
Buttermilk soak: Soak your chicken tenders in buttermilk for 30 minutes before breading. The acidity tenderizes the meat and helps the coating cling better. This is the same technique used in Southern fried chicken recipes.
Double dredge: Going through the flour-egg-breadcrumbs process twice creates a thicker, crunchier crust. Do not rush this step. The extra layer is what separates good tenders from great ones.
Season every layer: Do not just season the chicken. Add a pinch of salt and pepper to the flour and breadcrumbs too. Every bite should be flavorful, not just the outer crust.
Use a meat thermometer: This is non-negotiable. A digital instant-read thermometer takes the guesswork out of cooking. It ensures your chicken is perfectly done every time without drying it out.
Rest before serving: Let the tenders rest for 3 to 5 minutes after baking. This allows the juices to redistribute throughout the meat. Cutting in too early releases those juices onto the cutting board instead of keeping them in the chicken.
Frequently Asked Questions
Can I use chicken thighs instead of chicken breast for baked chicken tenders?
Yes, you absolutely can. Chicken thighs are more flavorful and juicy than breast meat. They do take slightly longer to bake, so add a few extra minutes and check that the internal temperature reaches 165°F. Thigh tenders have a richer taste that many people prefer.
How do I make gluten free oven baked chicken tenders?
Swap the all-purpose flour for a gluten free flour blend. Use gluten free breadcrumbs or crushed gluten free crackers instead of panko. Make sure your Italian seasoning and any other packaged ingredients are certified gluten free. The rest of the recipe stays exactly the same.
Can I prep the breaded tenders ahead of time?
Yes, breading ahead of time is a great meal prep strategy. Place the breaded tenders on a baking sheet lined with parchment paper, cover them tightly with plastic wrap, and refrigerate for up to 24 hours. When you are ready to cook, simply bake them as directed. The coating sets up nicely during refrigeration.
What oven temperature is best for crispy baked chicken tenders?
425°F is the ideal temperature for oven baked chicken tenders. This high heat quickly crisps the breading while cooking the chicken through. Lower temperatures cause the chicken to dry out before the crust can properly brown and crunch.
How long do homemade baked chicken tenders last in the freezer?
Unbaked breaded chicken tenders freeze beautifully for up to 3 months. Place them on a baking sheet in a single layer, freeze until solid, then transfer to a freezer bag. When you are ready to cook, bake them from frozen and add 3 to 5 extra minutes to the cooking time.
Why are my baked chicken tenders not crispy?
The most common reasons are overcrowding the pan, skipping the wire rack, or not baking at a high enough temperature. Make sure your oven is fully preheated to 425°F. Use a wire rack instead of placing tenders directly on a sheet pan. And give each tender enough space so steam can escape during baking.
Conclusion
Making oven baked chicken tenders from scratch is one of the most rewarding things you can do in the kitchen. The process is simple, the ingredients are affordable, and the results are impressive. You get crispy, juicy, flavorful chicken tenders that are far healthier than anything from a fast food restaurant.
This homemade chicken tender recipe gives you full control over what goes into your food. You choose the seasonings. You decide how thick the crust is. You bake at the perfect temperature for the ideal texture.
Once you master the basic technique, you can experiment with endless variations. Try different breadcrumbs. Mix in new spices. Pair them with your favorite sauces. The possibilities are truly endless.
So grab some chicken breasts, set up your breading station, and get baking. Your family will thank you for serving crispy baked chicken tenders made with real ingredients and real care. This is one recipe you will come back to again and again.