How To Toast Shredded Coconut In Oven The Easy Way
Toasting shredded coconut in the oven is one of the simplest ways to elevate your baking and cooking. This guide shows you exactly how to achieve perfectly golden, crunchy toasted coconut every single time. You will learn the right temperature, timing, and simple tricks that make all the difference. Whether you use sweetened or unsweetened coconut, the process is quick and easy to master. Read on to discover how a few minutes in the oven can transform ordinary coconut into a gourmet ingredient.
There is something magical about toasted shredded coconut. A few minutes in the oven transforms plain, fluffy coconut into golden, crunchy little pieces that add depth and flavor to almost anything you make. If you have ever wondered how to get that restaurant-quality coconut topping at home, the answer is simpler than you think.
How To Toast Shredded Coconut In Oven is one of the easiest kitchen skills you can learn. It requires almost no equipment, costs very little, and takes less than fifteen minutes from start to finish. Whether you are a beginner baker or a seasoned cook, this technique will become one of your go-to moves in the kitchen.
The beauty of oven-toasting coconut lies in its simplicity. You do not need a special toaster or a fancy gadget. Your regular home oven does all the work. All you need is shredded coconut, a baking sheet, and a few minutes of your time. Once you try it, you will never go back to using plain, untoasted coconut again.
In this article, we walk you through every step of the process. You will learn the ideal oven temperature for coconut, how long to bake it, and what to watch for so you never burn a batch. We also share creative ways to use your toasted coconut and common mistakes to avoid. By the end, you will feel confident toasting coconut like a pro.
Key Takeaways
- Low and slow is the secret: Toasting at 325°F to 350°F ensures even browning without burning.
- Stirring frequently matters: Coconut toasts fast, so checking and stirring every few minutes prevents scorching.
- Line your baking sheet: Using parchment paper or a silicone mat makes cleanup effortless and prevents sticking.
- Spread coconut in a thin layer: A single, even layer allows heat to reach every piece for consistent results.
- Toast both sweetened and unsweetened coconut: Each brings a different flavor profile to your recipes.
- Store properly to keep crunch: An airtight container keeps oven-baked coconut fresh for up to two weeks.
- Toasted coconut adds instant flavor: It works in desserts, smoothies, salads, and savory dishes alike.
📑 Table of Contents
Why Toast Shredded Coconut?
You might be thinking, “Why bother toasting coconut at all?” That is a fair question. After all, you can buy pre-toasted coconut at the store. But there is a big difference between store-bought and homemade.
When you bake shredded coconut at home, you control the level of toastiness. You decide whether you want lightly golden pieces or deeply caramelized, dark crunchy bits. Store-bought options often sit on shelves for weeks, losing their freshness and crunch along the way.
Here are some of the best reasons to toast your own coconut at home:
- Freshness: Homemade toasted coconut tastes noticeably better because it is made to order.
- Texture control: You can stop baking the moment it reaches your preferred level of crunch.
- No additives: You know exactly what goes into it. No preservatives or extra sugars.
- Cost savings: A bag of shredded coconut costs very little, and one batch goes a long way.
- Aroma: The smell of coconut toasting in the oven fills your kitchen with a warm, tropical fragrance.
Toasted coconut also brings a deeper, nuttier flavor compared to raw coconut. That complexity makes it a fantastic addition to both sweet and savory dishes. Once you start using it, you will find yourself adding it to everything from morning oatmeal to dinner garnishes.
Sweetened vs. Unsweetened Coconut for Toasting
You can toast both sweetened and unsweetened shredded coconut. Each one gives you a different result. Sweetened shredded coconut caramelizes more quickly and tastes like a cross between coconut and butterscotch. It is wonderful for desserts and sweet toppings.
Unsweetened coconut has a more natural, slightly nutty flavor. It works beautifully in savory dishes, granola, and trail mix. Both types toast wonderfully, but keep in mind that sweetened coconut may brown faster because of the sugar content. Adjust your baking time accordingly when using sweetened varieties.
What You Will Need
Before you start, gather your tools and ingredients. The list is short, which is part of why this process is so easy.
Ingredients:
- Shredded coconut (sweetened or unsweetened, depending on your preference)
- Optional: a tiny pinch of salt for savory applications
- Optional: a drizzle of honey or maple syrup if you want extra sweetness
Tools:
- A rimmed baking sheet
- Parchment paper or a silicone baking mat
- A spatula or wooden spoon for stirring
- A cooling rack (optional but helpful)
- An oven preheated to the right temperature
That is it. You do not need any special ingredients or expensive equipment. A standard oven-baked coconut recipe calls for nothing more than what you likely already have in your kitchen. The simplicity of this process is what makes it so appealing for home cooks of all levels.
Step-by-Step: How To Toast Shredded Coconut In Oven
Now let us get into the heart of the matter. Here is the complete process for achieving perfectly toasted coconut every time. Follow these steps closely, and you will have excellent results.
Step 1: Preheat Your Oven
Set your oven to 325°F (163°C). This is the sweet spot for coconut toasting. Some recipes call for 350°F, but 325°F gives you a wider window to monitor the coconut and reduce the risk of burning. Low heat coconut toasting is the key to even, golden results without any bitter edges.
While your oven is heating up, line your baking sheet with parchment paper or a silicone mat. This small step saves you from stuck-on coconut and makes cleanup a breeze.
Step 2: Spread the Coconut in a Thin, Even Layer
Pour your shredded coconut onto the lined baking sheet. Use your hands or a spatula to spread it out into a single, thin layer. Spread coconut on baking sheet evenly, making sure no pieces are piled on top of each other.
The thinner the layer, the more evenly the coconut will toast. If you have a lot of coconut, use two baking sheets or toast in batches. Overcrowding the pan leads to uneven toasting and steaming instead of roasting, which is the opposite of what you want.
Step 3: Place the Sheet in the Oven
Put the baking sheet on the middle rack of your oven. The middle position allows heat to circulate evenly around the coconut. Avoid placing it on the top rack, where the heat is more intense and burning is more likely.
Set a timer for five minutes. Even if you think you will watch it the whole time, a timer keeps you from forgetting about it.
Step 4: Stir and Check Every Three to Five Minutes
This is the most important step in the entire process. Stir frequently coconut to ensure even browning. Use a spatula to gently toss and flip the pieces. You want every strand of coconut to have equal exposure to the heat.
After the first five minutes, check the coconut. Look for any pieces that are already turning golden. If you see color developing, give everything a good stir. Continue checking every three to five minutes after that.
Step 5: Watch for the Golden Color
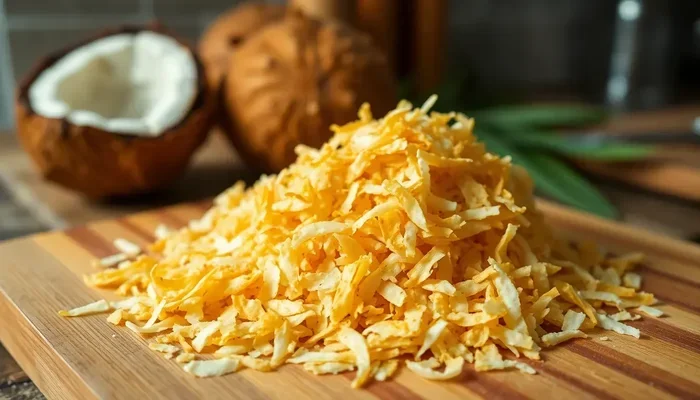
You are looking for a light to medium golden brown color. The coconut will also become noticeably drier and more rigid. Some pieces may curl slightly at the edges, and that is perfectly normal. The aroma will shift from mild and sweet to rich and toasty.
Remember that coconut continues to darken slightly after you remove it from the oven. So pull it out when it looks just a shade lighter than your desired final color. This is the number one tip for avoiding over-toasted coconut.
Step 6: Cool Completely
Remove the baking sheet from the oven and let the coconut cool on the pan for at least ten to fifteen minutes. During cooling, the coconut will crisp up even more. If you transfer it while still hot, the residual moisture can make it soggy.
For the crispiest result, spread the cooled coconut in a single layer on a wire rack. Once completely cool, transfer it to an airtight container for storage or use it right away in your favorite recipes.
Temperature and Timing: The Perfect Balance
Getting the temperature and timing right is what separates perfectly toasted coconut from burnt or underdone coconut. Let us break it down clearly.
The ideal oven temperature for coconut is between 325°F and 350°F. Here is a quick reference table to guide you:
| Coconut Type | Temperature | Time Range | Result |
|---|---|---|---|
| Sweetened shredded | 325°F | 10-15 minutes | Golden, caramelized, crunchy |
| Unsweetened shredded | 325°F | 12-18 minutes | Light golden, nutty flavor |
| Sweetened shredded | 350°F | 8-12 minutes | Darker, deeper caramel notes |
| Unsweetened shredded | 350°F | 10-15 minutes | Medium golden, toasty crunch |
| Desiccated coconut | 325°F | 8-12 minutes | Fine, even toast, great for baking |
These times and temperatures are guidelines. Every oven runs slightly differently, so start checking early and often. Ovens with convection fans tend to toast coconut more evenly and may reduce the time by a couple of minutes.
If you are using a toaster oven, the same principles apply. Set it to 325°F, spread the coconut thinly, and check frequently. Toaster ovens can be even more efficient because the heating elements are closer to the food.
Creative Ways To Use Toasted Coconut
Once you have a batch of toasted coconut ready, the fun really begins. There are so many ways to use it beyond just sprinkling it on top of a dessert. Here are some of our favorite ideas.
In Desserts and Baked Goods
Toasted coconut is a dream addition to cakes, cookies, and cupcakes. Sprinkle it over a chocolate cake for a beautiful contrast in color and texture. Fold it into cookie dough before baking for added crunch. It also works wonderfully as a filling layer in macaroons or layered desserts like tiramisu-style coconut parfaits.
In Breakfast and Morning Meals
Add toasted coconut to your morning coconut toppings rotation. It pairs beautifully with yogurt, oatmeal, smoothie bowls, and pancakes. A handful of crunchy coconut turns a simple breakfast into something special. You can also mix it into homemade granola or coconut flakes recipe combinations for a satisfying morning crunch.
In Savory Dishes
Do not limit toasted coconut to sweet applications. It adds a wonderful nutty crunch to savory dishes. Sprinkle it over curries, stir-fries, or rice bowls. It works as a coconut garnish for soups and salads. In Southeast Asian cuisine, toasted coconut is a common finishing touch that brings everything together.
In Snacks and Trail Mix
Combine your toasted coconut with nuts, dried fruit, dark chocolate chips, and a few seeds for a homemade trail mix. It stores well and makes a great snack for hiking, road trips, or a quick energy boost during the day. The crunch holds up beautifully over time when stored properly.
Common Mistakes and How To Avoid Them
Toasting coconut is simple, but it is easy to make a few common errors. Here are the mistakes most people make and how to avoid them.
Mistake 1: Setting the Oven Too Hot
High heat is the enemy of toasted coconut. It causes the outside to burn while the inside stays pale and soft. Always use moderate heat between 325°F and 350°F. Low heat coconut toasting gives you full control and a much better final product.
Mistake 2: Overcrowding the Pan
Piling coconut too high on the baking sheet traps steam and leads to uneven toasting. The coconut will steam instead of roast, resulting in soft, chewy pieces rather than the crunchy texture you want. Always spread it in a thin, single layer.
Mistake 3: Walking Away from the Oven
Coconut toasts quickly and can go from perfectly golden to burnt in a matter of minutes. Do not leave the kitchen while it is in the oven. Set a timer and stay nearby so you can stir and check it regularly.
Mistake 4: Not Letting It Cool
It is tempting to use the coconut right away while it is still warm. But it will not reach its full crunch until it cools completely. Patience here pays off with a much better texture in your final dish.
Mistake 5: Storing It Improperly
Toasted coconut loses its crunch fast if stored in a container that lets in air or moisture. Always use an airtight jar or container. If you live in a humid climate, adding a small packet of silica gel can help preserve the crunch even longer.
Expert Tips for Perfectly Toasted Coconut
Here are some bonus tips from experienced bakers and cooks that will take your toasted coconut to the next level.
- Use a silicone baking mat: It promotes even heat distribution and prevents sticking better than parchment paper in some cases.
- Add a tiny bit of salt: A light sprinkle of flaky salt before toasting enhances the natural coconut flavor and creates a beautiful sweet-salty contrast.
- Toast for color, not time: Every oven is different. Trust your eyes and nose more than the clock. When it smells toasty and looks golden, it is done.
- Make double batches: Toasted coconut does not take long to make, and it stores well. Making extra means you always have it on hand.
- Try different coconut sizes: Fine shredded coconut toasts faster and more evenly. Large flake coconut takes longer and gives you bigger, more dramatic crunch pieces.
- Use it fresh for the best texture: While toasted coconut stores well, it tastes best within the first few days of making it.
How To Store Toasted Coconut
Proper storage keeps your homemade toasted coconut fresh and crunchy for up to two weeks. Let it cool completely before storing it. Place it in an airtight container or a resealable freezer bag, pressing out as much air as possible.
Store the container in a cool, dark place like your pantry or a kitchen cupboard. Avoid storing it near the stove or oven, where heat and humidity can soften the coconut quickly. For longer storage, you can freeze toasted coconut for up to three months. Just make sure it is in a sealed, freezer-safe bag.
When you are ready to use frozen coconut, let it come to room temperature while still sealed. This prevents condensation from forming on the coconut and making it soggy.
Conclusion
How To Toast Shredded Coconut In Oven is one of the simplest yet most rewarding kitchen techniques you can learn. It takes almost no effort, costs very little, and delivers results that are far superior to anything you can buy off the shelf. From the moment you pull that golden, fragrant tray out of the oven, you will understand why so many home cooks swear by homemade toasted coconut.
Remember the key principles: keep the temperature moderate, spread the coconut thinly, stir frequently, and watch it closely. These few habits ensure perfect results every time. Once you have a batch ready, the creative possibilities are endless. Sprinkle it on desserts, mix it into breakfast, toss it with savory dishes, or simply enjoy it as a snack.
Give it a try this week. You will be amazed at how such a small change can make a big difference in your cooking. Once you start using homemade toasted coconut, you will wonder how you ever lived without it. Happy toasting!
Frequently Asked Questions
Can I toast coconut on a parchment-lined baking sheet?
Yes, parchment paper is one of the best options for toasting coconut. It prevents sticking and makes cleanup very easy. Just make sure the coconut is spread in a thin, even layer on top of the parchment for the best results.
How do I know when my coconut is done toasting?
Look for a light to medium golden brown color and a rich, toasty aroma. The coconut should feel dry and crisp to the touch. Remember that it will continue to darken slightly as it cools, so pull it out just a shade lighter than your ideal color.
Can I use desiccated coconut instead of shredded coconut?
Absolutely. Desiccated coconut works wonderfully for oven toasting. Because the pieces are finer, it may toast slightly faster than regular shredded coconut. Keep a close eye on it and stir frequently to prevent burning.
How long does homemade toasted coconut last?
When stored in an airtight container at room temperature, toasted coconut stays fresh and crunchy for up to two weeks. In the freezer, it can last for up to three months. Always make sure it is completely cool before sealing it in a container.
Is it better to toast coconut in the oven or on the stovetop?
Both methods work well, but the oven gives you more even results with less effort. Stovetop toasting in a dry skillet requires constant stirring and close attention, but it produces a slightly different texture. The oven method is more forgiving and better for beginners.
Can I add sugar or spices before toasting the coconut?
Yes, you can toss the coconut with a small amount of sugar, cinnamon, or nutmeg before baking. Just keep in mind that adding sugar will cause the coconut to caramelize faster, so reduce your baking time slightly and watch it closely to prevent burning.