Fresh Pumpkin Pie Tips For An Irresistible Fall Treat
Fresh pumpkin pie is the ultimate fall dessert that brings warmth and tradition to every table. This guide covers everything you need to know, from selecting the best sugar pie pumpkin to mastering the perfect custard filling. You will learn proven baking tips, common mistakes to avoid, and creative serving ideas that make your pie irresistible.
Key Takeaways
- Use sugar pie pumpkins: They are smaller, sweeter, and produce smoother puree than carving pumpkins.
- Roast, don’t boil: Roasting concentrates the flavor and removes excess moisture for a richer pie.
- Bake until just set: A slightly jiggly center ensures a creamy texture that sets perfectly as it cools.
- Fresh spices matter: Grinding your own nutmeg and cinnamon makes a noticeable difference in flavor.
- Let it cool completely: Rushing the cooling process leads to cracks and a runny filling.
- Pair with coffee creamer: A homemade pumpkin spice creamer elevates every slice.
📑 Table of Contents
- What Makes Fresh Pumpkin Pie So Special
- Choosing the Right Pumpkin for Your Pie
- Making Homemade Pumpkin Puree
- The Perfect Pumpkin Pie Filling
- Baking Tips for a Flawless Pumpkin Pie
- Storing and Enjoying Your Fresh Pumpkin Pie
- Common Mistakes to Avoid When Making Pumpkin Pie
- Expert Insights on Perfecting Your Fresh Pumpkin Pie
- Key Takeaways
What Makes Fresh Pumpkin Pie So Special
There is something magical about a warm slice of fresh pumpkin pie on a crisp autumn evening. The aroma of cinnamon and nutmeg fills the kitchen. The silky filling melts on your tongue. And the flaky crust crumbles just right. It is comfort food at its finest.
Unlike canned versions, a pie made from fresh pumpkin puree has a deeper, more complex flavor. You control every ingredient. You adjust the sweetness. You decide how spicy or mild you want it. Once you taste the difference, you will never go back to the can.
Fresh pumpkin pie also connects us to tradition. Generations of families have gathered around the table to share this classic fall dessert. It is more than just a recipe. It is a celebration of the season. Whether you are baking for Thanksgiving or a weekend gathering, a homemade pie speaks volumes about the care you put into your cooking.
The best part? Making fresh pumpkin pie from scratch is not as hard as it sounds. With the right guidance, anyone can pull off a show-stopping pie. Let us walk through every step together.
Choosing the Right Pumpkin for Your Pie
Not all pumpkins are created equal. If you have ever tried to bake with a large carving pumpkin, you know the results can be disappointing. They are stringy, watery, and bland. For the best fresh pumpkin pie, you need the right variety.
Why Sugar Pie Pumpkins Are the Best Choice
Sugar pie pumpkins, also called pie pumpkins, are small and round. They typically weigh between four and eight pounds. Their flesh is dense, sweet, and smooth. This is exactly what you want in a pumpkin pie filling.
Carving pumpkins, on the other hand, are bred to be tall and hollow. They have more water and less flavor. Using one will give you a watery, bland puree that ruins your pie. Always look for the label that says “sugar pie” or “pie pumpkin” at your local farmers market or grocery store.
What to Look for When Buying
Here are the key things to check when picking out your pumpkin:
- Weight: A good pie pumpkin feels heavy for its size. That means it has thick flesh and plenty of moisture.
- Skin: The skin should be firm and smooth. Avoid any with soft spots, bruises, or cracks.
- Stem: Look for a dry, intact stem. A green or moist stem means the pumpkin was picked too recently.
- Color: Choose a deep orange pumpkin. Avoid ones that are pale or have green patches.
These small details make a big difference in the final flavor of your homemade pumpkin pie. Take your time at the store or market. Pick the best one you can find.
Freshness Matters for Flavor
Just like how long coffee beans stay fresh directly impacts the taste of your morning brew, the freshness of your pumpkin affects the flavor of your pie. A pumpkin that sits too long after being harvested can lose its sweetness and develop a bland, starchy taste. Try to use your pumpkin within a few days of purchasing it for the best results.
Making Homemade Pumpkin Puree
Making your own fresh pumpkin puree is the secret weapon behind an incredible pie. Store-bought puree works in a pinch, but homemade puree has a richness and depth that is hard to match. Plus, it is surprisingly easy.
Step-by-Step: Roasting Your Pumpkin
Roasting is the best method for making pumpkin puree. It caramelizes the natural sugars and removes excess water. Here is how to do it:
- Preheat your oven to 400 degrees Fahrenheit.
- Cut your pumpkin in half from top to bottom.
- Scoop out the seeds and stringy pulp with a spoon.
- Place the halves cut-side down on a lined baking sheet.
- Roast for 45 to 60 minutes until the flesh is fork-tender.
- Let the pumpkin cool slightly, then scoop the flesh into a blender or food processor.
- Puree until smooth. You are done.
Draining the Puree Is Key
This step is often overlooked, but it is essential. Fresh pumpkin puree contains a lot of water. If you do not remove the excess moisture, your pie filling will be too wet. A soggy crust and a runny filling will ruin your hard work.
To drain your puree, place it in a cheesecloth or fine-mesh strainer over a bowl. Let it drain in the refrigerator for at least two hours, or overnight for the best results. You will be amazed at how much liquid comes out.
Once drained, your fresh pumpkin puree is ready to use. Measure out the amount you need for your recipe. You can also freeze the extra puree in portions for future seasonal baking projects.
The Perfect Pumpkin Pie Filling
The filling is the heart of any fresh pumpkin pie. Getting the balance of spices, sweetness, and texture right is what separates a good pie from a great one.
Essential Ingredients for a Classic Filling
A traditional pumpkin pie filling calls for a handful of simple ingredients. Each one plays an important role:
- Pureed pumpkin: Use your homemade puree or high-quality canned puree. About one and three-quarter cups for a standard 9-inch pie.
- Evaporated milk: This gives the filling its creamy, custard-like texture. Whole milk or cream can be substituted, but evaporated milk creates the classic flavor.
- Eggs: Two large eggs bind the filling together and help it set during baking.
- Sugar: Granulated white sugar works best. Some bakers like to use a mix of brown sugar for a deeper, caramel-like note.
- Pumpkin spice: This blend of cinnamon, nutmeg, ginger, and allspice is the signature flavor of any autumn treat.
The Spice Blend: Fresh vs. Pre-Mixed
Using pre-mixed pumpkin spice is convenient, but grinding your own spices makes a world of difference. Freshly ground nutmeg and cinnamon have a brighter, more vibrant flavor. Pre-ground spices lose their potency over time, especially if they have been sitting in your cabinet for months.
If you want to take your spice game to the next level, try adding a tiny pinch of cloves or allspice. These warm notes add complexity to the filling without overpowering the pumpkin flavor. A little goes a long way.
Getting the Consistency Right
The ideal pie filling should be pourable but not watery. It should look like a thick, smooth custard before it goes into the oven. Once baked, it will set into a silky, sliceable texture. If your mixture seems too thin, add a bit more puree. If it seems too thick, a splash of evaporated milk will loosen it up.
Many bakers also swear by adding a teaspoon of vanilla extract or a tablespoon of bourbon for extra depth. These small additions can transform a good pie into an extraordinary one.
Serving Suggestions That Impress
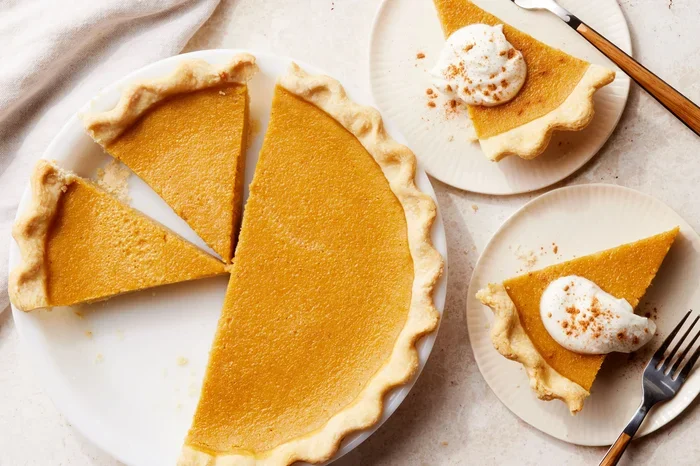
Once your pie is baked and cooled, it is time to think about presentation. A simple dusting of powdered sugar looks elegant. A dollop of freshly whipped cream adds a lovely contrast. For something extra special, try drizzling a little caramel sauce over each slice.
Want to pair your pie with a warm beverage? A cup of coffee alongside your slice is a classic fall combination. Try making a batch of homemade pumpkin spice creamer to add to your coffee. The creamy, spiced flavor complements the pie perfectly and makes your dessert moment feel truly indulgent.
Baking Tips for a Flawless Pumpkin Pie
Baking a fresh pumpkin pie is part science and part art. Getting the oven temperature and timing right is crucial. A few small mistakes can lead to cracks, a soggy bottom, or a filling that never sets properly.
The Right Oven Temperature
Bake your pie at 425 degrees Fahrenheit for the first 15 minutes, then reduce the temperature to 350 degrees for the remaining 40 to 50 minutes. This two-stage baking method helps the crust set while gently cooking the filling. High heat at the start creates a burst of steam that helps the crust puff up and become flaky.
Avoid opening your oven door too often during baking. Every time you open the door, the temperature drops. This can cause the filling to crack as it sets. Trust the process and let the oven do its work.
How to Tell When Your Pie Is Done
This is one of the most common questions among home bakers. The answer is simple: look at the center of the pie. When the edges are set but the center still has a gentle jiggle, your pie is done. It will look slightly underdone, but that is exactly what you want.
The residual heat will continue to cook the filling as it cools. If you bake it until it looks fully set in the oven, it will be overcooked and rubbery by the time it reaches the table. A custard pie like pumpkin pie should always be taken out a little early.
Preventing Cracks in the Filling
Cracked pumpkin pie is a common frustration, but it is easy to avoid. Here are the main causes and solutions:
- Overbaking: This is the number one cause of cracks. Pull the pie out when the center still jiggles slightly.
- Temperature changes: Never place a hot pie on a cold surface. Let it cool gradually at room temperature.
- Too much sugar: Excess sugar can cause the eggs to over-coagulate and crack. Stick to the recommended amount.
- Beating the eggs too much: This incorporates too much air, which expands during baking and then collapses, causing cracks. Mix just until combined.
Blind Baking the Crust
For the best results, consider blind baking your pie crust before adding the filling. This means pre-baking the crust for about 15 minutes with pie weights or dried beans. It prevents a soggy bottom and gives your crust a golden, crisp texture.
Some recipes skip this step, and that is fine too. But if you want a truly professional-quality homemade pumpkin pie, blind baking is worth the extra few minutes.
Storing and Enjoying Your Fresh Pumpkin Pie
Once your pie is baked and cooled, proper storage keeps it fresh and delicious. A fresh pumpkin pie contains dairy and eggs, so food safety matters.
Always store your pie in the refrigerator. It will keep for up to four days covered with plastic wrap or in an airtight container. If you have leftover slices, wrap each one individually for easy grab-and-go enjoyment throughout the week.
You can also freeze pumpkin pie for up to two months. Wrap the whole pie or individual slices tightly in plastic wrap and foil. Thaw overnight in the refrigerator before serving. The texture may be slightly softer after freezing, but the flavor remains excellent.
For the best flavor experience, serve your pie at room temperature. Cold straight from the fridge mutes the spices and makes the filling too firm. Take it out about 30 minutes before serving. The warmth of your kitchen will bring out the beautiful aromas of pumpkin spice and cinnamon.
Freshness and Ingredient Storage
Just as you need to know how long coffee beans stay fresh to get the best flavor from your brew, understanding the shelf life of your baking ingredients is important. Whole spices like nutmeg and cinnamon sticks last much longer than pre-ground versions. Store them in airtight containers in a cool, dark place. Your pie crust from scratch dough can also be frozen ahead of time, making holiday baking much easier.
Common Mistakes to Avoid When Making Pumpkin Pie
Even experienced bakers can stumble when making fresh pumpkin pie. Here are the most common mistakes and how to avoid them:
Using the Wrong Type of Pumpkin
We have covered this, but it bears repeating. Carving pumpkins will give you a watery, flavorless puree. Always use sugar pie pumpkins for baking. The difference in taste and texture is dramatic.
Skipping the Draining Step
Too much water in your puree leads to a soggy crust and a runny filling. Take the time to drain your puree thoroughly. It is a small step that makes a huge difference.
Overmixing the Filling
Overmixing incorporates too much air into the eggs, which causes the pie to puff up in the oven and then collapse and crack as it cools. Mix gently and just until everything is combined.
Baking at the Wrong Temperature
Too high a temperature will scorch the crust before the filling sets. Too low a temperature will leave the center undercooked. Follow the recommended temperatures and use an oven thermometer if you are unsure about your oven’s accuracy.
Rushing the Cooling Process
Patience is key with fresh pumpkin pie. Let it cool completely at room temperature before slicing. Cutting into a warm pie will give you a messy, runny mess. Give it at least two hours, or even better, bake it the night before and let it rest overnight in the fridge.
Expert Insights on Perfecting Your Fresh Pumpkin Pie
Professional bakers and pastry chefs share a few secrets that take fresh pumpkin pie to the next level. These tips are simple but incredibly effective.
Add a pinch of salt. Salt enhances the sweetness and balances the spices. It is a trick that works wonders in any custard-based dessert. Just a quarter teaspoon can transform your filling from flat to fabulous.
Use brown butter in your crust. Melted butter that is cooked until it turns golden brown adds a nutty, toasty flavor to your pie crust. It pairs beautifully with the warm spices of pumpkin pie. This is a favorite trick among seasonal baking experts.
Let the puree rest. After draining, let your pumpkin puree sit in the refrigerator for a few hours before using it. This allows any remaining moisture to settle and makes the puree even thicker and more flavorful.
Experiment with additions. Try adding a tablespoon of maple syrup for a rustic twist. A splash of orange juice concentrate brightens the pumpkin flavor. A teaspoon of espresso powder deepens the chocolate-adjacent notes without making the pie taste like coffee.
These small tweaks show that baking is both a science and a creative art. Once you master the basics, you can make the recipe your own.
Key Takeaways
- Start with the right pumpkin: Sugar pie pumpkins give you the best flavor and texture for your fresh pumpkin pie.
- Roast and drain your puree: These steps remove excess moisture and concentrate the pumpkin flavor.
- Use fresh spices: Grind your own cinnamon and nutmeg for a brighter, more vibrant taste.
- Bake with patience: Pull the pie out when the center still jiggles. It will set as it cools.
- Cool completely before slicing: Rushing this step leads to cracks and a runny filling.
- Store properly: Refrigerate your pie and consume within four days for the best quality.
- Make it your own: Add personal touches like brown butter crust or a splash of maple syrup to make the recipe truly yours.
Fresh pumpkin pie is one of the most beloved fall desserts for good reason. It is warm, spiced, creamy, and comforting. When you make it from scratch using fresh pumpkin puree, the flavor is in a completely different league. Every bite tells the story of the care and love you put into it.
Whether you are a seasoned baker or just starting out, these tips will help you create a pie that impresses everyone at the table. The process is simple, the ingredients are accessible, and the results are unforgettable. So grab a sugar pie pumpkin, preheat your oven, and get ready to bake the best homemade pumpkin pie you have ever tasted.
This autumn treat is more than just a recipe. It is a tradition, a gathering point for family and friends, and a celebration of everything that makes fall so special. Your kitchen will smell incredible, and your loved ones will remember this pie for years to come.
Frequently Asked Questions
Can I use a carving pumpkin for pie?
You can, but the results will not be great. Carving pumpkins have more water and less sugar than sugar pie pumpkins. The filling will be watery and the flavor will be weak. Always choose a sugar pie pumpkin for the best fresh pumpkin pie experience.
How long does homemade pumpkin puree last?
Fresh pumpkin puree keeps in the refrigerator for up to three days. You can also freeze it in portions for up to six months. Label your containers with the date so you always know how long your pumpkin puree has been stored.
Why does my pumpkin pie crack on top?
Cracks usually happen because the pie is overbaked or cooled too quickly. Pull your pie out when the center still jiggles slightly. Let it cool gradually at room temperature rather than moving it from a hot oven to a cold surface.
Do I need to blind bake the pie crust?
It is not required, but it is highly recommended. Blind baking prevents a soggy bottom and gives your crust a crisp, golden texture. Line the crust with parchment paper and fill it with pie weights or dried beans for 15 minutes before adding the filling.
Can I make pumpkin pie ahead of time?
Absolutely. In fact, pumpkin pie tastes even better after resting overnight in the refrigerator. Bake it a day ahead, let it cool completely, and store it in the fridge. Bring it to room temperature before serving for the best flavor and texture.
What is the best way to serve fresh pumpkin pie?
Serve your fresh pumpkin pie at room temperature with a dollop of whipped cream and a sprinkle of cinnamon. Pair it with a warm cup of coffee or tea for the ultimate fall experience. A side of pumpkin spice creamer in your coffee takes the pairing to the next level.